About One Laptop per Child
 One Laptop per Child (OLPC) is a project started by Nicholas Negroponte at the Massachusetts Institute of Technology (MIT) with a core of MIT Media Lab personnel. The organization has grown to include passionate people creating software and hardware and sustainable community involvement to fulfill the educational mission of OLPC.
The mission for OLPC is simple yet compelling: To create educational opportunities for the world's poorest children by providing each child with a rugged, low-cost, energy efficient laptop with content and software designed for collaborative, joyful, and self-empowered learning.
You can learn more about OLPC at http://laptop.org and http://wiki.laptop.org -- everyone is welcome to participate.

About Computers

The XO from OLPC
What is a computer?
A computer contains information and responds to instructions. Computers are used as tools to access and exchange information. They can be like a classroom or like a toy, and they offer a way to communicate with others.
Because computers take instructions and may be programmed, a computer can be whatever you want it to be. Many people use computers to write, to perform mathematics, to create art, to play games, to record sound and images, to communicate with others, to read, and to learn. The uses of your XO are limited only by the Activities you use and your imagination.
What can your XO do?
Your XO can store an entire library of written stories, videos, and pictures. It can make and play music. It contains Activities that you can use to learn math, play games, create pictures, and communicate with others. You interact with your XO using the touchpad, keyboard, microphone, or camera.
How does it do it?
Computers are built of component parts that work together to carry out tasks that you give to the computer by interacting with it. See wiki.laptop.org/go/Disassembly for pictures of the parts of the XO.
You can use your XO to figure out how computers work by reading about computers and learning their basic functions, and then learning about hardware and software and how it all works.
Volunteering
Volunteer contribution is central to the educational spirit of OLPC, and there are many different ways to volunteer for the project. Consult the sections below to learn how to become a volunteer, based on your interests and background.
If learning matters to you, you will be welcome. To get involved directly, visit the web site http://wiki.laptop.org/go/Participate or email volunteer@laptop.org.
Kids, siblings, and parents
The XO is meant for the entire family to use, so one of the best ways to get involved is to learn as much as you can--that way you can help others to learn in turn.
You can contribute to the wiki, a web site that anyone can edit, at http://wiki.laptop.org. Wiki contributors can share their knowledge and experience with the XO. To learn how to get started editing the wiki, go to http://wiki.laptop.org/go/Wiki_getting_started.
You can tell others about your projects and recruit others to join your efforts, and you might want to get involved in a regional group with other XO owners in your area. You can find many such vibrant communities at http://wiki.laptop.org/go/Regional_community_groups.
Teachers, students, and educators
The OLPC project is an education project above all else, so the contributions of teachers, students, and educators are highly valued. You can contribute by testing, developing content, mentoring, or running group activities. You can start a University chapter of OLPC users--both formal informal clubs exist. Details may be found at wiki.laptop.org/go/University_program.
You can try to meet with other teachers and students within your region, or look up pre-existing groups within the list of regional groups here: wiki.laptop.org/go/Regional_community_groups.
Support Gang
If you enjoy personally helping others, and the challenge of solving problems with learners worldwide, you would be a perfect fit for the Support Gang. The Support Gang works together answering all kinds of questions about the XO, peripherals, software, volunteering, deployment, organizational development, and any other questions OLPC donors and XO users ask.
The Support Gang is an extremely friendly and supportive group, who come together from all around the world, and work together closely online. They also meet weekly with invited guest speakers by phone, and in person whenever possible.
You can join the Support Gang at http://wiki.laptop.org/go/Support_Gang. Fellow volunteers and OLPC will help you get started and assist you in finding answers to difficult or unusual questions. Bilingual volunteers are especially welcome.
Documentation
If you would like to help others learn about the XO then you can help with the documentation. We have a dedicated team and we eagerly welcome new contributors! You don't need to be a expert on the technology to participate - you may wish to just spell check or check images. You may also be inspired to write a chapter or improve existing chapters. You can learn more on how to contribute by joining the OLPC Library mailing list http://lists.laptop.org/listinfo/library and the FLOSS Manuals mailing list http://lists.flossmanuals.net/listinfo.cgi/discuss-flossmanuals.net.
You may also want to look at the documentation tools at FLOSS Manuals : http://www.flossmanuals.net.
Translators
OLPC is a world-wide program that tries to reach people in many countries, who speak many different languages. If you speak and write more than one language, you can help translate the wiki or the software. If you can help, please see http://wiki.laptop.org/go/Translation.
Content creators, writers, artists, photographers, videographers
Everyone is a creator: by creating and sharing something, you come to understand it better. Writing about the XO can also be one of the greatest contributions to helping others.
Please consider offering your communications or media talents on the OLPC Wiki--whether by writing, designing, editing, storytelling, or simply organizing--anywhere within http://wiki.laptop.org.
If you want to create art for the XO, you can join other artists at the Art Community page at http://wiki.laptop.org/go/Community:Art.
You can upload photos to a worldwide archive at http://www.flickr.com/groups/olpc. One group of photos even shows those specially taken by XO laptops themselves, using the Record Activity.
Hardware designers and testers
There are many ways to volunteer to assist with the hardware, from brainstorming about alternative power to developing peripherals to repairing XOs. You may want to develop peripherals for the XO that use its USB ports or other inputs, for health applications or beyond. One such way to get involved is found here: http://wiki.laptop.org/go/Health.
You can get involved with community repair centers or start your own, either as volunteers or as a business: http://wiki.laptop.org/go/Repair_center_locations.
You may want to work on power generation and firmware coding. To find out more about these types of hardware projects search for those keywords at http://wiki.laptop.org.
Software
The XO's software is designed to be malleable because we want the help of all the people in the world who are capable of writing free software to help other people learn. To get involved, you can:
In short: "patches are welcome".
Local opportunities
Help create changes in the community you live in - as well as ones you'd like to visit. Start or join a grassroots group: http://wiki.laptop.org/go/Regional_community_groups.
Getting Started
Welcome to XO-land! You are about to start on a wonderful adventure of exploration and learning. The cute little green and white machine in the box is the tool that will enable you to travel the world via the Internet, compose and play music, create works of art, do science experiments, take photos and videos, communicate with friends and family via e-mail, and even learn to do a little computer programming.
But the XO represents a lot more than that. It is a symbol of your commitment to the education of the children of the world. OLPC is not a computer project, it is an education project. We hope you will proudly enjoy using your XO as children around the world do.
Before you get started, please read through this guide so you will have an idea of what to expect.
The first thing you need to do is carefully unpack your XO. Save everything! If you don't, you may accidentally throw away something important. Be sure to save the box, packing materials, and any paperwork that is in the box.


Before you use your XO for the first time, you should fully charge the battery. The Battery section later in this chapter shows you how to install the battery and connect the charger.
While you wait for it to charge, read through the rest of this guide and see what you can do!
Opening the XO
You can open, flip, and close the XO to position it in different ways. Be careful, if you don't take a look into the manual, and just begin in excitement that how to open this laptop, you might break one or two parts of it. Be careful, and do everything with extreme care :)
To open the XO
- Position the laptop with the handle away from you, and then rotate both of the antennae towards you.

- Lift the front edge of the top of laptop, and then move the top upward away from you. You can hear and feel a slight click as you first lift the top.

To flip the XO
You can switch the XO so that the screen lies flat and covers the keyboard. This lets you handle the gamepad buttons more easily or read electronic books (ebooks), using the arrow buttons to page forward and backward.

- Bring the display up to a 90-degree angle and rotate the antennae down.
- Rotate the display 180 degrees until it is facing backwards.
- Fold the display down onto the keyboard.
- Press the rotate key to orient the display.
Just make sure that you aren't having any problem rotating the display, just because if you do it incorrectly(like any sound occurs), congratulations, you have broken your first XO!
Features and Ports
The XO laptop has many built-in features. These include a camera, microphone, speakers and wireless antennae. In addition, the laptop allows for the attachment of other external devices. This is often done by plugging the devices into connectors (some are more commonly referred to as ports, jacks or slots).
Physical Features
Backlit screen
The display functions in a full-color mode similar to other laptop displays and in an ultra-low-power, ultra-high-resolution, black-and-white mode that is readable in direct sunlight.
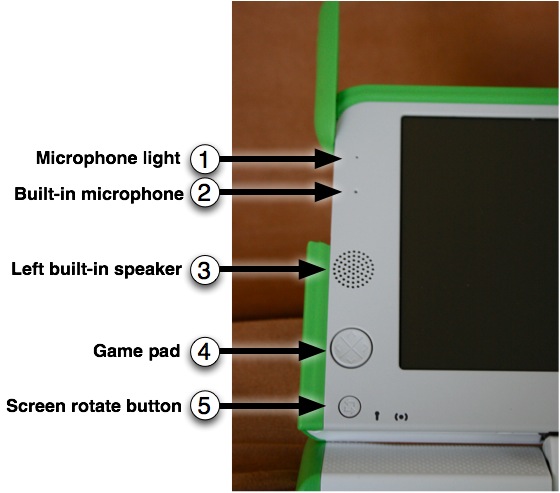
1, 2 - Built-in microphone
There is both a built-in microphone (and an external microphone jack, which supports both AC and DC sources.) As a privacy measure, an LED above the microphone (1) lights up whenever the microphone is in use.
3, 8 - Built-in speakers
Internal stereo speakers and an amplifier provide a way to play music, videos, and anything you have recorded yourself. There’s also a jack for external headphones or speakers.
4 - Game pad
Two sets of four-direction cursor-control keys can be game controllers. Since they still function when the screen is folded down into e-book mode, the XO creates a self-contained game playing pad including a controller.
5 - Screen rotate button
A button on the XO laptop’s display frame changes the orientation of the screen, so it can be viewed right-side-up from any direction.
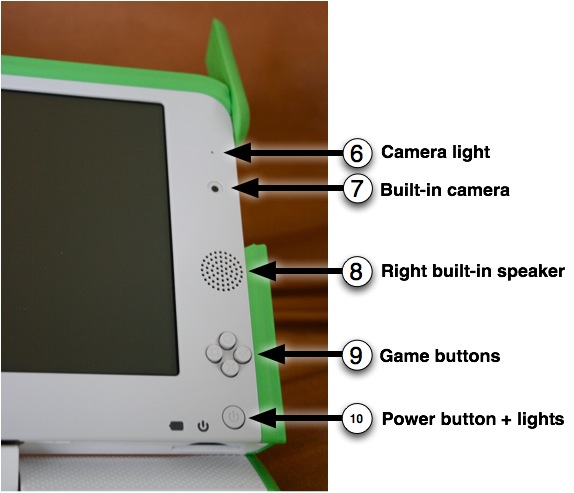
6, 7 - Built-in camera
The XO laptop has a built-in color camera, enabling still photography and video recording. As a privacy measure, an LED above the camera (6) lights up whenever the camera is on.
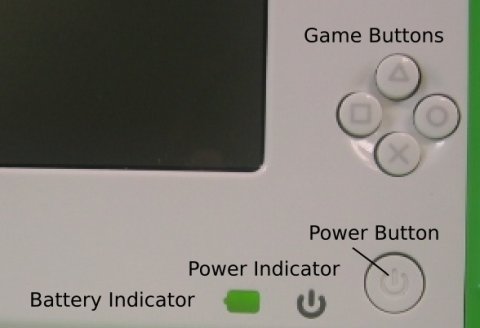
9 - Game buttons
The game buttons can be used when the screen is folded down into e-book mode, creating a self-contained game player. The buttons are labeled with a circle, a square, a check, and an ×. These buttons are often used by Activities. For example, the circle button can be used as the shutter for the camera in the Record Activity.
10 - Power button, indicators
From left to right: the battery-level indicator; the power indicator; and the power button.
Ports
Along with offering unique connectivity options, the XO laptop can work with a wide range of external devices.
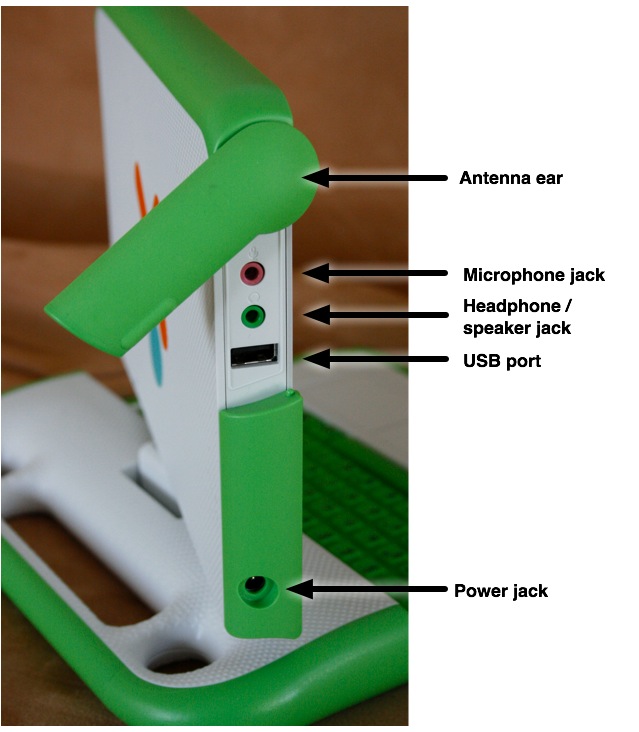
Antennae ears
When the wireless antennae "ears" are rotated up, they provide the XO with a connection range vastly superior to those of conventional laptops. When down, they keep dirt out of the connectors and act as a latch.
External headphones and microphone jacks
Along with built-in speakers and microphone, the XO laptop features jacks for external headphones and an external microphone.
USB/memory ports
The XO laptop features three external USB ports to support a variety of plug-in peripherals (one seen in the photo above, and two others under the other "ear"). 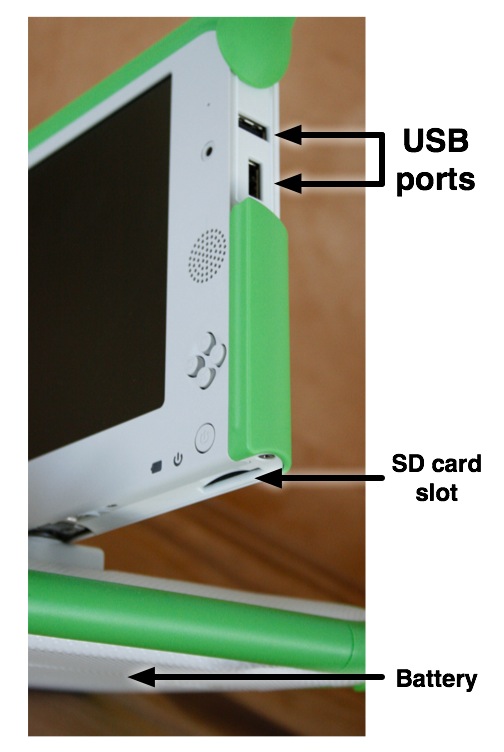
Power jack
The XO comes with a power cord that can be plugged into any 110-to-240-volt AC outlet for charging. The power jack also accepts DC power from a solar panel for charging the XO laptop’s battery.
SD memory card slot
There is a slot underneath the display that accepts SD memory cards for photos, video, and other content. Rotate the display so that the left-hand edge is over the keyboard—the slot is then accessible from below.
Rechargeable battery
Since many children in the developing world live "off the grid" (in places with poor or non-existent power infrastructure), the XO laptop is designed to be extremely power efficient.
Charging the Battery
Using battery power
The XO needs its battery attached, or the laptop needs to be plugged into a wall directly. It will run from either source of power. When you get your battery it should come with some amount of charge. Use the following instructions to install your battery and charge your laptop.

This is the XO battery. The battery attaches to the back of your XO.
Installing the battery
- Line up the four tabs on the new battery with the long edge furthest from the catches.
- Slide the battery into place.

- Slide the left-hand side catch to the left, and press the battery gently into place.
- Slide the right-hand side catch to the left, to lock the battery in place.

Charging the battery
- Be sure that the battery is attached to the XO.
- Plug the power cord into your XO.
- Plug the other end of the power cord into the nearest power source.
When to charge the battery
The battery icon in the Frame fills with color, showing you how much power (or charge) is left in the battery. Move the pointer over the battery icon to see how full the battery is. While the battery charges, the battery light near the power button (shaped like a battery) should display yellow, turning to green when the battery is fully charged. A red light tells you that the battery is running very low, and you should charge it soon.
Troubleshooting
If your battery charge gets extremely low during shipping, your XO may not start up. Plugging in external power may not charge the battery. If this happens, remove the battery and power up the laptop on external power. Once the laptop is powered on, insert the battery. It will now charge, and the charging light should be on.
If you're the tinkering type, more advanced battery troubleshooting tips can be found at: http://wiki.laptop.org/go/XO_Troubleshooting_Battery.
Starting the XO

To start the XO, press the Power button, near the lower right corner of the screen. The XO takes about two minutes to start up.
If the battery needs charging, the light next to the power button glows red. Plug the AC adaptor into the left side of the XO and plug the power cord into an outlet if you see a red light or if the XO does not start up.
If you have difficulty starting your XO, refer to the Repairing chapter for ideas.
Starting for the first time
After you press the power button and the XO initially starts up, the XO screen asks for your first name. The next time you start it, it remembers your name and goes directly to the Home View. Later on you can learn how to change to a nickname of your choosing.
- Type your name.

- After you enter your name, click Next.
(Use a finger on the touchpad below the keyboard to move the arrow over the word "Next". Press the key below the touchpad on the left with an "X" on it to "click".)

- Next, you will a small O on top of an X. This symbol represents you when you use your XO. Use your finger on the touchpad to move the arrow over the person symbol. "Click" this symbol by pressing the key with an "X" on the left below the touchpad to choose colors that you like.

- After you choose your colors, click "Done."

Shutting down the XO
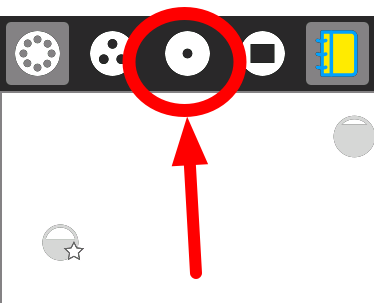
- When you have finished using the computer, go to the Home View by pressing the key with a single dot in a black circle, in the top row on the left.
- Click the middle XO icon to view a menu.
- On the menu, click Shutdown to ensure that your laptop stops properly.

You should always follow this Shutdown procedure, because it allows your XO to tidy up its internal files before it turns itself off. This helps the XO know where to find things when you start up again. However, if something bad happens and you can't move the pointer or you can't click, you can make an emergency shutdown by pressing and holding the power button for a few seconds. Be careful that your power button does not get stuck in the down position. If it does get stuck, the XO does not detect the depression of the power button, and does not turn on. If this happens, refer to the Repairing chapter for information on how to repair it.
The Keyboard and Touchpad

The dust- and water-resistant keyboard and touchpad have special keys for more functionality. For each deployment, keyboards are localized to the primary language of that country, so your keyboard may not match the one in this figure exactly. Keys outlined in yellow are reserved for future features.
- Escape key
The escape key is labeled with an × symbol on a black circle. The escape key is most commonly used in combination with the control key to quit activities (ctrl + esc).
- Tab key
The tab key is labeled with arrows pointing right and left and creates an indentation in a paragraph. Also, use it in combination with the control, shift and alt keys to display open Activities. For example, alt + tab displays running Activities one after the other.
- Control key
The control key is used in combination with other keys to issue commands. For example, ctrl + c copies to the clipboard; ctrl + v pastes from the clipboard.
- Shift key
The shift key is used in combination with other keys as a modifier, most commonly to shift between lowercase and uppercase in Latin-based alphabets.
- Fn key
The function key is used in combination with other keys as a modifier. For example, fn + erase is delete; fn + up arrow is page up.
- Alt key
The alt key is used in combination with other keys to issue commands. For example, alt + enter toggles full-screen mode; alt + spacebar toggles the tray visibility. This example works in the Browse Activity but not in the Record Activity.
- Spacebar
The spacebar key types a space. In the future, when used in conjunction with the function key (fn), it will display the source code for the currently running Activity.
- Alt Gr key
The alt graphics key is used in combination with other keys as a modifier, most commonly to select an alternative letter or generate an accented character. For example, on the US keyboard, alt gr + j creates a euro sign €; a + alt gr + 4 creates á.
- Arrow keys
The arrow keys are used for navigation; combined with the function key (fn), they are used for page up, page down, home, and end.
- Language key
The language key is found on keyboard layouts that combine Latin and non-Latin scripts, going between scripts so that you can switch between typing in English and Hindi by pressing it. On Latin-only keyboards, the language key has been replaced by a × and ÷ key.
- Enter key
The enter key—in addition to its standard use—is used in combination with modifier keys. For example, alt + enter toggles full-screen mode.
- Erase key
The erase key deletes the character behind the cursor (backspace). fn + erase deletes the key in front of (or on) the cursor.
- Frame key
The Frame key toggles the presence of the Frame on the screen. The Frame is the black border around the screen that holds the Activity taskbar, clipboard, wireless connections, battery level, and so on.
- Volume controls
The volume keys lower and raise the audio level.
- Brightness controls
The brightness keys lower and raise the brightness of the screen backlight. To turn the backlight off completely may take 7 to 8 button presses.
- View keys
The four view keys, from left to right, take you to the Neighborhood view, the Group view, the Home view, and the Activity view.
- Search key
The search key takes you directly to the Journal and places the text cursor in the search box.
Screen and Speakers
The top row of the XO keyboard has three long buttons.
The long button on the far right controls the lighting on the screen and the volume of the speakers.

The left two keys control the lighting.
- Press the key with the small sun to dim the light on the screen. Press this key repeatedly to put the screen into a greyscale mode, which saves power.
- Press the key with the large sun to increase the brightness of the light. Press this key repeatedly to go to a color mode.
The two keys on the right of this long button control the sound.
- Press the key with the small audio icon to decrease the speaker volume, which also saves power.
- Press the key with the large audio icon to increase the speaker volume.
- While starting the XO, press the small audio icon to decrease the volume startup sound. The next time you start the XO, it remembers that you silenced the startup sound previously, so it will not make the sound again until you press the large audio icon while starting up.
Rotating the screen's display
You can press the small rotate button with two arrows on the bottom left of the XO screen to rotate the display by 90 degrees with each button press. Use this button when you flip the XO into a flat book reader configuration.
Storage
The Journal Activity offers file storage and retrieval through the Sugar user interface. To view the Journal, click the Journal icon in the Frame, shown next to the View icons below.

Internal Storage
Your XO can store a limited number of files on its 1 GB flash disk drive. You should maintain your XO so that it does not run out of storage space for new files. You can delete some items by using the Journal Activity.

To clear out space for more files:
- 1. On the Frame, click the Journal icon.
- 2. Hover the pointer over the Journal icon to see the amount of free space.

- 3. Look for files that you can delete, such as old files or large files that you have copied to another location.
-
- In general, video and audio media files and some PDF files or e-books are larger than individual Write Activity files or still photographs. The upper limit for a PDF file that the XO can read is about 36 MB.
- The Browse Activity may download more than one copy of a PDF or media file if you do not realize you have already downloaded it. Delete duplicates to save space.
- 4. Select a file to delete by right-clicking its icon and clicking Erase.
- Or, click the small arrow button to go to a preview of the Activity or file. Once you are previewing the item, click the Erase icon (minus sign at the top of the screen).

If you want to resume using the file, click the icon for the file to launch the Activity.
External Storage
You can use either an SD card or a USB storage device or drive to save and retrieve files externally.
An SD card (Secure Digital card) is a flat, rectangular plastic device about 3.2 cm by 2.4 cm (1 1/4" by 5/8"). They are also used in many digital cameras for photo storage. The XO has one SD card slot.
The easiest to use are USB storage Flash Drives (memory sticks). These are about the size of a pack of chewing gum. Certain brands have an onboard indicator light, showing when data is moving to or from the computer.
There are 3 ports on the XO that you can use with a USB flash drive. One is on the left of the screen, two are on the right. All are protected by the antennae when the XO is closed.
To start access to a storage device
- Insert the USB drive or SD card.
- Go to the Journal view to see the USB or SD icon in the lower left of the Frame.
To save a file from the journal to the USB drive or SD card
- Click the Journal item's icon and drag it to the USB/SD icon.
To retrieve a file from the USB drive or SD card
- Click the USB/SD icon first.
- Drag the item from the USB drive or SD card to the journal icon.
To remove the USB drive
Move the pointer over the USB icon at the bottom of the Journal and click Unmount.

When the USB icon disappears, it is safe to remove the USB drive.
To insert an SD card
The SD card slot is underneath the screen, below the power button. You will need to rotate the screen counterclockwise to access this slot.

To remove an SD card
Move the pointer over the SD icon at the bottom of the Journal and click Unmount.

When the SD icon disappears, it is safe to remove the SD card. Push upwards on the card with your thumb and release to spring it from the slot.
Replacing the Battery
You do not need to remove the battery unless it is faulty. For example, a faulty battery might not charge, or might lose its power very quickly. Here are instructions for removing a faulty battery.
Removing the battery
- Shut down the XO by going to the Home View, clicking the XO icon, and then clicking Shutdown.
- Close the lid, and turn the XO over, so that the XO logo is on the underside.
- Slide the right-hand side catch further to the right. It does not come off.

- Slide the left-hand side catch further to the left. Note that this catch is spring loaded so you must hold it in the desired position.

- Lift the battery out from the central indentation between the two catches.
To re-insert the battery, refer to the Charging chapter.
Locating a battery for replacement
Refer to wiki.laptop.org/go/Directory_of_repair_centers to get to the most recent directory of repair centers, and ask for a replacement battery for your XO.
Power for your XO
While your XO typically runs on battery power with charging required for a certain number of hours of use, you can look for sources of power beyond the AC adapter included with your laptop. Or look for ways to modify the AC adapter to accept different ways of charging the battery. This chapter discusses some of those advanced power modification ideas.
Note: Early prototypes of an OLPC laptop shown with hand cranks on the side were not developed fully due to concerns about mechanical stress on the case and the lack of an efficient ratio for the amount of time spent generating electricity physically compared to using the laptop. Read more discussion about kinetic energy converting to electric power at
http://wiki.laptop.org/go/Battery_and_power.
Replacement Chargers
If you misplace or damage your power adapter, you can replace it, by ordering from one of several vendors and community groups here at http://wiki.laptop.org/go/Spare_parts.
Any charger whose jack fits into the XO's power port and outputs the right polarity between 11 and 18 volts will work.
DC jack measurements:
- 1.67mm center pin diameter
- 5.5mm outer barrel diameter
- 11mm contact length
For a thorough discussion of electrical specifications and evolving battery updates, read http://wiki.laptop.org/go/Battery_and_power.
Charging using a solar panel or car battery adapter
With the right connector that fits your XO's DC input on the left side of the XO, you can connect to alternative power peripherals such as a solar panel, foot pedal, or car adapter to charge your XO battery. The specifications above for the DC jack size and voltage output requirements should drive your decision.
Several specific options for solar panels and car battery adapters are available at http://wiki.laptop.org/go/Product_News.
About Networks and the Internet
What is a network?
A computer network is a grouping of connected computers.
Types of networks
Networks are typically described by their scale: local-area network (LAN) covering a small geographic area, like a home, office, or building; wide-area network (WAN), covering a relatively broad geographic area (such as one city to another and one country to another country), Metropolitan-Area network (MAN) connecting multiple local-area networks together but not extending beyond the boundaries of the immediate village, town, city or area.
Sometimes networks are described by the hardware that connects the computers: satellite, optical fiber, Ethernet, wireless, and so on. Some networks use physical connections—wired—while others use radio waves—wireless.
You can name a network based on its functional relationship: client-server and peer-to-peer are good examples.
Finally, you can talk about networks by topology. Topology means the logical relations between devices. Examples include: bus, star, mesh, and tree.
OLPC XO networks
A typical OLPC XO network would be local-area, wireless, peer-to-peer, mesh. However, the XO supports (directly or indirectly) a variety of networks.
The most common scenarios all utilize the built-in wireless radios:
- Simple mesh: XOs talking to each other without Internet access.
- Infrastructure: XOs connecting to the Internet through a preexisting access point (AP).
- School server: XOs talking to each other and the Internet through a school server.

Simple mesh network

Infrastructure network

School server network
The school server
Part of the OLPC deployment model is to utilize school servers. These servers are designed to provide a gateway to the Internet, a local content repository, back-up, school management, and other local functions. As important as all of these services, their most critical role is to scale the local-area network. Without a school server, the largest network that can be maintained is approximately 20 laptops. Each school server can maintain a network of approximately 120 laptops.
The reasons for this difference include:
- By maintaining state information, the school server eliminates the need for much of the multicast traffic, which puts a heavy load in the network.
- The school server can unify up to three separate mesh channels.
What is the Internet?
The Internet consists of a worldwide interconnection of governmental, academic, public, and private networks. The Internet carries various information resources and services, such as electronic mail, chat, documents, online gaming, and the the World Wide Web (WWW).
Get me the Internet!
Although the OLPC ecosystem provides a self-configuring local-area wireless network, connectivity to the Internet is something that needs to be worked out on an individual basis.
Glossary of Network-related terms
- mesh network
- a wireless mesh network is a communications network made up of radio nodes in which nodes can forward information on behalf of each other so that even nodes that are not in direct radio contact can communicate via nodes that are between them. The collective coverage area of the radio nodes working as a single network becomes a mesh cloud.
- infrastructure mode
- network connectivity through a WiFi access point, e.g., 802.11b/g
- mesh mode
- network connectivity through a mesh network (The Mesh Routing Protocol used in the OLPC laptop (OLPC-Mesh) is based on the 802.11s standard being developed by the 802.11 Task Group S [http://www.ieee802.org/11/Reports/tgs_update.htm].)
- simple mesh mode
- a mesh network that is running between laptops without a School Server
- school server mesh mode
- a mesh network that is mediated by a School Server
- mesh channel
- the laptops use three channels for communication: 1, 6, and 11; in simple mesh mode, the laptops can only see other laptops on the same channel; in a School Server mesh, laptops on all channels are visible
- access point (AP)
- an AP is a device that connects wireless communication devices together to form a wireless network. The AP usually connects to a wired network and can relay data between wireless devices and wired devices. Several APs can link together to form a larger network.
- mesh portal point
- a mesh node that serves as a gateway (portal) to a network external to the mesh
Give Me the Internet, Please
The designers of the XO laptop designed it for primarily wireless access, so it can work well in developing nations, where it is faster and less expensive to introduce wireless connections than wired ones.
XOs are designed to connect to other XOs using a mesh network. A mesh network allows nearby XO laptops to talk to one another directly (wirelessly) without the need for a traditional Internet Service Provider (ISP).
The XO also supports wireless connections for direct Internet connection. Collaboration with others on Activities does not require an Internet connection.
There are different ways to connect to the Internet:
- using a wireless access point such as a WiFi hotspot at a library or coffee shop, or a location that has a wireless router such as your house
- using a "School Server" provided by your school system
- using a USB-to-Ethernet cable that plugs into a cable modem, DSL modem, or local network such as those offered at a home or workplace
Before you connect
If you are going to connect at home, check with your ISP to find out if your network is protected with a password. Your router also has a password which can be found in its documentation. Become familiar with your wireless router settings so that you can troubleshoot the connection if needed. The Troubleshooting chapter offers some assistance.
Check your current connection status as shown in the lower area on the Frame. If you have connected successfully in the past, the XO "remembers" the connection and will connect again in the future.

Go to a location with your XO where you know there is a Wireless Access Point (WAP) nearby.
Find out the network name (or SSID) and its password, if it is secured with a password. The XO refers to this as the Wireless Key.
Connecting to the network
- 1. Go to the Neighborhood View.

- 2. In the Search field, enter the name of the network to which you want to connect.
-
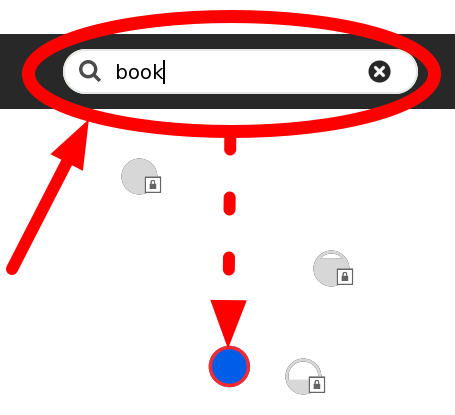
Or roll the pointer over one of the network access circles until you recognize the name of the wireless network.
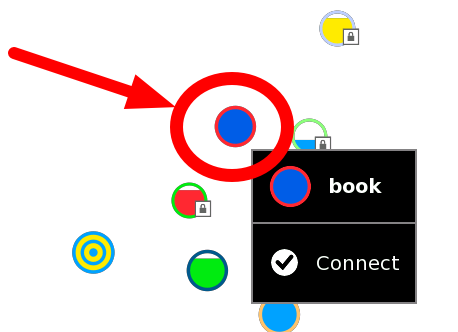
- 3. Connect by clicking the center of the circle.

Wireless access points are represented by circles. The fill level indicates signal strength.
- Access points that require keys have a "locked" icon.

- Access points that you have successfully connected to become "Favorites" as indicated by a star icon.

- The center of the circle blinks while the laptop is trying to connect and two curves surround the circle.

- Access points that represent the Mesh network are indicated with a target icon, with one for channel 1, one for channel 6, and one for channel 11.
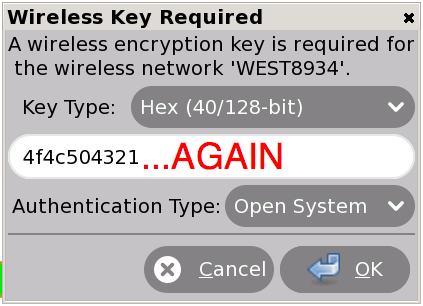
- 4. Enter the wireless key if prompted.
- You might need to ask your teacher or parent for the wireless key.

- While the XO is connecting to the network, the Access Point blinks.
- Once you are connected, the menu on the circle in the Neighborhood View changes, and you can see a circle with two curves around it in the lower right area of the Frame.
Retrying if needed
If the attempt to connect fails, the circle stops blinking, but the access point icon does not appear in the Frame. Click the circle in the Neighborhood View to try again—it sometimes takes 2–3 tries to connect.
If you cannot see an Access Point with a name that you recognize, the wireless antenna might be too far away, or the Access Point might not be working properly. For more information, or if you have difficulties getting a network connection, refer to the Troubleshooting chapter.
Disconnecting
To disconnect from the network, hover the pointer over the access point and click Disconnect on the menu.

Launching the Browse Activity
Once your XO is connected, you can return back to the Home View and launch the Browse Activity.

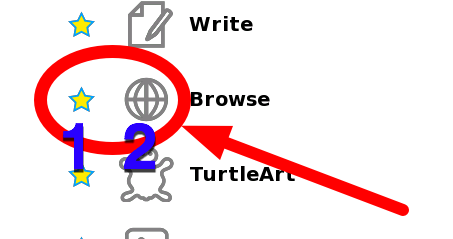
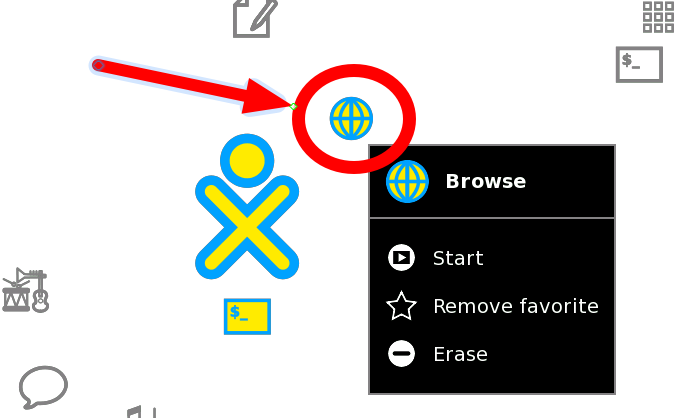
- If you have not yet added the Browse Activity to your favorites, click the List View (left) and scroll to Browse. Add the Activity to your favorites list by clicking the star next to it (1). Launch Browse for the first time by clicking the globe icon (2). Next time, you can use the freeform view to launch it (as is shown in the next paragraph).
- If you have added the Browse Activity to your favorites list, you can click the globe icon to open the Browse Activity and test your access to the Internet.
- Click the globe icon to launch the Browse Activity.
-
More information about your XO's connection:
- Your Wireless Access Point has a network name, also called an SSID, that displays in the Neighborhood View. The XO cannot recognize SSIDs that are hidden, which is configured on the access point. Refer to the Troubleshooting chapter for more information about hidden SSIDs.
- If you are connected to the Internet, your XO laptop cannot be on the mesh network, and if your XO is on a mesh network, it cannot simultaneously connect wirelessly to the Internet.

- If the XO cannot find an available Internet network point after five minutes of searching, it defaults to Mesh Network 1, which enables your XO laptop to connect to other nearby XO laptops.
- Please be patient; it can take your XO up to a minute to find newly visible networks.
- Sometimes you'll be asked to enter the "Wireless Key" again. Enter it again and repeat until your connection is complete.
- For more information about connecting, please see the Support FAQ online.
Troubleshooting Connectivity
You can look at http://wiki.laptop.org/go/Support_FAQ for many technical troubleshooting tips, but you should read through all the information on this page to troubleshoot the wireless connectivity yourself.
Understanding wireless router configuration
Connect your router to any computer, and then use a web browser to view the router's configuration page and change the router's settings.
Here are some common router manufacturer's administrative addresses, usernames, and passwords used for configuring router information. To find a more complete list, you may try visiting another computer that has an internet connection (for example, the local library) and searching the Internet for router default logins.
| Router |
|
|
|
|
Address |
|
|
|
|
Username |
|
|
|
|
Password |
|
3Com
|
|
|
|
|
http://192.168.1.1
|
|
|
|
|
admin
|
|
|
|
|
admin
|
|
D-Link
|
|
|
|
|
http://192.168.0.1
|
|
|
|
|
admin
|
|
|
|
|
|
|
Linksys
|
|
|
|
|
http://192.168.1.1
|
|
|
|
|
admin
|
|
|
|
|
admin
|
|
Broadband
|
|
|
|
|
http://192.168.2.1
|
|
|
|
|
admin
|
|
|
|
|
admin
|
|
Netgear
|
|
|
|
|
http://192.168.0.1
|
|
|
|
|
admin
|
|
|
|
|
password
|
|
Gateway 2Wire
|
|
|
|
|
http://192.168.1.254⁞
|
|
|
|
|
|
|
|
|
|
|
If you are unable to connect a computer to your router to do this, call your Internet Service Provider and ask them for assistance. They should be able to access your router remotely, get the needed information for you, and even make any needed changes.
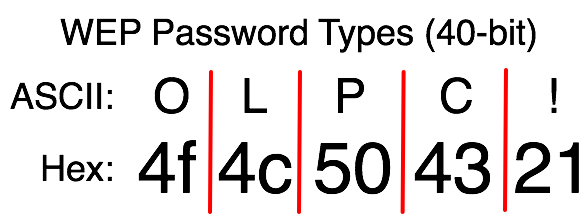
Your wireless router settings may contain Wired Equivalent Privacy (WEP) or Wi-Fi Protected Access (WPA) for security protection. Find out which type of security it uses and the passphrase either by asking your ISP or by using the router's configuration pages.
Based on the type of security system being used (WPA or WEP), the Wireless Key type varies. For WPA, you use a Passphrase key (for example, "password", "tHisisAp4ssword"). For WEP, use either a Hex key (for example, "4f4c504321", usually all keys that consist of only of 0-9 and a-f) or its corresponding ASCII key ("OLPC!"). 40-bit Hex keys are 10 letters/numbers long, corresponding to 5 letter/number ASCII keys.
Common connectivity problems and solutions
Inability to connect with an Access Point from the Neighborhood View is the most commonly reported symptom. The symptom is usually a flashing circle icon where the access point circle icon never appears in the Frame or the circle's menu never contains "Connected." This flashing animation indicates the XO is trying to connect, but the lack of connection indicators tells you that it fails to connect. If this happens, try the troubleshooting suggestions just below.
Is the wifi hotspot dot visible in the Neighborhood View?
Go to the Neighborhood View and type the name of your SSID in the Seach box to highlight your access point. Each circle network icon represents a Service Set Identifier (SSID). On one of the icons in the Neighborhood View, you should see your Wi-Fi hotspot's network name.


If you cannot see the network name there may be a few reasons for this, so continue troubleshooting.
Is the name of the network a hidden SSID?
If your SSID/Network Name is set to be Hidden in the router configuration, it is not possible for the XO to connect to your wireless network through the Sugar User Interface.
You may connect manually by typing commands in the Terminal Activity. To do so, launch the Terminal Activity and type these commands:
su -l
/sbin/iwconfig eth0 mode managed essid myhiddennetwork
/sbin/dhclient eth0
As an explanation, the su command creates a root process. The iwconfig command connects to your hidden network (of course, substitute the name of your access point for the string myhiddennetwork in the above example). Finally, dhclient asks for an IP address from the access point.
Is your Wi-Fi router filtering connections based on a MAC Address?
You can prevent other computers from using your wireless router by configuring it to filter by MAC Address. A MAC Address is a unique address embedded in your computer's network adapter. While MAC address filtering is not a secure method of protecting a network, some routers use it, and it could prevent your XO from using that access point.
To fix a filtering problem, you can find the MAC Address and add it to the list of allowed computers that can connect with the wireless router.
To do so, launch the Terminal Activity and type these commands:
/sbin/ifconfig -a eth0
The MAC address is in the first line next to the HWAddr tag: and is in the form of "00:17:C4:XX:XX:XX"
In the WiFi router configuration for filtering, add the MAC Address you found with the ifconfig command.
Is your WiFi router configured to support 802.11b or 802.11g or both?
Read the documentation for your wireless router to determine how to configure it for 802.11g support, or to determine if it is using the 802.11g protocol. In this example, the Mode drop-down list is where you would look for protocol settings. It may not work to have both g and b modes as shown, so try different configurations to see if another configuration works.

Are the access point settings not in channels 1, 6, or 11?
Is your access point working on another channel that is not in 1, 6, or 11? For some older builds, the XO expects to find access points in one of these three channels, the three non-interfering channels available to 802.11g wireless protocol.
Try changing your access point to one of the three channels and check if you can associate your XO to it. Refer to your access point's documentation for information on changing the frequency channel that your access point broadcasts on. This image shows an example of the settings for a wireless router. The Channel field is where you change the frequency setting.

Why can't the XO Browse when connected?
Symptom: Your XO shows that your Internet connection is working, but you cannot browse or search any pages.
Most likely, the XO has failed to receive DNS information from your internet access point. If this is the case, you would be able to access the Internet for sites named directly with IP addresses but not their common names. In other words, http://209.85.133.18 would work but http://www.google.com would not.
Verify what the XO has received (from the Internet access point) for DNS information by using the Browse Activity and looking at this URL:
file://localhost/etc/resolv.conf
This page should show the IP address of the DNS server assigned by the Internet access point. If there isn't an IP address on this page, or if the IP address assigned is wrong, this would account for the behavior you're seeing.
If there is no IP address, or the address is wrong, you'll need to determine why the Internet access point is failing to supply one, but this is likely to be misconfiguration of the access point.
Connecting to the Internet without wireless access
If you cannot successfully or consistently connect to the Internet using Wi-Fi, you can use a USB-to-Ethernet connector to hook up to a wired connection rather than wireless. Examples of products that have worked for other users include the Linksys USB100M and the Zoltan Tech USB2.0 Fast Ethernet adapter, which cost about USD $10-$25.
If you want to connect to your XO wirelessly with a dial-up connection, you can do it with an older version of Apple's Airport Extreme (A1034). Apple no longer sells them, but they are available on the Internet for between $18 and $36. Be sure the one you get has a port for the phone line, and preferably, with a phone cord included. Directions for connecting with it are on the Wiki at http://wiki.laptop.org/go/Wifi_Connectivity#Apple_Airport.
Connecting while traveling
Your XO makes a wonderful traveling companion. You can connect to a wide variety of public WiFi sites often found in community centers and libraries, even in restaurants and hotels. All you will need to do is to obtain a correct password and log on according to the instructions above. Many places will not require a password to connect and the process will be even easier. Remember, however, that passwords provide an extra layer of internet security. Without them, you run a slightly higher risk of experiencing some type of Internet fraud.
External Hardware
Your XO has three USB ports that can be used to connect an external mouse, keyboard, storage devices, and possibly other hardware additions with appropriate support.
Connecting to the Internet without wireless access
You can use a USB to Ethernet connector for a wired connection to the Internet. Examples of products that work include the Linksys USB100M and the Zoltan Tech USB2.0 Fast Ethernet adapter, which cost about USD $10-$25. For a current list of USB Ethernet devices go to http://wiki.laptop.org/go/USB_ethernet_adaptors.
Which wireless devices may work well with my XO?
The hardware that provides the wireless connection can affect whether the XO laptop can connect either to the Mesh network or to the Internet.
A Wireless Access Point Compatibility table at wiki.laptop.org/go/Wireless_Access_Point_Compatibility gives some information about manufacturers of wireless hardware, the model number, and some notes about its compatibility.
Safety
Your XO laptop is checked for safety against the European Union's RoHS Directive, which ensures that it contains no hazardous or unsafe materials. Its NiMH batteries contain no toxic heavy metals.
Virus protection
As you may know, it is possible for some computers to be "infected" with a "virus" when connected to other computers. Viruses are programs that can copy themselves and often cause problems for the computer that runs them. The XO laptop cannot be easily infected by viruses, because of its unique security system that isolates each Activity. Currently you do not need to install separate anti-virus software or firewall software.
Internet safety
Please realize that the XO laptop is designed for easy-to-use wireless connection to the Internet and other networks. While the Internet lets you access lots of useful information and talk to lots of people, not all of the information or people are good and safe. You should be careful and ask your teacher or parent for help and protection while browsing on the Internet.
Parents and teachers, we recommend that you filter Internet content as appropriate for your school district or home, stay in touch with what your children and students are reading and finding on the Internet, and ask your Internet Service Provider for assistance with filtering what parts of the Internet your XO can access.
Caring for your XO
Although your XO is tough, try to keep it dry and clean. Here are some tips for taking care of it:
- Carry it carefully to avoid dropping it.
- Don't step on it or sit on it.
- If it gets dirty, wipe it with a damp cloth and dry it.
- Do not dip it into water. If it gets wet, such as from rain, let it dry completely before using it.
The XO laptop has no hard drive and only two internal cables. With care it can be dissassembled for repair. For added robustness, the XO's plastic walls are thicker than other laptops. Its green mesh network antennae give a better wireless connection than typical laptops. Plus, they double as external covers for the USB ports, which are protected internally as well. Internal bumpers protect the screen display by cushioning it.
Sometimes, It happens that the keys you are pressing appear somewhat dark shade of green or somewhat blackish. Remember, don't keep your hand on a single key for long. And wipe it with clean cloth to clean it.
Resetting to Factory Defaults
Warning: EVERYTHING on your XO will be deleted if you use a USB storage device and the following method to reflash your XO's flash memory.
With Internet connectivity, you can prepare yourself to reflash (restore) an XO to its factory-default settings. This procedure is called a "clean-install" and is described in more detail at http://wiki.laptop.org/go/Clean-install_procedure. (Software updates can be delivered by clean-installing or by other means.)
Clean-installing works by completely reformatting your XO with a software image stored on a USB storage device.
Before you begin
You will need:
- A USB storage device that has at least 1 GB of space free
- A computer with fast Internet access (this should allow you to download the required 300-400MB within about an hour)
You will then load two special downloaded files onto your USB storage device. After that, the reflashing process takes about ten minutes.
Preparing your USB Storage Device
- Download the OS image and its "fs.zip" file to your local computer. These are compressed files, so DO NOT open them — instead, in your browser, visit the following two pages and follow their instructions:
- Copy the resulting files onto your clean (FAT or FAT32-formatted, not quick-formatted) USB storage device.
- Your USB storage device should now contain exactly two files named something like: enxxx-n.img and fs.zip. (On some operating systems, the ".img" and ".zip" extensions may be hidden.)
- These files should occupy a total of at least 300 MB of space.
- Unmount the USB storage device and disconnect it from your computer when it is safe to do so.
You have now prepared yourself to restore the factory-default settings which are current at this time.
Reinstalling your XO's Operating System
- Turn off your XO.
- Connect your prepared USB storage device to your XO.
 Next, hold down all four gamepad keys above the power button, and then push the power button to turn the XO on. You will see a message that tells you to "Release the game key to continue". Do not continue until you see this message.
- Release the gamepad keys. The reflash process runs automatically; first you will see the XO arrange and color in a grid of boxes, then the XO will display "Rebooting in 10 seconds..." The XO will then restart with a clean image.
- Enter your name for your XO and then click Next.
- Click the XO icon to change the colors and then click Done.
- Optionally, connect your XO to the Internet, then use the Control Panel to download the latest Activities.
If something goes wrong
If you see a "Bad hash at eblock #0" message while reflashing your XO, then it means the image you copied to the USB storage device is corrupt. You should repeat the preparation steps, perhaps with a different USB storage device, and then retry the reinstallation step.
Advanced: Changing the XO's Operating System
After you become comfortable with the procedure for restoring your XO to its factory-default settings, you might decide to change, upgrade, downgrade, or altogether replace your XO's operating system. There are several ways to accomplish this goal, all of which are discussed at http://wiki.laptop.org/go/Change_your_OS. Some of these mechanisms (such as olpc-update and others) may be more bandwidth-efficient and easily undoable.
Maintaining your XO
Maintenance of the XO hardware involves updating the software and firmware and keeping the case in working order.
To update the Sugar software or Activities that run on the XO laptop, refer to the update information for software update at http://wiki.laptop.org/go/Olpc-update. You might want to update all the software on your XO laptop when a new version of the software is released. It takes about 30 minutes, and you can use the instructions there to install all new updates without losing any data. Refer to the "Latest Releases" section of http://wiki.laptop.org for the most recent version number and information about updates and reasons for updating.
Updating your XO to the latest firmware version
Typically separate Open Firmware (OFW) updates are not neccesary because the software will contain the needed firmware updates.
However, you can update the OFW by following the instructions on http://wiki.laptop.org/go/Upgrading_Firmware.
Repairs
Your XO is built and designed for repair work to be completed with only your hands and a screwdriver, and the case includes extra screws in case you need them.
For photos and step-by-step instructions on repairing your XO or putting replacement parts in, go to http://wiki.laptop.org/go/Repair.
Refer to http://wiki.laptop.org/go/Repair_center_locations to get to the most recent directory of repair centers, if you do not want to repair your XO yourself.
Recalibrating the touchpad
The XO touchpad does not offer a click mechanism like some touchpads. You must click the long button marked with an X to select something on the screen. Sometimes the touchpad seems to behave erratically or makes the cursor jump on the screen.
If the pointer is not following your finger on the touchpad, or if it jumps to the corners when you touch the touchpad, please try this recalibration procedure:
Hold down the three keys at one time: the upper left, upper right, and lower right of the keyboard and the fourth key, fn, the lower leftmost key, as the last one pressed, and then release them all.

If this doesn't help, try shutting down the laptop and removing the battery for ten seconds before restarting.
Finally, plug a standard USB mouse into your laptop to bypass the problem.
Checking for keys that stay down or appear stuck
Your XO must have a developer's key to do this keyboard test. Refer to http://wiki.laptop.org/go/Developer_key for more information about developer's keys.
- With the XO off, hold down the "check mark" game button (above the power button) while pushing the power button. After start up, the screen displays "Release the game keys to continue" and shows a text diagram of which key is pressed.
- Release the "check mark" game button.
- Next, after you see "Type the Esc key to interrupt automatic startup," press the escape key in the upper left hand corner of the keyboard layout (a circle with an x). The XO displays an ok prompt.
- At the ok prompt, type:
test keyboard
and press enter.
A blue keyboard map displays on the screen.
- Press keys one at a time to see the keyboard map turn the key light blue.
If the display on screen shows a light blue key constantly, the keyboard has a problem with that particular key sticking. Refer to a repair center for full diagnosis and repair at http://wiki.laptop.org/go/Repair_center_locations.
- Press the the escape key (circle with an x) again to exit the keyboard test.
- At the ok prompt, type reboot to restart.
Repairing damage to the keyboard
If your keyboard becomes damaged, normally it has to be replaced. Replacements are available through the repair centers. Information on spare parts and repair centers can be found at http://wiki.laptop.org/go/Repair_center_locations.
Restoring the software to factory defaults
If you want to completely wipe clean the XO, you can try upgrading the activated laptop to re-flash its entire "disk image" including both its operating system and its Activities. Refer to Resetting your XO for detailed instructions. Please be aware that ALL DATA WILL BE LOST.
Troubleshooting the internal XO hardware
The XO can give you information about possible repairs that are needed.
Start by pressing the power button for a second, and then answer the following questions.
Does the Power LED half-circle light up?
When the power button is pressed once, and the power LED doesn't turn on, first try resetting it.
To reset the XO, remove all power sources from the laptop:
- Take the battery out and remove the power adapter.
- Wait two minutes. This allows embedded hardware to lose all power and reset itself.
- Replace at least one source of power, either the battery or power adapter, and watch the power/battery LED while you do so.
The battery LED should flash orange momentarily (about a quarter of a second) when power is first reapplied. If you do not see this flash, you either have a motherboard hardware problem or faulty EC firmware installed. Contact a repair center for assistance.
If the power LED doesn't turn on or flash, but the laptop proceeds to illuminate the backlight and even start, the problem may be either the LEDs themselves or the power LED driver. The LEDs are in series, so if one fails they may both fail to light.
On rare occasions, the power button becomes stuck mechanically. In this case, the laptop does not detect the depression of the power button, and does not turn on. Ensure that the power button is moving freely by pressing it a few times.
If the battery LED flashed on restoration of power and the power button isn't stuck, and no other signs of life are detected, then you can't determine the reason for failure. Contact a repair center for assistance.
Does the display light up?
After starting the XO and viewing the power LED, the next visible feedback from the XO is that the display lights up. The LCD display should be initialized with white, then begin to show text or graphics. The backlight for the screen should be turned on, even if the backlight was previously turned off.
If this does not happen then the boot sequence may not be operating correctly. Next, look at the Microphone activity LED to see if it is lit. If the power LED and the microphone LED are both lit then a serious boot error has occurred and you should contact a repair center for assistance.
Can you hear the startup sound when the XO starts?
If the startup sound does not play, this usually indicates a problem that a repair center needs to fix.
Yes, the startup sound plays
If the display doesn't initialize, but the boot sound plays, then this is probably a problem with the display.
No, the XO boots normally, but no boot sound plays
If no boot sound is played, but the machine boots normally and has audio, it is possible that the default boot volume to has been changed to 0. While the boot sound is playing, you can adjust the volume using the volume adjust keys. This modified volume setting is saved and used for future boots. Try increasing the volume right after starting the laptop a few times, and see if the boot sound returns.
If no boot sound is played, and the machine boots normally but has no audio see http://wiki.laptop.org/go/XO_Troubleshooting_AV.
Does the display remains blank after starting up?
Sometimes the display is active (including backlight), but no text or graphics appear. This problem can be caused by removing the power to an XO while it is upgrading the firmware. You should contact a repair center for assistance.
Does the display say "Connect power to proceed"?
Sometimes a firmware update requires two sources of power, both a battery and a power adapter. If this is the problem, provide both sources of power and reboot. The XO should proceed with a firmware update and boot normally.
Is the display is showing an XO icon only?
This means that the XO has started the startup process.
You can see much more information about your Open Firmware by holding the "check mark" game button (above the power button) after powering on. That makes Open Firmware display more detailed messages about what it is doing during the secure boot process (including early boot messages from the Linux kernel). The messages are in English only.
Is it showing an XO icon with a serial number and three icons below it?
If the laptop powers up, but stops when displaying the XO icon in the middle of the screen, followed by a serial number (e.g. CSN74902B22) and three icons (SD disk, USB disk, Network signal strength), it is looking for its activation lease. This should eventually print "Activation lease not found" at the top of the screen and power-off soon thereafter.
The solution is to re-activate the laptop. Obtain a copy of the lease (or a new lease) from your country activation manager, place it (named "lease.sig") in the top-level directory of a USB key and boot the laptop. See the "what to do with activation keys" section within: http://wiki.laptop.org/go/Activation_and_Developer_Keys.
Is it showing an XO icon with a "sad face" above it?
This means that Open Firmware couldn't find a signed operating system on the internal flash memory. Firmware bootup also looks on USB memory sticks and SD cards for signed operating system software.
Try upgrading or re-installing the software: http://wiki.laptop.org/go/Secure_Upgrade.
XO icon with a single dot below it?
If the XO powers up, but stops when just displaying the XO icon in the middle, with a single dot below it, it means that something was wrong when the Linux operating system started. When this happens, try upgrading or reinstalling the XO.
If this has happened to the same XO more than one time, consider a repair center for full diagnosis and repair at
http://wiki.laptop.org/go/Repair_center_locations.
Getting Support
An entire community built this XO and everything on it, and we want to help you with it. OLPC has proven that volunteer-driven support works, often with far more heartfelt caring than any corporate help desk!
If you have any questions about the XO, ask a teacher for help, a friend, or search on the Internet. If you have a question about your XO, there is a very good chance it is already answered within our expanding Support FAQ / RTFM knowledge base:
Then look into the http://support.laptop.org web site's extensive helpful guidance for exploring and fixing your XO, allowing you to solve challenging issues right alongside others. Specifically, check out:
If you are still unable to find an answer online, please email help@laptop.org.
Finally, if you are satisfied with the hard work volunteers have brought you here, please consider giving back, by joining our dedicated community: http://wiki.laptop.org/go/Support_Gang
Thanks!
Keyboard Shortcuts
You can use key presses instead of moving the pointer for some actions on the XO. This list shows the keys that you press at the same time to get the described results. Note: not all shortcuts will work in all Activities.

Key combination
|
Description |
ctrl + c (shift + ctrl + c in Terminal)
|
Copy the selection
|
ctrl + v (shift + ctrl + v in Terminal)
|
Paste the selection
|
ctrl + x (shift + ctrl + x in Terminal)
|
Cut the selection
|
ctrl + u while using the Browse Activity
|
Launch the Write Activity and view the source code for the current web page
|
alt + esc
|
Quit an Activity
|
alt + tab
|
Cycle forward through running Activities
|
shift + alt + tab
|
Cycle backward through running Activities
|
alt + enter
|
Toggle full-screen mode
|
alt + spacebar
|
Toggle tray visibility. This command may not work in all applications.
|
alt + 1
|
Save a snapshot of the current screen into the Journal
|
ctrl + alt + erase
|
Restart Sugar, the graphical interface for the XO
|
fn + 1
|
Neighborhood View
|
fn + 2
|
Group View
|
fn + 3
|
Home View
|
fn + 4
|
Activity View
|
shift + alt + r
|
Rotate the display
|
esc + Frame icon key + RightArrow + fn
(the four corners keys on the keyboard) |
Reset the touchpad if the pointer behaves strangely when you use the touchpad
|
fn + spacebar
|
View source code system wide. This command may not work in all applications.
|
fn + up arrow
|
Page Up
|
fn + down arrow
|
Page Down
|
fn + left arrow
|
Home
|
fn + right arrow
|
End
|
ctrl + brightness down
|
Backlight off - black&white mode
|
ctrl + brightness up
|
Full brightness - color mode
|
ctrl + volume down
|
Mute
|
ctrl + volume up
|
Full volume
|
Hardware Specifications
Storage
Random access memory (RAM): 256 megabytes
Built-in Flash, instead of a traditional hard disk: 1 gigabyte
Expansion:
- 3 USB sockets (can be used with external or portable storage devices)
- 1 SD card slot, for multi-gigabyte Secure Digital cards
NOTE: With the wireless network, you can store additional files to your school's server or to other network storage locations.
Peripheral devices
- Video and still picture camera: 640x480 pixels at 30 frames per second
Networking
The wireless networking capability supports the following standards:
- WiFi: 802.11b/g (2.4GHz)
- Mesh: 802.11s
Detailed Specification
http://wiki.laptop.org/go/Hardware_specification
License
All chapters copyright of the authors (see below). Unless otherwise stated all chapters in this manual licensed with GNU General Public License version 2
This documentation is free documentation; you can redistribute it and/or modify it under the terms of the GNU General Public License as published by the Free Software Foundation; either version 2 of the License, or (at your option) any later version.
This documentation is distributed in the hope that it will be useful, but WITHOUT ANY WARRANTY; without even the implied warranty of MERCHANTABILITY or FITNESS FOR A PARTICULAR PURPOSE. See the GNU General Public License for more details.
You should have received a copy of the GNU General Public License along with this documentation; if not, write to the Free Software Foundation, Inc., 51 Franklin Street, Fifth Floor, Boston, MA 02110-1301, USA.
Authors
ABOUT COMPUTERS
© Anne Gentle 2008, 2009
Modifications:
adam hyde 2008
Charles McCarthy 2008
A Holt 2008
Janet Swisher 2008
Sandy Culver 2008
INTRODUCTION
© Walter Bender 2008
Modifications:
Anne Gentle 2008
Tom Boyle 2008
ABOUT OLPC
© Anne Gentle 2008
Modifications:
adam hyde 2008
A Holt 2008
Rob Mason 2008
Sandy Culver 2008
Tom Boyle 2008
POWERING OF YOUR LAPTOP
© Seth Woodworth 2008
Modifications:
Anne Gentle 2008
CARING FOR YOUR XO
© Anne Gentle 2008
Modifications:
Abhishek Indoria 2009
adam hyde 2008
Janet Swisher 2008
Sandy Culver 2008
BATTERY CHARGING
© Anne Gentle 2008
Modifications:
adam hyde 2008
Charles McCarthy 2008
A Holt 2008
Janet Swisher 2008
Rob Mason 2008
Sandy Culver 2008
Seth Woodworth 2008
Tom Boyle 2008
CREDITS
© adam hyde 2006, 2007, 2008
NETWORKING HARDWARE
© Anne Gentle 2008
Modifications:
adam hyde 2008
Sandy Culver 2008
Tom Boyle 2008
STORAGE
© Anne Gentle 2008
Modifications:
adam hyde 2008
Brian Jordan 2008
Caryl Bigenho 2008
A Holt 2008
Sandy Culver 2008
Tom Boyle 2008
GETTING STARTED
© Caryl Bigenho 2008
Modifications:
adam hyde 2008
Anne Gentle 2008
Charles McCarthy 2008
A Holt 2008
Lisa Lewis 2008
Rob Mason 2008
Tom Boyle 2008
GETTING SUPPORT
© Anne Gentle 2008
Modifications:
adam hyde 2008
A Holt 2008
Sandy Culver 2008
Tom Boyle 2008
GIVE ME THE INTERNET
© Anne Gentle 2008
Modifications:
Brian Jordan 2008
Caryl Bigenho 2008
A Holt 2008
Janet Swisher 2008
Sandy Culver 2008
S Page 2008
Tom Boyle 2008
Glossary
© adam hyde 2006, 2007
HARDWARE SPECIFICATIONS
© Anne Gentle 2008
Modifications:
adam hyde 2008
A Holt 2008
Janet Swisher 2008
HOW TO REFLASH
© Anne Gentle 2008
Modifications:
adam hyde 2008
Brian Jordan 2008
A Holt 2008
Michael Stone 2008
Mitch Bradley 2008
Tom Boyle 2008
HOW TO VOLUNTEER
© Anne Gentle 2008
Modifications:
adam hyde 2008
Caryl Bigenho 2008
Charles McCarthy 2008
A Holt 2008
Janet Swisher 2008
Michael Stone 2008
Rob Mason 2008
Sandy Culver 2008
Tom Boyle 2008
INTRODUCTION
© Anne Gentle 2006, 2008
Modifications:
Abhishek Indoria 2009
adam hyde 2006, 2007, 2008
A Holt 2008
Luke Faraone 2008
Michael Stone 2008
Rob Mason 2008
Sandy Culver 2008
Seth Woodworth 2008
Tom Boyle 2008
KEYBOARD
© Seth Woodworth 2008
Modifications:
Anne Gentle 2008
Brian Jordan 2008
Tom Boyle 2008
KEYBOARD SHORTCUTS
© Anne Gentle 2008
Modifications:
adam hyde 2008
Janet Swisher 2008
Janis Grinbergs 2008
Martin Dengler 2008
Rob Mason 2008
Tom Boyle 2008
MAINTENANCE
© adam hyde 2008
Modifications:
Anne Gentle 2008
A Holt 2008
Sandy Culver 2008
Tom Boyle 2008
OPENING THE XO
© adam hyde 2008
Modifications:
Abhishek Indoria 2009
Anne Gentle 2008
Caryl Bigenho 2008
Janet Swisher 2008
S Page 2008
POWERINGYOURXO
© Seth Woodworth 2008
PORTS
© Seth Woodworth 2008
Modifications:
adam hyde 2008
Anne Gentle 2008
Brian Jordan 2008
Tom Boyle 2008
REPAIRING
© adam hyde 2008
Modifications:
Anne Gentle 2008
A Holt 2008
Sandy Culver 2008
Tom Boyle 2008
REPLACING
© adam hyde 2008
Modifications:
Anne Gentle 2008
Janet Swisher 2008
Lisa Lewis 2008
WIRELESS DEVICES
© adam hyde 2008
Modifications:
Anne Gentle 2008
SAFETY
© adam hyde 2008
Modifications:
Anne Gentle 2008
A Holt 2008
Janet Swisher 2008
SCREEN
© adam hyde 2008
Modifications:
Anne Gentle 2008
Caryl Bigenho 2008
STARTING THE XO
© adam hyde 2008
Modifications:
Anne Gentle 2008
Caryl Bigenho 2008
Charles McCarthy 2008
A Holt 2008
Janet Swisher 2008
Rob Mason 2008
Sandy Culver 2008
Tom Boyle 2008
TROUBLESHOOTING
© adam hyde 2008
Modifications:
Anne Gentle 2008, 2009
Brian Jordan 2008
Caryl Bigenho 2008
A Holt 2008
Sandy Culver 2008
Tom Boyle 2008

Free manuals for free software
General Public License
Version 2, June 1991
Copyright (C) 1989, 1991 Free Software Foundation, Inc.
51 Franklin Street, Fifth Floor, Boston, MA 02110-1301, USA
Everyone is permitted to copy and distribute verbatim copies
of this license document, but changing it is not allowed.
Preamble
The licenses for most software are designed to take away your freedom to share and change it. By contrast, the GNU General Public License is intended to guarantee your freedom to share and change free software--to make sure the software is free for all its users. This General Public License applies to most of the Free Software Foundation's software and to any other program whose authors commit to using it. (Some other Free Software Foundation software is covered by the GNU Lesser General Public License instead.) You can apply it to your programs, too.
When we speak of free software, we are referring to freedom, not price. Our General Public Licenses are designed to make sure that you have the freedom to distribute copies of free software (and charge for this service if you wish), that you receive source code or can get it if you want it, that you can change the software or use pieces of it in new free programs; and that you know you can do these things.
To protect your rights, we need to make restrictions that forbid anyone to deny you these rights or to ask you to surrender the rights. These restrictions translate to certain responsibilities for you if you distribute copies of the software, or if you modify it.
For example, if you distribute copies of such a program, whether gratis or for a fee, you must give the recipients all the rights that you have. You must make sure that they, too, receive or can get the source code. And you must show them these terms so they know their rights.
We protect your rights with two steps: (1) copyright the software, and (2) offer you this license which gives you legal permission to copy, distribute and/or modify the software.
Also, for each author's protection and ours, we want to make certain that everyone understands that there is no warranty for this free software. If the software is modified by someone else and passed on, we want its recipients to know that what they have is not the original, so that any problems introduced by others will not reflect on the original authors' reputations.
Finally, any free program is threatened constantly by software patents. We wish to avoid the danger that redistributors of a free program will individually obtain patent licenses, in effect making the program proprietary. To prevent this, we have made it clear that any patent must be licensed for everyone's free use or not licensed at all.
The precise terms and conditions for copying, distribution and modification follow.
TERMS AND CONDITIONS FOR COPYING, DISTRIBUTION AND MODIFICATION
0. This License applies to any program or other work which contains a notice placed by the copyright holder saying it may be distributed under the terms of this General Public License. The "Program", below, refers to any such program or work, and a "work based on the Program" means either the Program or any derivative work under copyright law: that is to say, a work containing the Program or a portion of it, either verbatim or with modifications and/or translated into another language. (Hereinafter, translation is included without limitation in the term "modification".) Each licensee is addressed as "you".
Activities other than copying, distribution and modification are not covered by this License; they are outside its scope. The act of running the Program is not restricted, and the output from the Program is covered only if its contents constitute a work based on the Program (independent of having been made by running the Program). Whether that is true depends on what the Program does.
1. You may copy and distribute verbatim copies of the Program's source code as you receive it, in any medium, provided that you conspicuously and appropriately publish on each copy an appropriate copyright notice and disclaimer of warranty; keep intact all the notices that refer to this License and to the absence of any warranty; and give any other recipients of the Program a copy of this License along with the Program.
You may charge a fee for the physical act of transferring a copy, and you may at your option offer warranty protection in exchange for a fee.
2. You may modify your copy or copies of the Program or any portion of it, thus forming a work based on the Program, and copy and distribute such modifications or work under the terms of Section 1 above, provided that you also meet all of these conditions:
- a) You must cause the modified files to carry prominent notices stating that you changed the files and the date of any change.
- b) You must cause any work that you distribute or publish, that in whole or in part contains or is derived from the Program or any part thereof, to be licensed as a whole at no charge to all third parties under the terms of this License.
- c) If the modified program normally reads commands interactively when run, you must cause it, when started running for such interactive use in the most ordinary way, to print or display an announcement including an appropriate copyright notice and a notice that there is no warranty (or else, saying that you provide a warranty) and that users may redistribute the program under these conditions, and telling the user how to view a copy of this License. (Exception: if the Program itself is interactive but does not normally print such an announcement, your work based on the Program is not required to print an announcement.)
These requirements apply to the modified work as a whole. If identifiable sections of that work are not derived from the Program, and can be reasonably considered independent and separate works in themselves, then this License, and its terms, do not apply to those sections when you distribute them as separate works. But when you distribute the same sections as part of a whole which is a work based on the Program, the distribution of the whole must be on the terms of this License, whose permissions for other licensees extend to the entire whole, and thus to each and every part regardless of who wrote it.
Thus, it is not the intent of this section to claim rights or contest your rights to work written entirely by you; rather, the intent is to exercise the right to control the distribution of derivative or collective works based on the Program.
In addition, mere aggregation of another work not based on the Program with the Program (or with a work based on the Program) on a volume of a storage or distribution medium does not bring the other work under the scope of this License.
3. You may copy and distribute the Program (or a work based on it, under Section 2) in object code or executable form under the terms of Sections 1 and 2 above provided that you also do one of the following:
- a) Accompany it with the complete corresponding machine-readable source code, which must be distributed under the terms of Sections 1 and 2 above on a medium customarily used for software interchange; or,
- b) Accompany it with a written offer, valid for at least three years, to give any third party, for a charge no more than your cost of physically performing source distribution, a complete machine-readable copy of the corresponding source code, to be distributed under the terms of Sections 1 and 2 above on a medium customarily used for software interchange; or,
- c) Accompany it with the information you received as to the offer to distribute corresponding source code. (This alternative is allowed only for noncommercial distribution and only if you received the program in object code or executable form with such an offer, in accord with Subsection b above.)
The source code for a work means the preferred form of the work for making modifications to it. For an executable work, complete source code means all the source code for all modules it contains, plus any associated interface definition files, plus the scripts used to control compilation and installation of the executable. However, as a special exception, the source code distributed need not include anything that is normally distributed (in either source or binary form) with the major components (compiler, kernel, and so on) of the operating system on which the executable runs, unless that component itself accompanies the executable.
If distribution of executable or object code is made by offering access to copy from a designated place, then offering equivalent access to copy the source code from the same place counts as distribution of the source code, even though third parties are not compelled to copy the source along with the object code.
4. You may not copy, modify, sublicense, or distribute the Program except as expressly provided under this License. Any attempt otherwise to copy, modify, sublicense or distribute the Program is void, and will automatically terminate your rights under this License. However, parties who have received copies, or rights, from you under this License will not have their licenses terminated so long as such parties remain in full compliance.
5. You are not required to accept this License, since you have not signed it. However, nothing else grants you permission to modify or distribute the Program or its derivative works. These actions are prohibited by law if you do not accept this License. Therefore, by modifying or distributing the Program (or any work based on the Program), you indicate your acceptance of this License to do so, and all its terms and conditions for copying, distributing or modifying the Program or works based on it.
6. Each time you redistribute the Program (or any work based on the Program), the recipient automatically receives a license from the original licensor to copy, distribute or modify the Program subject to these terms and conditions. You may not impose any further restrictions on the recipients' exercise of the rights granted herein. You are not responsible for enforcing compliance by third parties to this License.
7. If, as a consequence of a court judgment or allegation of patent infringement or for any other reason (not limited to patent issues), conditions are imposed on you (whether by court order, agreement or otherwise) that contradict the conditions of this License, they do not excuse you from the conditions of this License. If you cannot distribute so as to satisfy simultaneously your obligations under this License and any other pertinent obligations, then as a consequence you may not distribute the Program at all. For example, if a patent license would not permit royalty-free redistribution of the Program by all those who receive copies directly or indirectly through you, then the only way you could satisfy both it and this License would be to refrain entirely from distribution of the Program.
If any portion of this section is held invalid or unenforceable under any particular circumstance, the balance of the section is intended to apply and the section as a whole is intended to apply in other circumstances.
It is not the purpose of this section to induce you to infringe any patents or other property right claims or to contest validity of any such claims; this section has the sole purpose of protecting the integrity of the free software distribution system, which is implemented by public license practices. Many people have made generous contributions to the wide range of software distributed through that system in reliance on consistent application of that system; it is up to the author/donor to decide if he or she is willing to distribute software through any other system and a licensee cannot impose that choice.
This section is intended to make thoroughly clear what is believed to be a consequence of the rest of this License.
8. If the distribution and/or use of the Program is restricted in certain countries either by patents or by copyrighted interfaces, the original copyright holder who places the Program under this License may add an explicit geographical distribution limitation excluding those countries, so that distribution is permitted only in or among countries not thus excluded. In such case, this License incorporates the limitation as if written in the body of this License.
9. The Free Software Foundation may publish revised and/or new versions of the General Public License from time to time. Such new versions will be similar in spirit to the present version, but may differ in detail to address new problems or concerns.
Each version is given a distinguishing version number. If the Program specifies a version number of this License which applies to it and "any later version", you have the option of following the terms and conditions either of that version or of any later version published by the Free Software Foundation. If the Program does not specify a version number of this License, you may choose any version ever published by the Free Software Foundation.
10. If you wish to incorporate parts of the Program into other free programs whose distribution conditions are different, write to the author to ask for permission. For software which is copyrighted by the Free Software Foundation, write to the Free Software Foundation; we sometimes make exceptions for this. Our decision will be guided by the two goals of preserving the free status of all derivatives of our free software and of promoting the sharing and reuse of software generally.
NO WARRANTY
11. BECAUSE THE PROGRAM IS LICENSED FREE OF CHARGE, THERE IS NO WARRANTY FOR THE PROGRAM, TO THE EXTENT PERMITTED BY APPLICABLE LAW. EXCEPT WHEN OTHERWISE STATED IN WRITING THE COPYRIGHT HOLDERS AND/OR OTHER PARTIES PROVIDE THE PROGRAM "AS IS" WITHOUT WARRANTY OF ANY KIND, EITHER EXPRESSED OR IMPLIED, INCLUDING, BUT NOT LIMITED TO, THE IMPLIED WARRANTIES OF MERCHANTABILITY AND FITNESS FOR A PARTICULAR PURPOSE. THE ENTIRE RISK AS TO THE QUALITY AND PERFORMANCE OF THE PROGRAM IS WITH YOU. SHOULD THE PROGRAM PROVE DEFECTIVE, YOU ASSUME THE COST OF ALL NECESSARY SERVICING, REPAIR OR CORRECTION.
12. IN NO EVENT UNLESS REQUIRED BY APPLICABLE LAW OR AGREED TO IN WRITING WILL ANY COPYRIGHT HOLDER, OR ANY OTHER PARTY WHO MAY MODIFY AND/OR REDISTRIBUTE THE PROGRAM AS PERMITTED ABOVE, BE LIABLE TO YOU FOR DAMAGES, INCLUDING ANY GENERAL, SPECIAL, INCIDENTAL OR CONSEQUENTIAL DAMAGES ARISING OUT OF THE USE OR INABILITY TO USE THE PROGRAM (INCLUDING BUT NOT LIMITED TO LOSS OF DATA OR DATA BEING RENDERED INACCURATE OR LOSSES SUSTAINED BY YOU OR THIRD PARTIES OR A FAILURE OF THE PROGRAM TO OPERATE WITH ANY OTHER PROGRAMS), EVEN IF SUCH HOLDER OR OTHER PARTY HAS BEEN ADVISED OF THE POSSIBILITY OF SUCH DAMAGES.
END OF TERMS AND CONDITIONS
Glossary
default chapter : put a glossary here or include one from the shared Glossaries
There will be info on how to do this soon....
To blah blah blah
Somebody Should Set The Title For This Chapter!