About the Authors
Contributors:
Jaya Klara Brekk (MayDay Rooms), Giles Boudet (MDesigner), Rob Canning, Pete Gomes (Mutant Film), Adnan Hadzi (Deptford TV), Anna Morris (Free Software Foundation Europe), James Stevens (dekspace), Jan Tretschok (xm:lab), Sacha van Geffen (FLOSS Manuals, Greenhost ISP), Philo van Kemenade (London Video Hackspace),, Soenke Zehle (xm:lab)
Larisa Blazic, media artist and senior lectuer at the University of Westminster, lives and works in London. Her research interest lie in developing understanding and knowledge of practice-led methodologies in the context of art practice, aesthetics and politics of everyday urban experience and moving image in public spaces real, virtual and imaginary.
Kate Mara is a film and video practitioner with a focus on human rights issues and participatory media production, who has also dabbled in open source projects. Her latest film, Into the Fire: The Hidden Victims of Austerity in Greece was crowd-distributed online and received over 60,000 views in the first week of its release.
SDNA is a creative studio based in London producing distinctive digital artwork. Our objective is to explore techniques of interaction within public spaces, using emerging technologies and unusual presentation media. Our interdisciplinary approach, integrating site-responsive installation and live performance, aims to widen the scope of digital art. Established in 2004 by directors Ben Foot and Valentina Floris, SDNA continues to develop and present digital artwork and theatrical productions for festivals, fashion labels, museums, city councils, musicians and many more. In the past eight years we have received many commissions for video design and multiple projection installations.
Mick Fuzz is a media production trainer, community media activist and part time gardener based in Manchester. He blogs about his work at http://clearerchannel.org
Case Study - Engagemedia.org

Engagemedia.org is an online video sharing website: a free and open alternative to commercial services with the aim of serving the needs of movements and communities working for social and environmental justice. Their geographical focus is on the Asia Pacific. Engagemedia were one of the convening partners of the Transmission series of events that focused on the use of Free Software and open video for the distribution of the video of social movements.
In their own words "We believe independent media and free and open technologies are fundamental to building the movements needed to challenge social injustice and environmental damage."
When talking about different solutions for distributing user generated content using websites, the question often comes up 'Why not use YouTube?' Here are some of the reasons people choose to run self hosted video sharing websites and to contribute to them:
Free tools for freedom: The context in which you watch video is important. While many people have the impression that Youtube helps to bring an audience to your video, in fact the opposite is also true - that your video is lost in amongst all the other content. In reality, most people get attention for their video by promoting it elsewhere on the web, and this is true regardless of the platform.
It would be wrong to argue that YouTube and other commercial video sharing websites have not be useful in distributing the work of social movements and other independent producers. There exists a dedicated Human Rights channel 1 giving more more profile to key videos. However, to rely on the good will of a large international corporation and to have their work displayed within the context of an advertisement driven consumer ecology is clearly out of sync with many the goals of many community based organisations, campaigner, artists or academics.
For these reasons many people chose platforms that show their video in a context that is more in line with their values.
The control of information: in order to use YouTube you will need to sign a contract that hands rights over to them allowing them to use your video in different ways, including removing your video from the internet or handing information over to governments. You will also be handing over information to them about who views your video and from where. This information, along with any comments posted or any additional data, will belong to them and is how they make their money.
The future consequences of a single corporation (Google, who own Youtube) owning detailed information about the online behaviour of a vast amount of people is not very well understood yet. For many people, this is reason enough to use alternatives where possible.
How Engagemedia solved this problem
In order to do this, Engagemedia.org developed a new tool for distributing video on the internet called Plumi - Content Management System, which is published under a GPL/ZPL licence. This module focuses on the use of that tool.
- http://www.youtube.com/user/humanrights ^
Case Study - Into the Fire
Into the Fire: The Hidden Victims of Austerity in Greece 1 is a film about the situation of refugees and migrants in one of the European border countries at a time of severe austerity and rising, at times murderous, racism. The documentary is based on interviews with people from all over the world, including Somalia, Nigeria, Kenia, Egypt, Pakistan, Greece, Britain, Guinea, Iran, Ghana, Ivory Coast and Morocco. Spoken languages include Arabic, English, French and Greek.
Many are speaking in a language other than their native language, or are speaking in a specific accent, or background noise means their words are hard to make out without subtitles. While the film's main language is English, we didn't want to decide whose English was understandable or 'acceptable' and whose wasn't. So we decided to subtitle the whole film.
To do this, we uploaded the film to Vimeo, set to private and password protected, and then dropped the link onto Amara. Amara is award winning web-based software for collaberative subtitle creation. It is published under the AGPL licence.The transcription interface was very intuitive. Remembering only a couple of keystrokes helped to move swiftly through the whole film and transcribe interviews and narration. In all, the Into the Fire subtitles consist of 577 lines for a 38 minute film.
We wanted to offer the film in different languages so it would be accessible to audiences that don't speak English. Already while filming, there was a lot of interest in Greece, so it was clear we would need Greek subtitles. Making the film on a shoestring meant we didn't have any funding to pay for translations. So we asked online: On our website, facebook and twitter we put out a call for volunteers to help us translating.
Everyone who got in touch with us received short instructions by email and the relevant links and passwords. And then we watched how translations grew and more languages were added.
Into the Fire was released on 21st April with subtitles in Albanian, Danish, Dutch, English, French, German, Greek, Italian and Spanish. On the release date, the Czech translation was almost finished and Polish, Serbian and Swahili translations had been started.
Most translations had more than one person working on them. The advantage of Amara is that people can contribute to a translation, then save it and someone else can pick up where they left off. Working with other people, and working with people who aren't physically near you is very simple.
For the most part, our translators, many of whom we've never met and don't know, have been able to work independently, with very basic instructions:
We've put the video and transcript up on Amara, an online subtitling tool. You can either download the full English version there, or start translating right on the web interface.
If you aren't sure how much time you will have, working on the web interface is great, as you can save it at any time and someone else can pick up where you left off and vice versa.
There's an "Edit Subtitles" button at the top right, which takes you to the translation interface. You can start translating immediately, when you're done just hit "save and exit" at the bottom left.
If you have any questions on how to use it, please get in touch.
This seemed to be suffient information for people to just get on with it. Once translations were done, we were able to download the different languages. Amara offers downloads of the subtitles in different formats, including SubRip Files (.srt). YouTube also supports this format for subtitles, so we were able to save the .srt files and upload them to YouTube. (YouTube use the term Closed Captions for subtitles, and shorten it to CC - not to be confused with Creative Commons).
- http://london.indymedia.org/articles/203 ^
Popcorn Case Study
http://popcorn.webmadecontent.org/1n
The neighbourhood tour above is an example of a video expanded with elements from across the web. At different points in the video we see elements from Wikipedia, Google Maps and Twitter, used to add context to the tour and the locations featured in it. Did you notice how all these elements are selectable and clickable? That's because they are separate from the video and loaded in dynamically based on the current position of the video timeline.
The example above is created with a tool called Popcorn Maker, created by Mozilla. Popcorn Maker makes it easy to enhance, remix and share web video. It lets you use your web browser to combine video and audio with content from the rest of the web — from text, links and maps to pictures and live feeds.
On the Popcorn Maker home page There are many other sample projects you can look at. These will give you some other ideas about how you could use Popcorn Maker to create interactive time-based experience online.
Case Study Popcorn.js
Imagine Video playing in your web browser. Now imagine that the footage is interactive, time based, and literally jumping out of the video frame: you can build this kind of experience with popcorn.js.
Popcorn.js combines HTML5 with JavaScript, allowing for immersive experiences, using the native HTMLMediaElement properties and it provides a plugin system for interactions. Popcorn is freely available under the MIT License.
One Millionth Tower Case Study

http://www.wired.com/underwire/2011/11/one-millionth-tower/
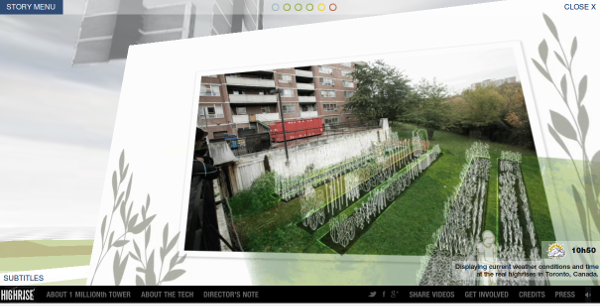
One Millionth Tower is a story with global implications about how, with the power of imagination, we can transform the urban and virtual spaces that belong to all of us.
One Millionth Tower is a "hyper-local" documentary focusing on a particular community: the highrise on Kipling Avenue in suburban Toronto, Canada. The project was established in collaboration between community members, architects, documentary filmmakers, and animators.
Additional Features include:
- a behind-the-scenes documentary about the collaborative process
- a short documentary featuring international examples of tower revitalization
- a short documentary exploring the open technology used to create the project
- and an interactive feature that takes you to highrise neighbourhoods in more than 200 countries in the world, thanks to Google Streetview and satellite imagery.
What are the elements that create this new experience make this work?
Popcorn.js - Check out the code: https://github.com/m4robb/one-millionth-tower
Mozilla / Web Made Movies' Popcorn is the event sequencer for the documentary, triggering the launch of Javascript code at precise times to display camera moves, animations, video and audio playback, and pulling in semantic data from Flickr and Wikipedia. Popcorn.js was also used to time the placement of semantic data, before implementing that code in the WebGL environment.
The experiences are now dynamic, real time with interactive buttons, forms, and twitter feeds. Expanding Video - Beyond the frame, expanding outside the frame of the video shot.
webGL - Web Graphics Library is a JavaScript API for rendering interactive 3D graphics and 2D graphics within any compatible web browser without the use of plug-ins. WebGL is integrated completely into all the web standards of the browser allowing GPU accelerated usage of physics and image processing and effects as part of the web page canvas. WebGL elements can be mixed with other HTML elements and composited with other parts of the page or page background.
HTML5 - custom alpha channel library for HTML5 video was used to composite the video assets seamlessly over top of 3D planes within the environment.
Mr. Doob's three.js 3D javascript - Along with modified particle systems of Canadian Geese, pollen, rain and snow. Three.js is a lightweight cross-browser JavaScript library/API used to create and display animated 3D computer graphics on a Web browser. Three.js scripts may be used in conjunction with the HTML5 canvas element, SVG or WebGL. The source code is hosted in a repository on GitHub.
Open video and audio formats (WebM and OGG)
XPath - XML language to parse data from a Google Docs Spreadsheet in order to ingest the Google Map coordinates. And XMLHttpRequest (XHR) was used for monitoring the download progress of all the assets / pre-caching.
Yahoo's Weather Services API - to pull in real-time weather data.
FAQ
Q. Where can I download the latest stable release code of Popcorn.js?
A. The latest stable releases code is always available here: Popcorn.js Minified Popcorn.js Complete (Core, Plugins, Players & Parsers Included)
Q. Where can I find the latest development code?
A. The latest development code can be found on Github
Q. How do I create a plugin?
A. For a step-by-step guide, visit Getting Started with Popcorn.js Plugins
Case Study: Preparing Mobile Video for Editing
There is a fantastic opportunity to use video shot my mobile video devices, low cost HD cameras and mobile phones for all sorts of contexts from citizen journalism, to home movies. However, because of the many different devices and the huge numbers of video and audio codecs and containers used it can be very tricky to get these formats to work with different editing programmes.
Case Study by Mick Fuzz. Part of my freelance work involves community based video editing. I find that I have to take a flexible approach to the tools I use based on what is available. One community media client wanted me to edit footage using a relatively old version of Premiere (cs3) on their machines and to incorporate footage from DV cameras, Kodak z18 cameras and a couple of DVDs
The real challenge was how to get the zi8 camera footage into a format that could be use Many Internet searches later I found I was not alone with this problem. 1
I've used many applications to convert video files from one format to another so I went to work. I evaluated or tried, Avidemux, Mpeg streamclip, Handbrake, Virtual Dub, Media Encoder, Super media converter. None of them were able to do the job. So I tried some work arounds. I used Mpeg streamclip to create a dv compatible mov file and then tried to convert it to an avi file with Avidemux. My mood progressed from one of interest, to amazement to frustration as the afternoon went on. By the time my partner came back from work I was in a state of desperation.
I don't normally use command line tools as I am primarily a teacher and there are a lot of barriers from students to using them. However after taking part in a couple of Open Video events and reading the manual Introduction to the Command Line, I decided I was going about solving this problem in the wrong way.
With graphical programs, you sometimes hit a limit; you just can't do what you want or you need to find cumbersome work-arounds to program limits. With the command line, you can combine commands to yield a virtually infinite range of new and interesting functions. By combining commands creatively, you can make the command line do exactly what you want; it puts you in control of your computer. 2
The applications that I used and failed with mostly used a command line application called ffmpeg in the background. I decided I wanted to spend a little bit of time to take back control of my computer. After setting myself this challenge I was able to find a two line command that made a successful conversion and did it for every file in the directory. This allowed me to get on with the job and has helped my relationship greatly.
- http://forum.videohelp.com/threads/313371-Editing-Kodak-Zi8-720P-60-files ^
- http://www.flossmanuals.net/command-line/ ^
Case Study: SDNA
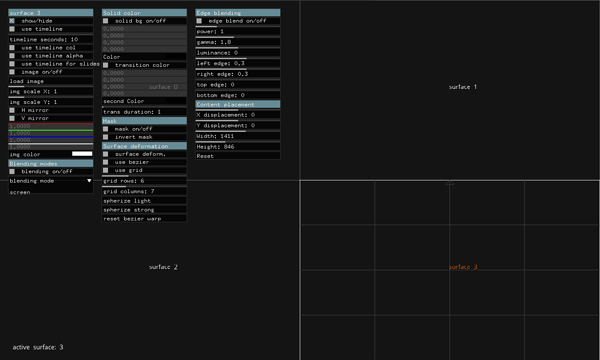
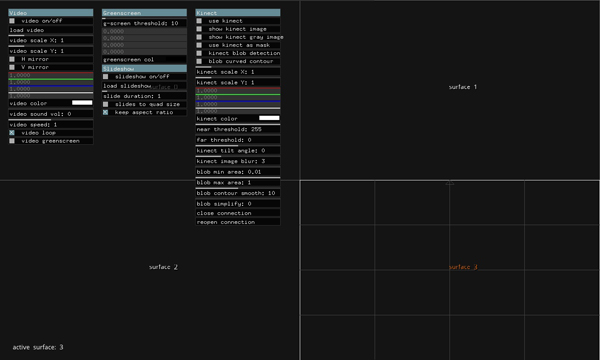
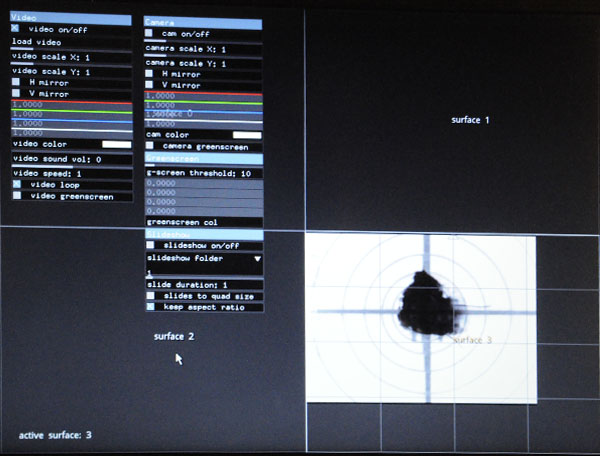
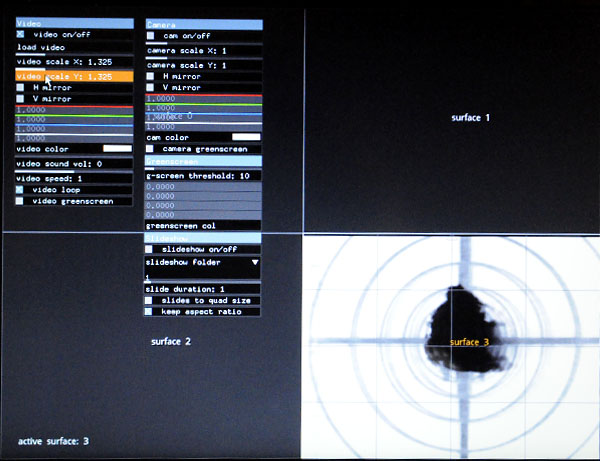
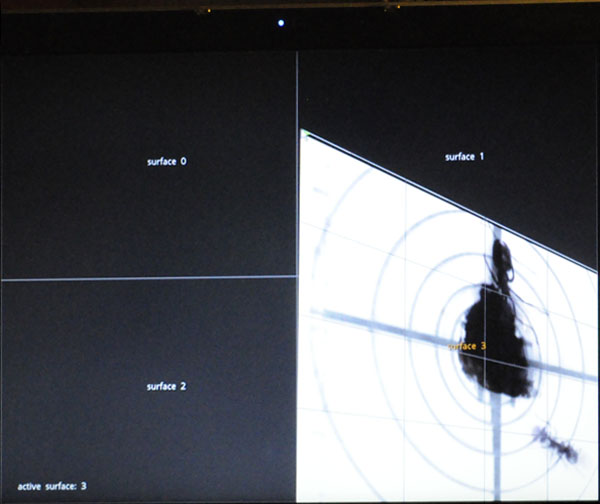
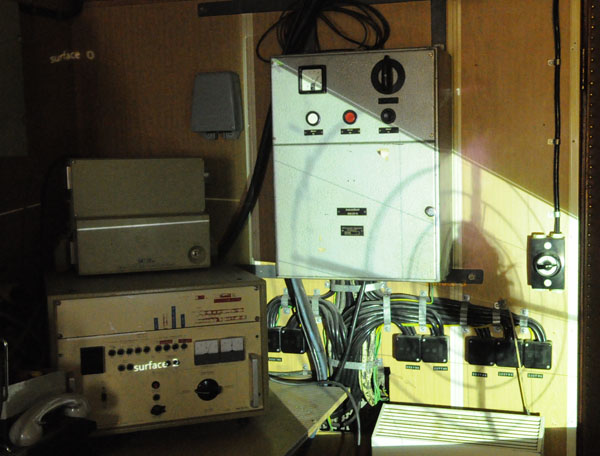
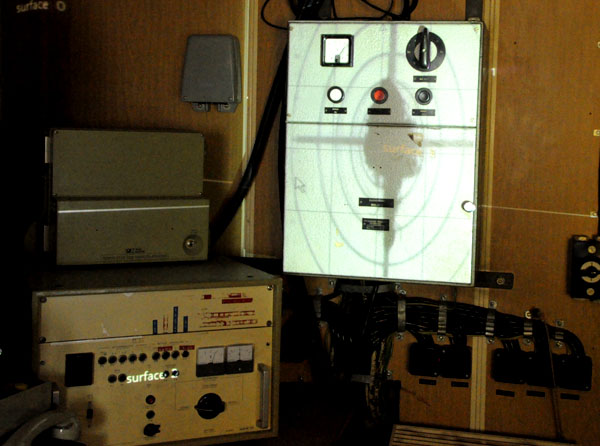
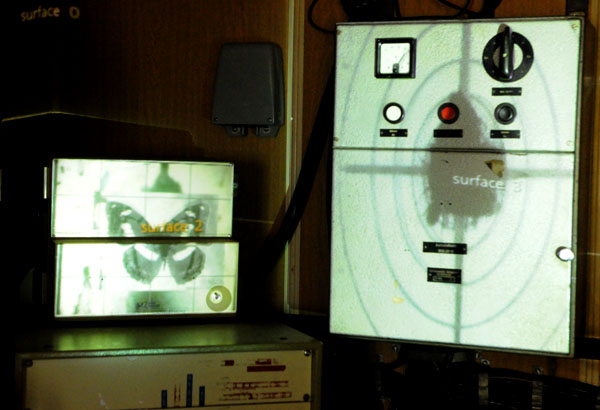
SDNA projection mapping experiments

We were invited to participate to the Open Video workshop at the Ms Stubnitz, a fascinating Cold War German fishing ship moored in Canary Warf, the financial quarter of London, bankers central as we call it around here. The Open Video workshop focuses on the exploration of Open Source Software to be used in different step of video production, post production and distribution. Our main objective was to find an approachable software with a simple interface capable of mapping videos to physical surfaces.
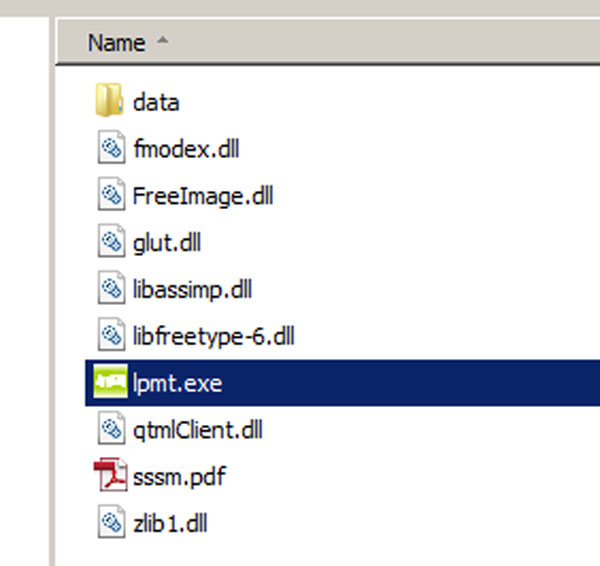
That's how we found LPMT, went to the communication room of the Ms Stubnitz and started to map the vintage radios. For more information please go to the Hands-on chapter.
Case Study - Straight-to-DVD Distribution
DVDs continue to be a vital tool wherever decentralized, off-line distribution is key.
Nollywood pioneered the straight-to-DVD production, bypassing the centralized distribution via big-screen releases - mainly because there are too few cinemas to rely on them for distribution, but also because the entire film industry is built around the small-scale production made possible by the (comparatively) low cost of digital technologies.
"I think Nollywood is so successful because it has already anticipated and reacted to the future of moving image distribution that the rest of the world, particularly Europe, is yet to recognise. By this I mean that Nollywood has understood that the distribution of information benefits from freer, looser forms of control, and that the way Nigerians distribute materials; by pirating, sharing, hosting screenings, actually works in the service of the production companies, rather than the other way around. By releasing films straight to DVD, Nollywood has flooded the market of African film and thereby ensured its dominance. This, clearly, shows that the system works. It challenges the European distribution model very profoundly." 1
Small scale screenings rather than cinema distribution suit a different cultural context for viewing video. They are a better fit for cultures where oral narratives are stronger. 2 DVDs are sold on the streets and to cars in traffic and there is a widespread rental system. This profusion of DVD a distribution medium creates a relatively level playing field and low barriers to entry for young film makers and those working on low budgets.
- http://www.theafricachannel.co.uk/nollywood-or-bust-at-africa-utopia/ ^
- http://www.academia.edu/2588216/Nollywood_Style_Nigerian_Movies_and_Shifting_Perceptions_of_Worth ^
Case Study: Video Editing
Flossie 20121 was the UK's first women-only free software conference: it provided an amazing opportunity to record the experiences and interests of women, who are often seen as a minority group in computing.

What had started out as a fun idea to record some vox-pops had snowballed into 30 half hour plus long interviews, capturing the passionately expressed opinions of women with a very wide variety of interest and experience in free software. From librarians to techno-artists and from academics to business leaders.
Amazing as this was, the project then hit a problem: none of the people involved in the project had time to edit the hours of footage that had been collected. The project had really “bitten off more than it could chew.” The net for free software video editors was cast wider, and there were many people with the interest, however, few of them had much knowledge of video editing tools or methods.
A video editing sprint was arranged where a group of individuals were trained to edit interviews and where the editing was done over a period of a few days in a collaborative environment. The participants needed training in a video editor that was Free Software to fit into the aims of the project. The application Kdenlive was chosen. Kdenlive, which stands for KDE Non-Linear Video Editor), is a free software video editing software package, released under the GPL2 licence. 3
The hands on task in this module is a short and simplified version of a guide 2 which provided training for sprint attendees. They explain how to edit an interview using Kdenlive, and can be used as a guide for both individual and group editing projects.
- http://www.flossie.org ^
- http://www.flossmanuals.net/how-to-use-video-editing-software/ ^
- http://www.kdenlive.org/ ^
Use FireFogg to Create Open Video Files
Firefogg is an open source, GPL-licensed Firefox extension for encoding Ogg video and WebM video files. It's simple to use, especially if you are already using the Firefox browser. FireFogg is an extension for Firefox and you won't have to download and install a separate application. Just install the extension and encode your video in Firefox!
Installing Firefogg
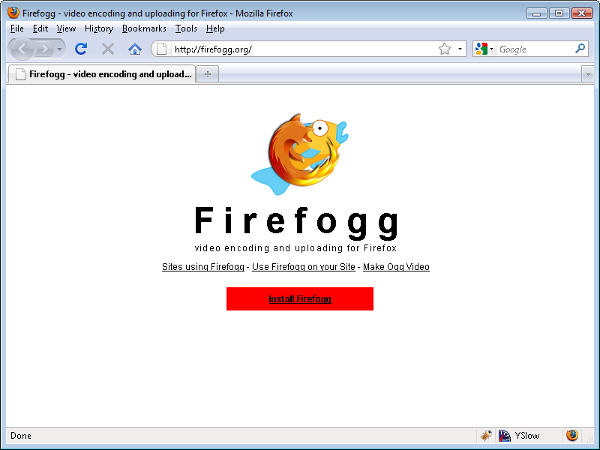
FireFogg works with the Firefox browser. If you aren't using Firefox yet, you’ll need to install Mozilla Firefox. When you have Firefox running, visit firefogg.org.

Click “Install Firefogg.” Firefox will prompt whether you really want to allow the site to install an extension. Click “Allow” to continue.
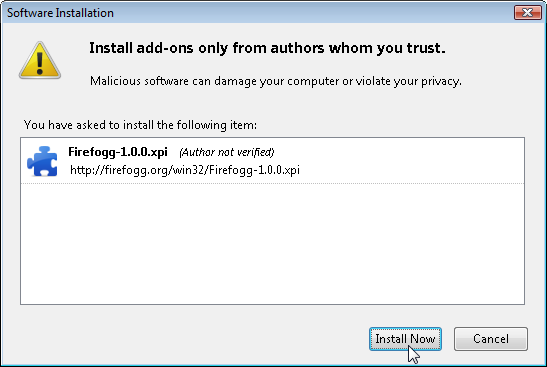
Firefox will present the standard software installation window. Click “Install” to continue.

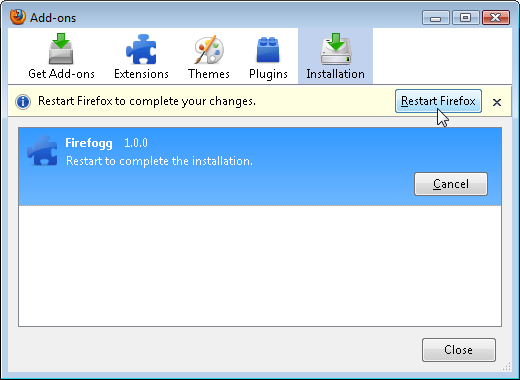
Click “Restart Firefox” to complete the installation.

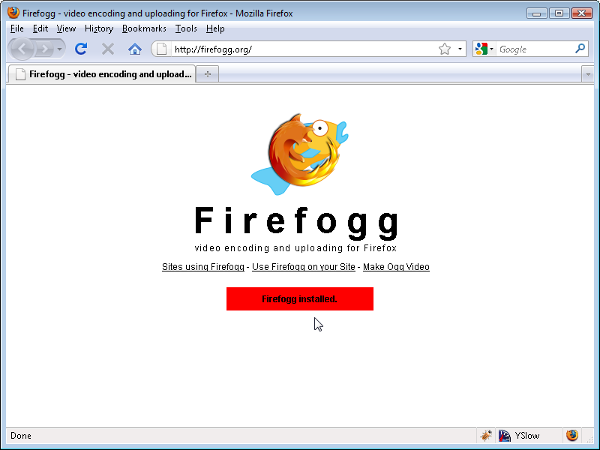
After restarting Firefox, go back to firefogg.org to confirm that Firefogg was successfully installed.
Encoding your video with Firefogg
Bookmark firefogg.org, you can encode your video right from Firefox.

Click “Make Ogg Video” to start the encoding process. / "Make web video" for me (see below)

Click Select File, and browse to select a file from your computer.The video will show up with some information on it's current encoding and size.

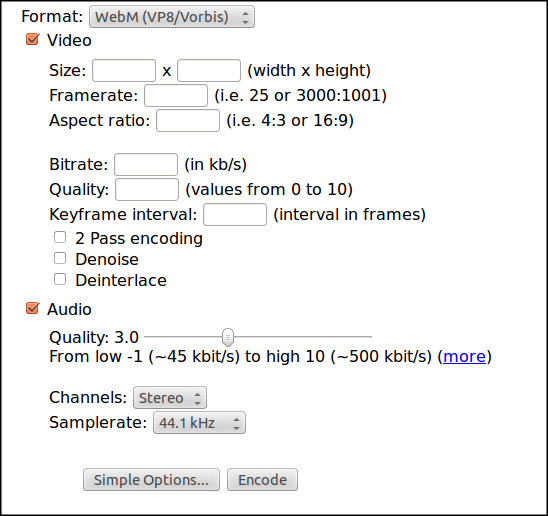
Select either Ogg or WebM video and then select the quality you want your target file to be.
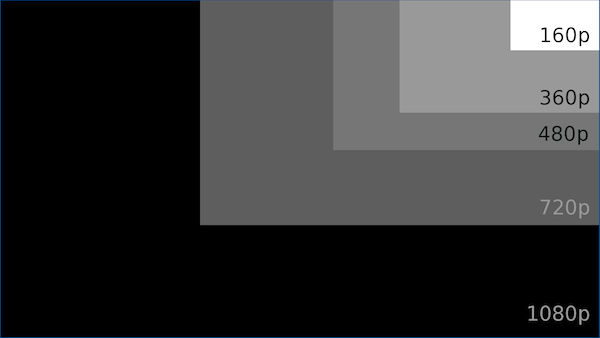
The image below will give you an idea of the relative sizes of the options. If you look at the image in the dimensions 1920 px wide x 1080 px high, you can see the actual size of the videos. 1080p and 720p are HD resolutions.

Click on Encode and choose a location to save your open video file.

Depending on the size and length of your video, encoding can take a while. When it is finsihed, you can find it in the folder you chose above, under the same name as the original and ending on .webm or .ogv
Advanced Options
There are some advanced options which you can select if you want greater control over your target file. For example you can change the dimensions of the video, the framerate and define an aspect ratio.

Use Miro Converter to Create Open Video Files
We can get our hands dirty and perhaps unearth some 'digital artifacts' by doing some video compression using encoding tools. The text is adapted from Mark Pilgrim's work released under a by-sa-3.0 licence and is online here - http://diveintohtml5.info/video.html
By the end of this task you should be able to:
- Convert a video file to another video file with an free / patent unencumberd container and / or codec
- Use Free Software to create an mp4 file for wide compatibility
Tools you will need for this task:
Encoding to WebM and Ogg Video files
Miro Video Converter is an open source, GPL-licensed program for encoding video in multiple formats. Download it for Mac OS X or Windows. It supports all the output formats mentioned in this chapter. It offers no options beyond choosing a video file and choosing an output format. It can take virtually any video file as input, including DV video produced by consumer-level camcorders. It produces reasonable quality output from most videos. If you are unhappy with the output, you can try another program.
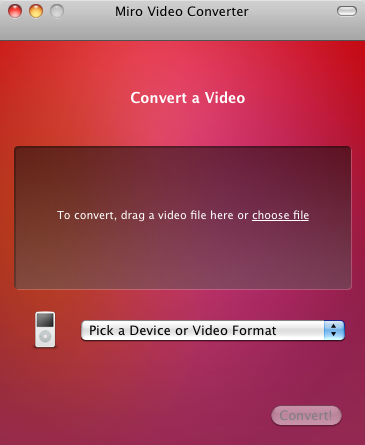
To start, just launch the Miro Video Converter application.
Miro Video Converter main screen

Click “Choose file” and select the source video you want to encode or drag and drop the video file on the grey area.
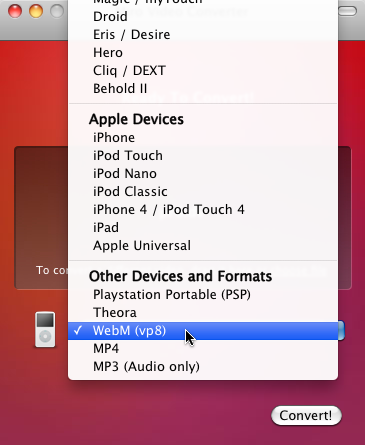
The “Pick a Device or Video Format” dropdown menu lists a variety of devices and formats. For the purposes of this chapter, we are only interested in three of them.
- WebM (vp8) is WebM video (VP8 video, new BSD licence and Vorbis audio, BSD-style licence, in a WebM container, BSD style licence)
- Theora is Theora video (3 clause BSD licence) and Vorbis audio in an Ogg container (BSD style licence)
- iPhone is H.264 Baseline Profile video (using x264 (GPL2) and AAC low-complexity audio in an MP4 container.
Create a WebM Video
Select “WebM” first.
Choosing WebM output

Click the “Convert” button and Miro Video Converter will immediately start encoding your video.
The new video will have the same name as the original, but end on .webm
Video location is different for Mac. See locating video section below
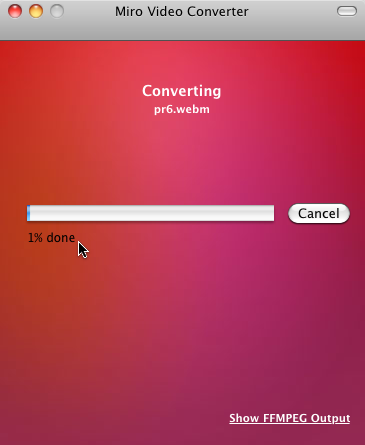
You’ll be staring at this screen
Depending on the size and length of your video, conversion my take a while.

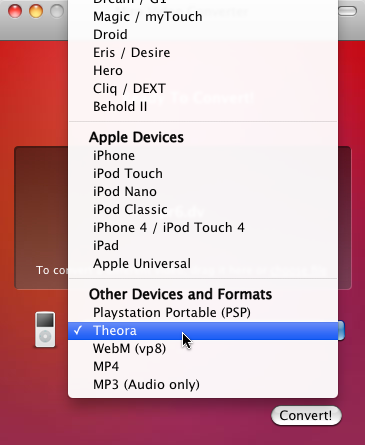
Create Theora Video
This time, select “Theora” from the Devices and Formats list.
Time for Theora

That’s it; press the “Convert” button again to encode your Theora video. The video will have the same name as the original and end on .theora.ogv
Time for a cup of coffee

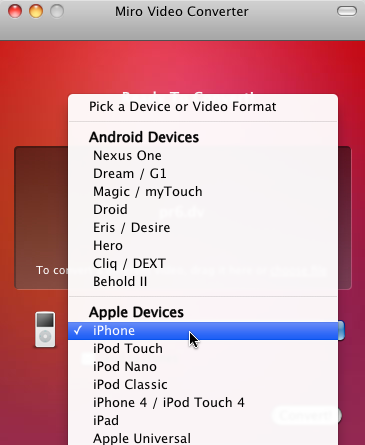
Create an iPhone-compatible H.264 Mp4 video
selecting “iPhone” from the Devices and Formats list.
iPhone, not iPhone 4

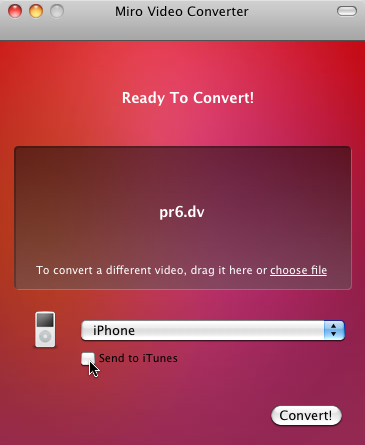
For iPhone-compatible video, Miro Video Converter will give you an option to send the encoded file to your iTunes library. I have no opinion on whether you would want to do that, but it’s not necessary for publishing video on the web.
Press the magical “Convert” button and wait. The encoded file will have the same name as the original and end on .iphone.mp4.
Do some yoga or something

You should now have three new video files in addition to your original source video.
Finding you Open Video File on you computer
Linux: The output file will be saved in the same directory as the source video.
Mac OS: Miro Converter will create a folder in your Movies folder called "Miro Video Converter." All the videos you create with it will be saved there. After Miro Converter has finished encoding your video, you can also select "Show File" to locate the video in Finder. Does this option exist in Linux and Windows?
How does it work on Windows?
Task - Encode a video file to Ogg Theora or WebM
Download a video file from Engagemedia.org or Archive.org.
Re-encode it to an Ogg or WebM video using Firefog.
If your system supports it, install Miro Video Converter and follow the instructions above to encode to three kinds of files.
Post your questions or results in the comments.
Creating Subtitles Online using Amara
Subtitles can open up your video to new audiences. One of the reasons for approaching subtitles in an open way is that it allows your community to get involved in the task of subtitling videos.
Subtitles are textual versions of the dialogue or commentary in films, television programs, video games, and the like, usually displayed at the bottom of the screen. They can be a written translation of the video dialogue in a foreign language or a rendering of the dialogue in the original language often targeting viewers who are deaf, hard-of-hearing or have accent recognition problems.
Video Captions Online
Some video sharing systems allow you to play captions and subtitles on top of your video files. Some even let you create or edit subtitles. Below we can see a video with English subtitles selected on the universal subtitler platform Amara.

Starting a new transcript
To start a subtitling a video using Amara, simply go to http://www.amara.org/ and copy and paste the link to your video into the field titled "Add a video"
If someone else has already added subtitles for the video you added, you will be directed to the existing transcript and translations. This way there is no duplication of work.
The video below from the Papuan Voices website has already been translated into many languages. These can be selected in the online video player.

The process of creating subtitles is quite easy and intuitive, and there are step by step instructions on the website.
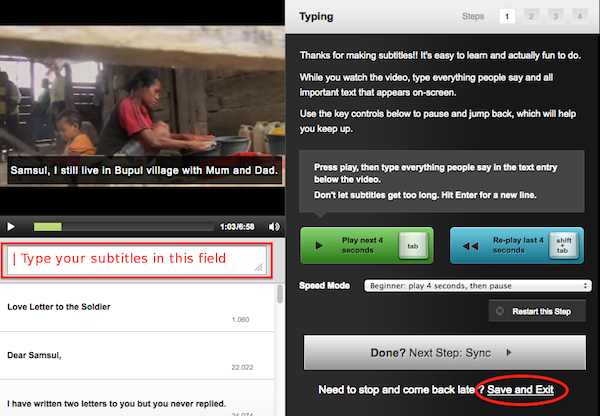
The work area is shown below.

To add a subtitle, simply start typing in the field below the video player. To start a new title, hit enter (the button you use for line breaks in text documents too).
You can start and stop the video playback with the green button shown in the image above, or use the tab bar on your keyboard.
If you want to save your transcript, but haven't finished it, select "Save and Exit"
Translating Subtitles
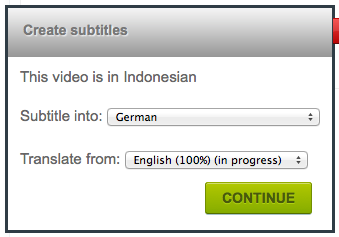
If a transcript already exists, you may want to add a translation. On the language selection field you also get the option "Add New Translation" Amara will prompt you to select the language you are translating into and the language you are translating from.

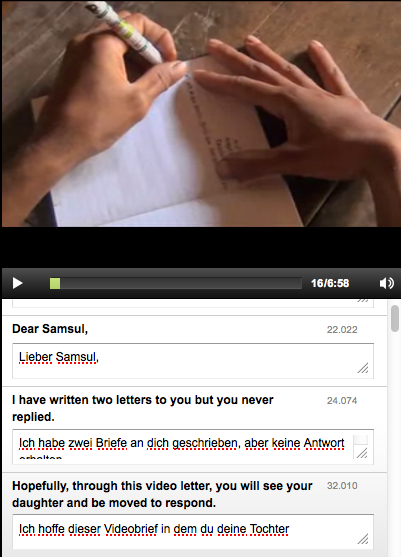
After creating a new translation, this is what the translation interface looks like.

The workflow has 4 stages.
- Transcript/translation: Typing up the spoken words or translating them from another language.
- Syncing: Using the down arrow on your keyboard and a graphic representation of the individual titles that you can drag left and right, the timing of your subtitles is adjusted.
- Edit Title and Description: Translate the title of the video and add a short description. This step is optional.
- Checking Work: Watch the film one last time and check for typing errors and translation mistakes and make sure that the timing is correct.
Done! You can now watch the video with your subtitles.
Sharing Subtitles online
When you have finished your subtitles you can share the work you have created in different ways.
The most simple way is to point people to the page of the working space on the website you have created the subtitles on.
Another way is to embed the "video player" into your own web page or blog.
Task: Creating subtitles
- Create subtitles for a video of your choice.
- Share these subtitles online
Hands On - DVD
After completing this tutorial you will be able to create a DVD with different menus and buttons for production (a process called DVD authoring or mastering). You will be comfortable with using VLC player and DVDStyler to prepare your menus and use the VLC-Player to check your video material. VLC media player is a free software cross-platform multimedia player and framework relased under the GLP-2 and LGPL licences and DVD Styler is a Cross-platform DVD authoring tool with Windows, Mac OS X, and Linux versions, using wxWidgets. It is free software under the license GNU GPL.
What you need: Footage
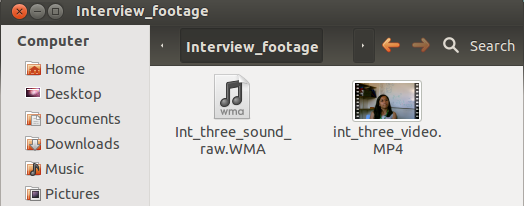
In this tutorial, we will call any kind of material that we will use "footage". There is audio footage and video footage. Footage comes in different formats. You may already have audio and video files available. If you dont have your own footage, please download these clips:
http://archive.org/download/RecordPlayer/RecordPlayer.mpeg
http://archive.org/download/HepCatSymphony/HepCatSymphony.mpeg
http://archive.org/download/CEP514/CEP514.mpg
DVD Specifications
Before we are going into opening our DVD authoring software lets have a look at the specifications for creating a DVD. Today we have two different video resolution modes that are used in certain countries.1

If you are happen to live in a PAL-Country your DVD -Resolution is 720x576px at 25 frames per second (fps), NTSC- Countries us 720x480px at 29.97 fps. If you find yourself in a SECAM country use PAL.
Transcoding your footage
If your footage doesn't fit to your wanted DVD-Standards DVD Styler can do the work for you. If you want to do the transcoding yourself then you should read more about transcoding.
Using DVD Styler
In this chapter you will learn to choose the right presets for DVDStyler, add your Video footage and burn your DVD with a menu.
Finally we are at the chapter you probably came here for.
If you don't have DVDStyler already installed download it here 2 or get it from your software center.
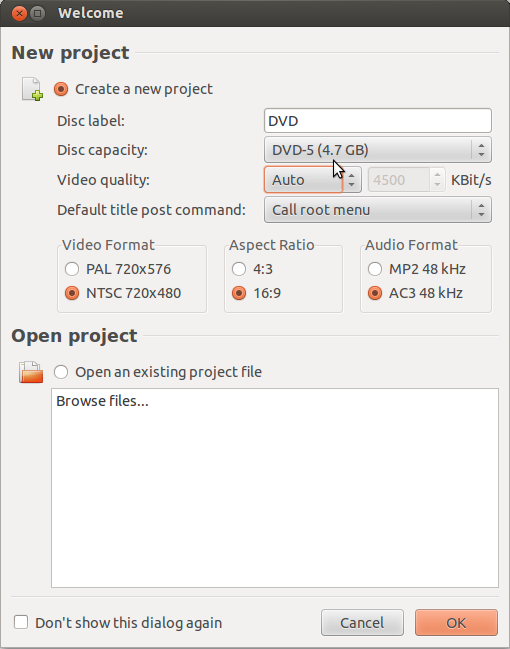
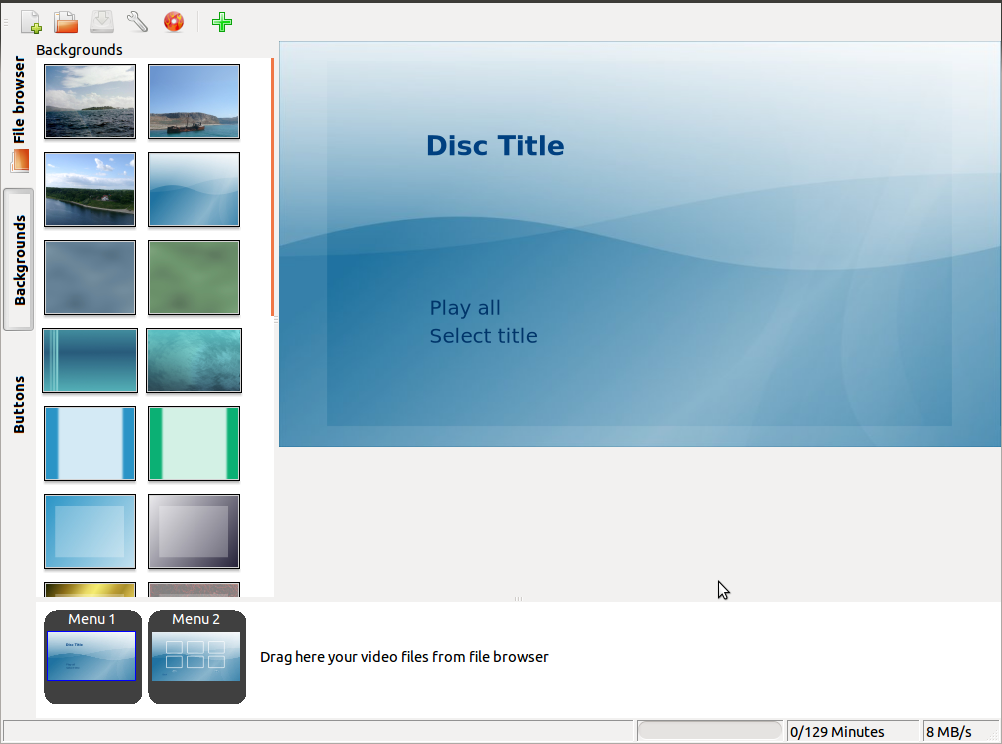
After starting DVDStyler choose your language (we will use english) and you will get this window

Choose create Project, your prefered DVD (usually it is a DVD-5). You could leave the Video Quality to Auto or for best results choose 8Mbit/s.
You might want to go back after each video to the Main menu, so choose "Default title post command: Call root menu"
Depending on the country you live in choose either PAL or NTSC (if you are not sure check back with chapter 3). Check back with your footage and select either 16:9 or 4:3.
For the Audio Format setting choose AC3.
In this Manual we will not cover the creation of individual menus and buttons although we will go into modifying existing templates.
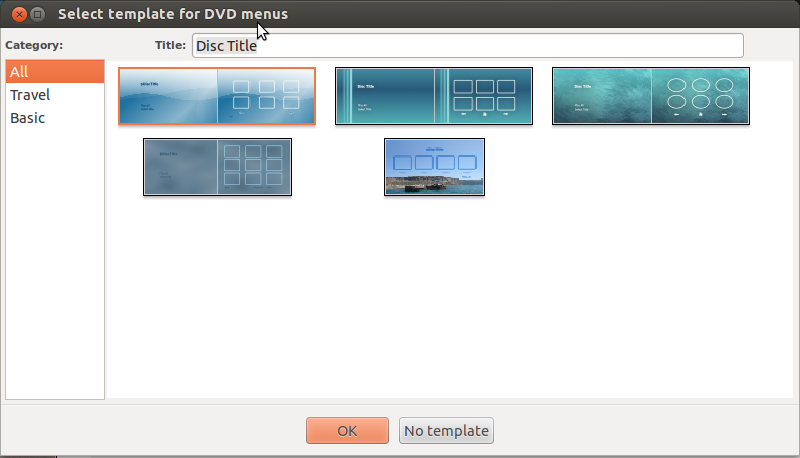
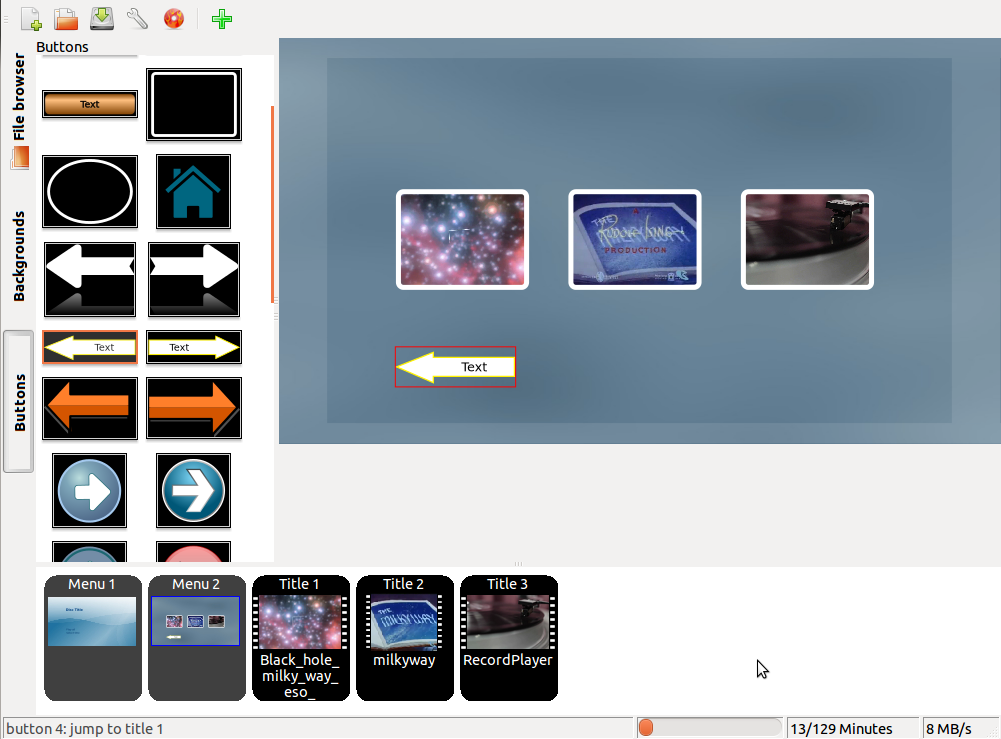
DVDStyler is coming with templates and buttons you can choose from

Lets choose the first menu as you see above.
We have everything in here we want to explore. A Main menu playing all the videos on your DVD, a referral to a second page where you can choose single videos and a back and forward button to navigate in between the two menus.
To add your video files you can either drag them into the space besides the menu-items or press the green + Button and choose your files from your computer.

Doubleclicking on an element opens the properties of the element.
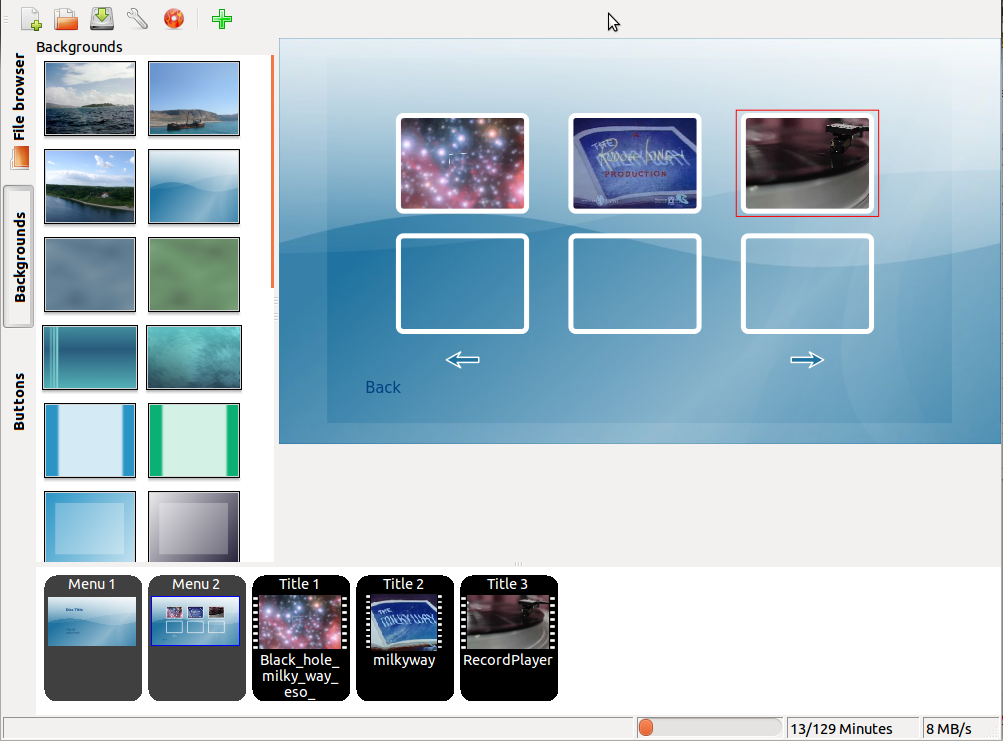
After you imported your videos you see that they are already arranged to your Menu 2

What do we want to learn?
We want to change the background of both menus, enter the name of our DVD, delete unnecessary boxes, move our video titles to the middle of the screen and exchanging the back-button with an arrow.
Lets change the background which is really easy. Select the menu you want to change by clicking on it in the lower left corner and then choose your prefered background from the background menu.
Naming is easy too. Doubleclick on "Disc Title", in the properties menu change the name, font, color as you like.
To delete unwanted items select the item and either hit delete or delete it with the context menu by clicking the right mouse button and choose delete.
Let's delete the lower three boxes in our Menu 2. select the menus by keeping the ctrl-key pressed and hit delete.
To move all our clip items to the middle of our menu select them the same way by keeping the ctrl-button pressed and left-click on them, then right-click > Align > center vertically.
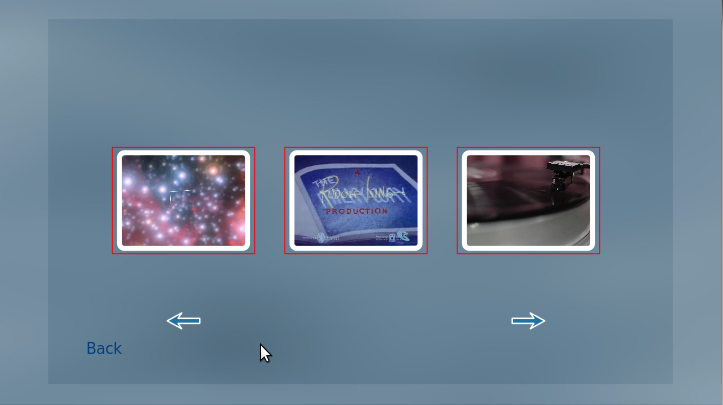
Now your Menu 2 should look like this:

Now lets delete the arrows and the "Back"-Button then go to the Button Menu and choose the nice little yellow arrow with the text inside and drag it into your menu.

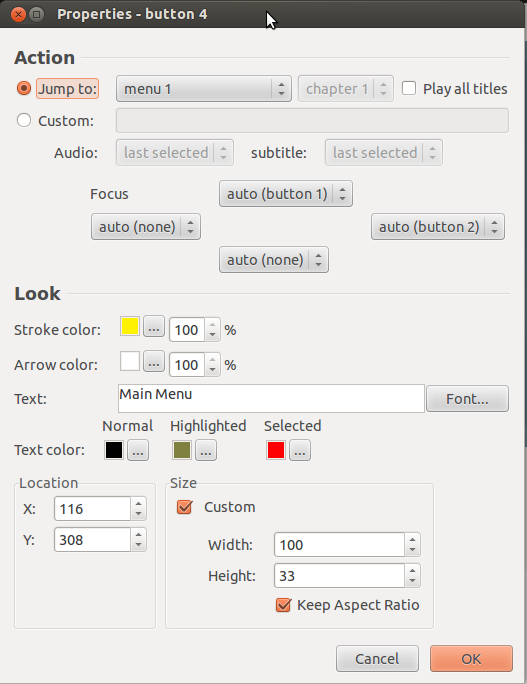
Doubleclick on the arrow in your menu to open the properties of this arrow.
To use the arrow for going back to our main menu (Menu 1) choose "Jump to: menu1". To change the text in the arrow just give it your prefered title in the "Text" field. changing the size of the arrow have a look at the lower part of the window and change the width and height field to your desired size but keep in mind that the size of the text is changing as well.
To keep the proportions of the arrow you might want to check the "Keep Aspect Ratio"

Hit OK and enjoy your menu.
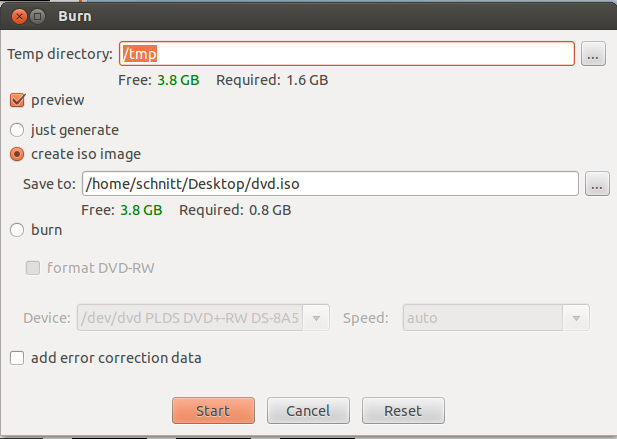
You are really close to your final DVD. Hit F9 or the red DVD-Button to get the Burn-Menu

Now it is up to you if you want to preview your work or burn it straight to DVD.
Congratulations! You learned what different file formats are, how to check that, found out about you DVD specifications and finally make a DVD with different Menus.
- https://upload.wikimedia.org/wikipedia/commons/0/0d/PAL-NTSC-SECAM.svg ^
- http://www.dvdstyler.org/ ^
Hands On - Editing an Interview with Kdenlive
Kdenlive is a Free Software video editing application that works with a large number of different video formats. It is designed for linux but can sometimes be installed on Mac. If you are not able to install Kdenlive on your operating system. You can follow the techniques of this tutorial with most video editing software.
The contents here are an extract of a longer manual called a Guide to Open Source Video Editing using Kdenlive 1. If you are not sure how to install the application of if you get stuck then please refer to the full manual.
Workflow
For this project we will complete the following tasks:
- Import your files
- Top and tail the footage
- Cut out redundant footage
- Trim the fat
- Add a title to identify the speaker
- Add transitions
By the end of this hands-on task you should have a good understanding of how a video editor works and should be able to apply this knowledge to a wide range of other projects.
Import your files
Firstly, make sure all original video files for your edit are in the same folder. This will become your project folder. If you only have one video file, just put the one file in a folder. The folder should have a name that identifies it in a memorable way.

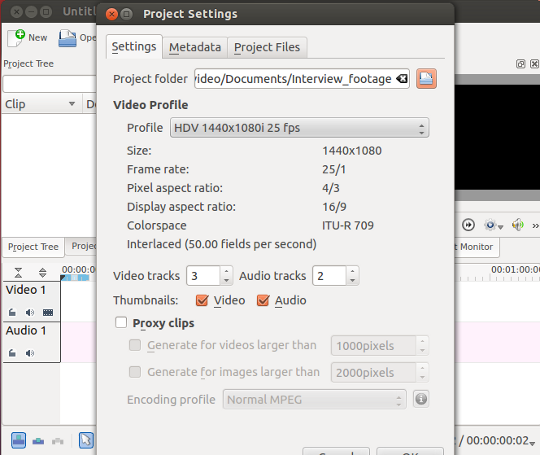
Now open your video editor, and click File > New to make a new Project: make sure you set your Project folder to be the same as where your video files are.

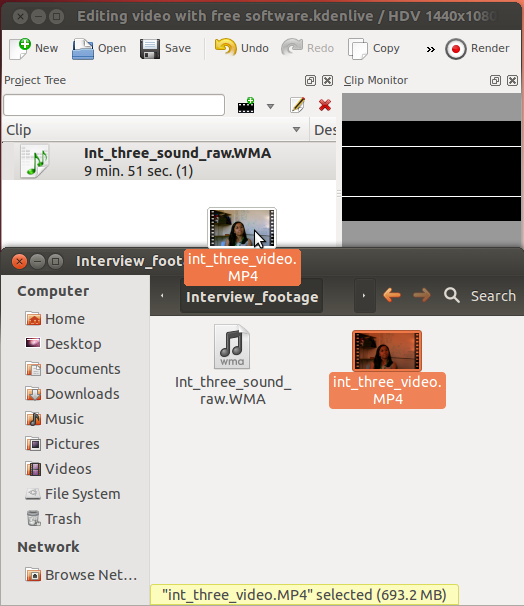
Now you need to import your clips into your project. You can do this by dragging them from your Project Folder and dropping them into the Project Tree.

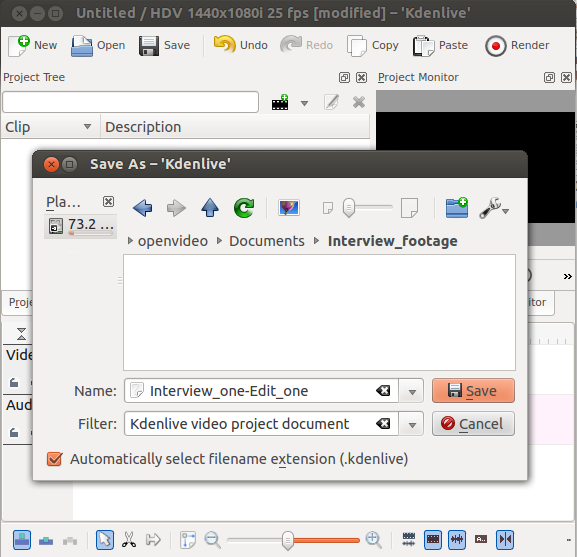
Next, save your edit: click File > Save As and choose a suitable name. This is different to setting the Project Folder: you can have many different edits, in the same Project folder - however, this is your first one, so perhaps name this edit "edit one".

Top and Tail: cut off the beginning and end of clips
You are now ready to start editing. Don't worry, this won't damage your original footage in any way.
Any changes you make to the video clips in the timeline do not affect the original clip. This remains the same on the hard drive, project tree and in the clip monitor window. So don’t worry about not being able to undo anything, you can always start again with the original clip.
At the start and end your video there will probably be a few minutes of waste footage, for example the interviewee and interviewer chatting about the weather or the public transport links to the event. To cut out this material you can follow the guide below.
Adjust your clip
You can shorten your clip by dragging the start or end of the clip inwards. This will remove some of the footage. If you remove too much, simply drag the edge outwards again. Keep adjusting in and outwards until you are happy.

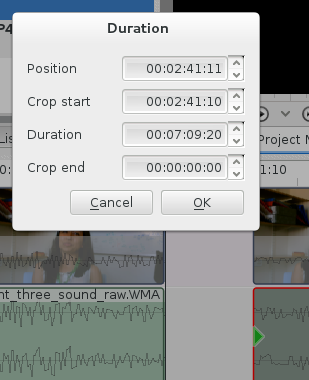
For very fine adjustments, double click on the clip and adjust the clip more precisely.

Cut out redundant footage
Next you need to remove, to cut out, any large areas of the footage that are not required. For example, if there was a fire alarm test in your interview which resulted in several minutes of noise or inactivity, or if the participant contacted you to ask for a redaction of a particular statement or section of statements. You can achieve this by following the guide below
Finding the cut points
With any luck you will have some idea where the problem areas of footage are. For example, you may have an email request such as:
"Hi, to follow up on our video/interview. Can the last question be removed from the interview please, the one where they ask about the time I spent working in Germany. I think its about 20 minutes into the interview. I was really tired and I was really stammering. I don't think I really did the topic justice. Perhaps you could just link to the project website instead?"
To find the descirbed selection use the Project Monitor window to play, forward and rewind your video. See that the position indicator on the Timeline moves along as your video plays: it can be helpful to use the position indicator to guide you when you cut or change a clip.
If you have a rough idea of what time the area to edit out starts, you can navigate to it using the time information located above your timeline or in the bottom right of your kdenlive window.

Remove a section from the middle
To remove a section from within the clip you need to cut it out using the Razor tool, which is located in the tools rack at the bottom of the editor window.

Select your razor tool from the tool rack and click on the place you want to cut, using your position indicator as a guide if you wish.
Next you need to mark the end of the area to remove. Press play till you have found the end point of the section that you wish to cut out, and use your Razor Tool to make another cut.

You have now isolated a section of the video and you can delete it. First, switch back to your selection tool in the toolbar:

Then select the area of your clip that you wish to remove and hit delete on your keyboard. You will now see a blank space in your timeline.

Line them up
Next, drag and drop the remaining so that they line up like one long clip. Make sure the first clip touches the very beginning of the timeline.

Trim the Fat – condense and refine the footage
When people talk in monologue about complex, personal or exciting topics, they often pause to gather their thoughts, repeat the same information in different ways, correct themselves or stammer/mince their words. In an academic setting this information might be kept for analysis, but most of the time the focus is on keeping the attention of your audience, and so this sort of deadweight footage simply must be removed.
There are several ways to approach this. You could first remove larger chunks of repetition, and then run through the footage again to remove over-long pauses, and then once more to remove any stammering or self-correction. You could, on the other hand, simply do all of these edits at once and aim for 100% condensement on only one run through the video.
Avoid manipulation
Be aware that there can be a fine line between removing excess words and changing the meaning of what is said. There is a nice guide here to what is acceptable: http://j-source.ca/article/ethical-guidelines-editing-audio and below is a condensed list of what may be unnaceptable taken from this wiki: http://tvtropes.org/pmwiki/pmwiki.php/Main/ManipulativeEditing
- Creating a relationship between two unrelated events or quotes, or manipulating the timing of events (order switchting for example);
- Cutting out the buts and excepts that would otherwise soften a statement;
- Cherry-picking scenes to show the individual in a poor light, especially when the context is removed;
- Causal deletion, for example, showing someone who is angry without showing the cause of the outburst;
- Hiding the interviewer when they have asked a very pointed question which the interviewee may not have otherwise talked about;
- Adding music which changes the mood dramatically.
How to trim the fat
The skills taught in the previous two sections should provide you with most of the tools you need, particularly the two points which are repeated below:

"Select your razor tool from the tool rack and click on the place you want to cut, using your position indicator as a guide if you wish. Next you need to mark the end of the area to remove. Press play till you have found the end point of the section that you wish to cut out, and use your Razor Tool to make another cut.You have now isolated a section of the video and you can delete it. First, switch back to your selection tool in the toolbar. Then select the area of your clip that you wish to remove and hit delete on your keyboard. You will now see a blank space in your timeline."
And for the fine tuning, for example cutting out the beginning or end of a word. If your new clip is not quite the right length, you can change it by dragging the edge of the clip left or right. For very fine adjustments, double click on the clip and adjust the clip more precisely.

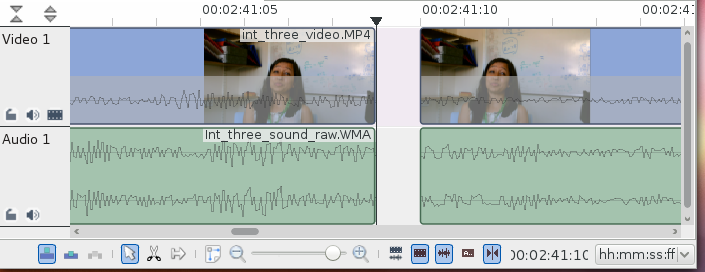
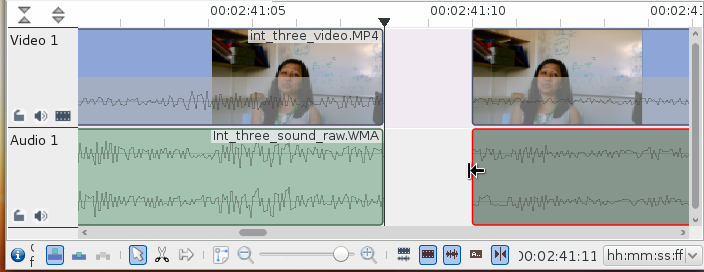
This part is the most time consuming and fiddly part of editing an interview. If your interview is a fast talker, you may have to go over the beginning or end of some cut points many many times before you can get a natural sounding break in the speech. Zooming in using the zoom level slider may help, you may be able to see the sound you are trying to remove in the waveform. See the screenshots below for an example:


Hands on: identifying a speaker with titles
In this task, you will identify the interviewee using a title, showing their name and position/organisation for a few seconds as they start speaking. It is a quick and simple method of introducing them, and so focus remains on their message.
First, right click in your Project Tree and select Add Title Clip

You will now see the Title Clip editor window.

If you see a grey and white squares, this means that the background of the slide is transparent, which is correct for this task because we will need to see the video footage beneath the title. If you do not see transparency, you need to change the opacity of the Background to zero.

Next, create your text by clicking on the T button. If you do not see all the buttons displayed in the image below, try expanding the title editor window to full screen.

Click somewhere on the transparent are and type the name of your interviewee - there may not be a spell checker so proof read things carefully.


You can adjust the size and colour of the text using the menus, and move it by drag and drop. Use a new text box (by clicking T again) for each new line or phrase.

Next, to improve the visibility and style, add a shadow to sit behind the text.

You can do this by clicking the Add Rectangle tool.

Finishing up
Before you render/export your edit into a whole new video you need to check that there are no gaps between cuts, all the clips should be lined up so that they are touching each other. You could also consider adding a titles or a slate at the end with your name on as editor, the logs of any organisations involved and the licence that you wish to release your work under.
Rendering
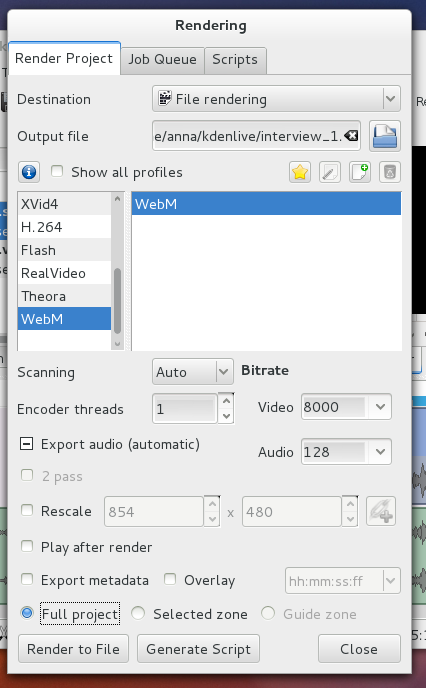
Rendering is the process where Kdenlive takes your edits and creates a new video file that can be viewed with other programs. When you are ready to export your video so you can, for example, upload it to the internet, you need to click the "render" button.

On kdenlive there are plenty of presets to make this rendering process simple. Try choosing the WEBM profile. You should give the video a name, and if you want to, you can ajust the size of the video (smaller videos make smaller files).

Use VLC to Stream Video
Video Lan Client (vlc) is a versatile program that does not only allow you to view video files, but also allows you to publish your live stream to the internet. VLC media player is relased under the GLP-2 and LGPL licences. In this task you will learn how to use vlc to stream the live video from your webcam to a streaming server on the internet.
What is streaming
A video file is like a bucket of water, a fixed amount of video content, while a stream is more like a water tap, it flows from the moment you start it, to the moment you stop it. This analogy also holds for actions like replaying, if you do not fill the bucket, save the stream to a file, your water or video is not replayable. You need streaming if you want other people to see your live event.
What do I need
For streaming you need:
- A streaming server; You can setup one yourself, but for this task we will be up-streaming to giss.tv, a free streaming service for personal or non-profit use.
- A capturing source; for this task we will use the built-in camera of your computer, but other cameras or even a file can be a source too.
- A stable internet connection, as you are sending the video data over this connection it needs to be good, otherwise your viewers might see freezing images or nothing at all.
Where to publish to
For this excercise we will be publishing to giss.tv, a free streaming service for non-profit and personal use. You can of course also use other services. This manual can be used with any service that is built on the icecast2 streaming server, for other servers small adjustments are needed, these are pointed out below.
To use giss.tv you first have to create an account.
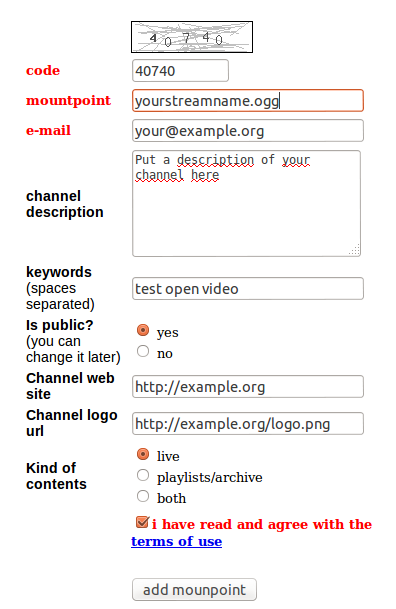
1. Go to the website giss.tv and halfway the page click on "Create your channel" you will be presented with a form. Below we will describe the meaning of the values and what to fill in.

- code: this is just a code to make sure you are not a computer, try to read the code in the image on top and put it here.
- mountpoint: this is the name of your stream, you can choose your own name here, but it has to end with ".ogg"
- e-mail: an activation mail will be sent to this address, make sure you do not make a typo.
- channel description: give a description of your channel here
- keywords: a way to index the channel, use words to describe your content.
- public: whether or not it shows on the giss.tv site (not public does not mean private!)
- Website: you can point to your website here
- logo url: you van point to a logo image for your channel
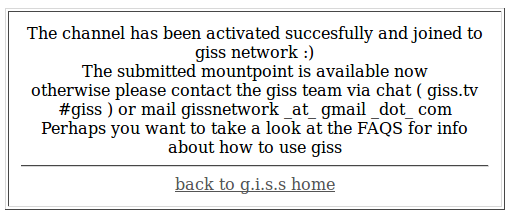
Read and accept the tems of use and click the button "add mounpoint" (sic). The next screen will tell you a mail has been sent to your e-mail adress. Open the mail and click on the activation link, if all went well the following screen should appear in your browser:

Congratulations, you are now ready to set up vlc to up-stream your event to the giss.tv streaming server.
Capturing your cam
To stream something you need to have a source (just like in the water example above), For this task we are going to use your webcam as a source, but most things that can produce video can be used, this includes dv-cameras, tv-cards, or even video files.
Your webcam itself produces a stream, this video stream is usually just sent to your screen, or if you are videochatting to the person on the other end. Now we need to connect it to the giss server, so giss can serve it. The program we are going to use for this is vlc.
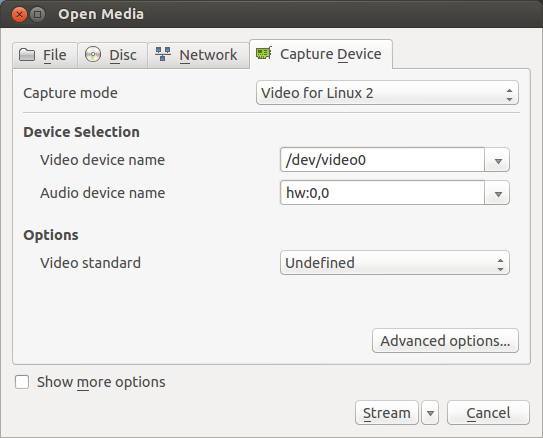
Open vlc, go to the "Media" menu and select "Open Capture Device" you will be presented with the following menu:

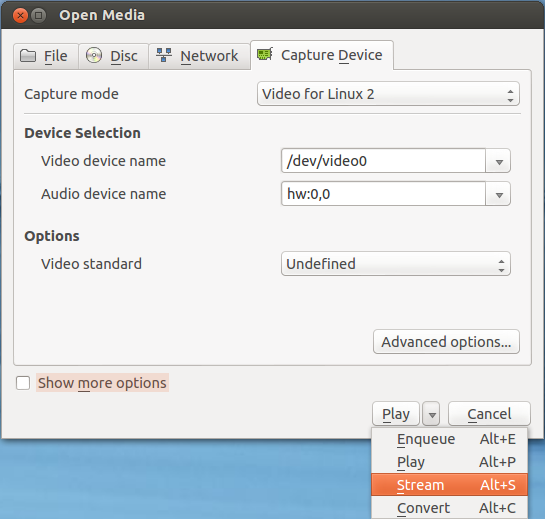
Use the dropdowns to select your video and audio device, typically ther will be one of each, if it lists more you can select play on the bottom of the dialog to test if you get the desired output to your screen. If it does, just reopen the "capture device" dialog.

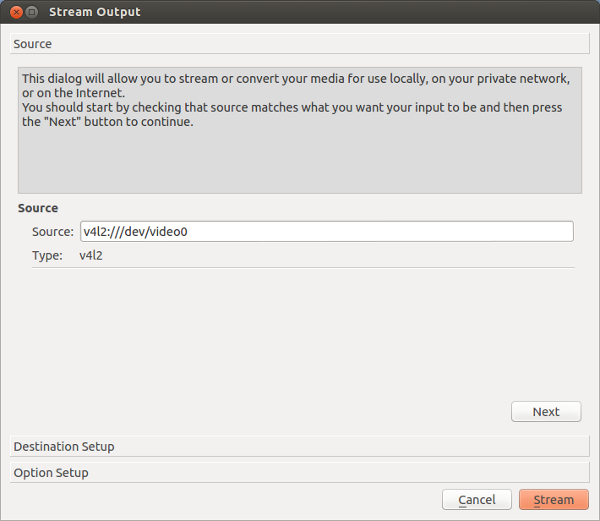
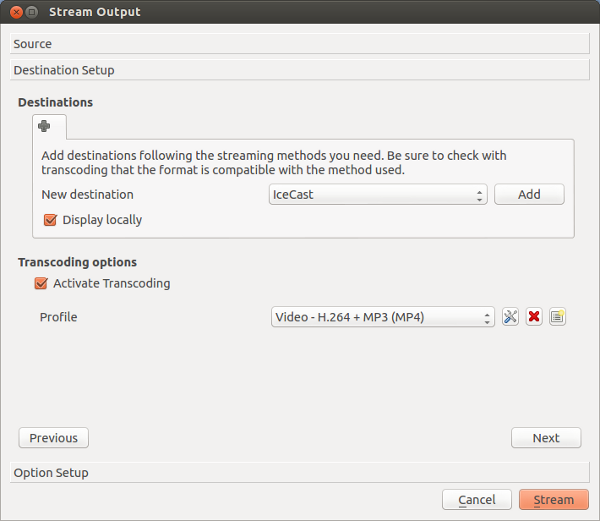
If you are satisfied with the selected options use the dropdown arrow on the bottom of the dialog to select that you want to stream the output rather than put it on your screen. You will be presented by the "Stream Output" dialog:

The source is already correctly filled in, so you can just click next:

If you want to see the stream on your screen "Display locally" this will let you view the stream as it is sent to the streaming server. Next, select IceCast for the "New destination" and click the add button:

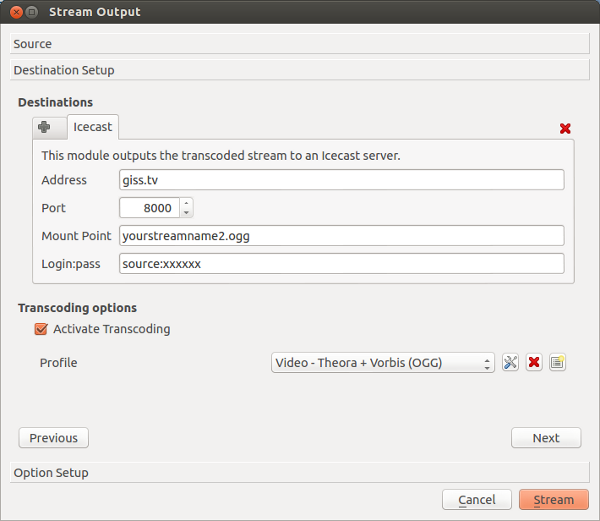
A new tab presents you with the fields required to connect to the server. The information can be found in the activation mail you received earlier. You have selected your mountpoint when creating the account. the login name is separated from the password by a colon ":"
Your webcam delivers the video in a format that the streaming server does not understand, that is why we have to 'transcode' it, change the internal format to something the streaming server understands. The giss.tv server uses Theora(video) + Vorbis(audio). These formats are open, which means nobody has to pay a license fee for them.
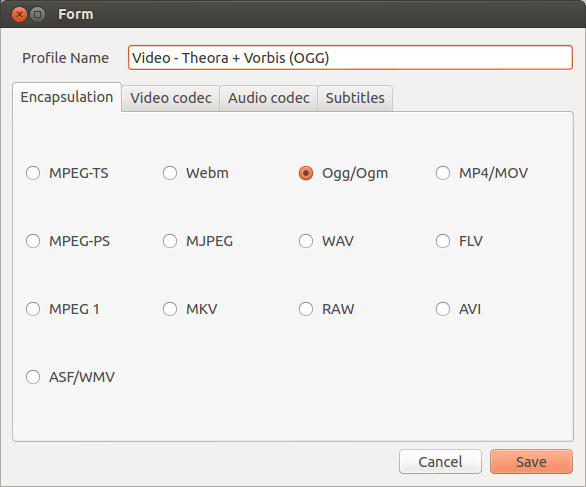
Select Theora + Forbis as profile and click on the tools button next to it, this gives the next dialog:

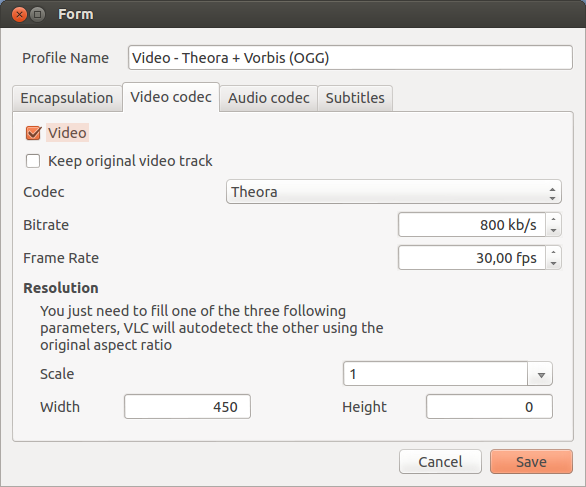
We do not need to change anything here, just click the "Video codec" tab to adjust the video settings:

This screen defines the size and quality of the streamed video.
Bitrate: this defines the quality of the image, but also the capacity that is needed on your internet connection. be aware that you are sending data from your computer to the internet, so it is not your download rate but your upload rate that counts. Most consumer lines have considerably slower upload speeds. If you do not know your upload speed you could use one of the online speed tests available, just google "speed test".
If your upload speed allows it, setting this value to the default of 800 kb/s should be file for a built-in webcam. Be aware that 128 kbps is added for the sound channel.
The resolution, this is the size at which the video is shown, for a webcam you can generally leave this without changes, otherwise you can just change one of the fields to the desired size.
Hit save when you are done. You will be sent back to the "stream output" dialog. Every thing is set here so you can just click "stream". Depending on your earlier choice you will see a black vlc window or you will see the stream as it will be sent to the server.
Connect your webbrowser or another VLC to your stream (http://giss.tv:8000/yourstreamname2.ogg in the example) and you should see the stream. There will be some delay as at every stage there is a buffer to make surre there are no interruptions in the video output.
Hands-On: Transcoding with FFmpeg
Create an MPPEG2 file for a DVD
In this part, you will find out how to encode in MPEG2, the format for the dvd authoring.
The DVD use the compression MPEG 2. The size or the resolution of the picture is 720x576 in a frame rate of 25 frames per second for Europe and for USA it is 720x480 in a frame rate of 29.97 frames per second. The aspect can be in 4/3 or 16/9. The total bitrate is at maximum 9800 kb/s. Generally, the video bitrate is 8000 kb/s and the audio 1536 kb/s. The rate of compression depends of the duration of your video. You have to adapt the quality of your compression with the size of the memory of your optical support in this case the DVD.
Stay with your Terminal or Konsole, we'll use FFMPEG for this in the first case. Why? Because FFMPEG has a preset for that and becuase FFMPEG is published under a GLP licence. The method is very simple. Call FFMPEG, choose your video to encode, call the preset to encode for a DVD and name your new file media in MPEG2 format that will be generated.
ffmpeg -i your_video.mp4 -target pal-dvd your_dvd.mp2
And validate by Enter on your keyboard. The processus of encodage is starting. It will take a certain time.
Some basics commands can refine your project, change the letter x by your own value ;
- -b xxxk to define the bitrate of your video codec
- -ab xxxk to define the bitrate of you audio codec
- -aspect x:x to define 16/9 or 4/3
Create an DV Avi file for Video Editors
To create a DV avi type 2 that is understood by video editing applications like Premiere and Windows movie maker we can use the first transcode to create a normal .dv file.
ffmpeg -i yourfile.MOV -target pal-dv -aspect 16:9 -y newfile.dv
You can then follow this up to make it conpatible as a 'microsoft dv avi' by adding a fourcc tag "dvsd" which identifies it as a 'microsoft' dv file and changing the file extension.
newfile.dv -vcodec copy -vtag dvsd -acodec copy -aspect 16:9 -y newdvfile.avi
There may be a way of doing all of this in one line, but I don't know how to do this yet.
Batch Encoding
If you want to do this for more than one file in a directory then you can create a short command line script to do this. Try it out to see how it works.
for file in *.MOV;do ffmpeg -i "$file" -target pal-dv  -aspect 16:9 -y "$file.dv";done

for file in *.dv;do ffmpeg -i "$file" -vcodec copy -vtag dvsd -acodec copy -aspect 16:9 -y "$file.avi";done
Using Plumi to Upload a Video
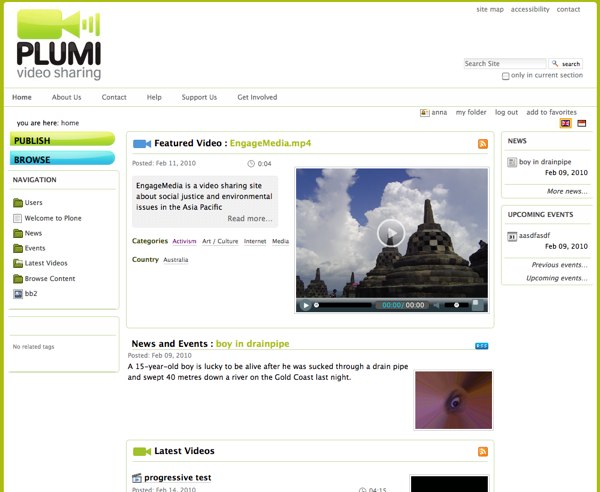
Plumi is a Free Software Content Management System designed for video-sharing, based on Plone and produced by EngageMedia. Plumi enables organisations to create video-sharing sites. Advanced features include video podcasting, support for open video files, embedded playback, open content licensing, a sophisticated publishing workflow and large file uploading via FTP.
You can also utilise many of Plone's other built in features including news, events, comments and user profiles. These features allow a more community based approach to sharing video and are suited to supporting peer communities and grass roots movements.

The following guide will take you through the process of registering and publishing a video to Plumi. At the time of writing you can use the plumi demo website at - http://demo.plumi.org
Getting Started
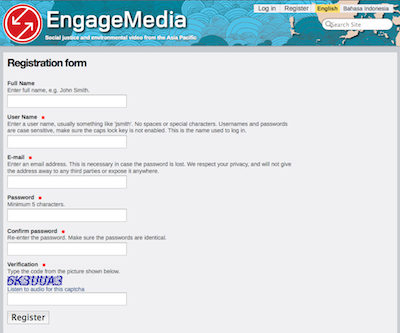
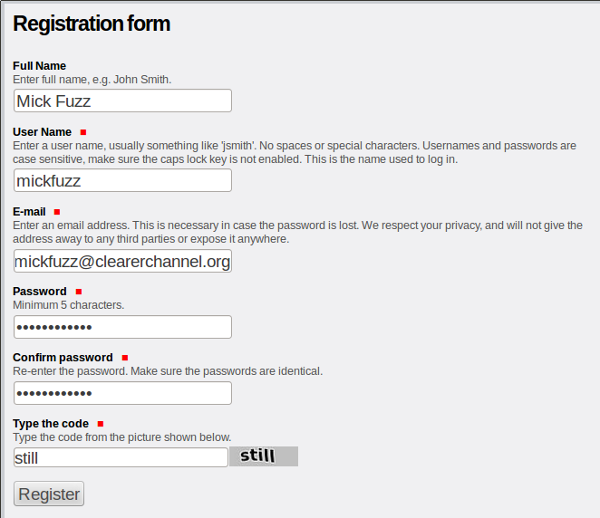
At the front page click on the register link on the top right of the page and fill out the registration form.

Publish Video Steps
To publish a video you must have registered, and must be signed-in.
Note: it may take a while to upload your video, depending on your internet connection, so please be patient. Also your video will not be published immediately - the default set up of a Plumi site is for new contributions to be moderated by site reviewers. After the content is reviewed you will be notified via email. You will not be able to edit the video unless you retract it.
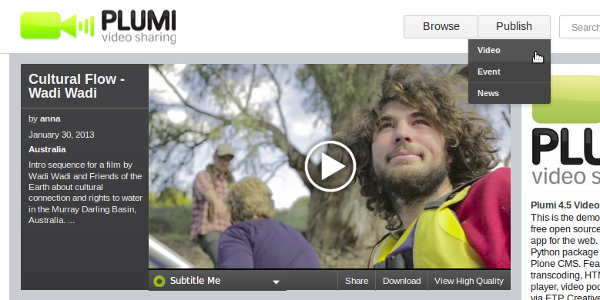
Click the Publish button at the top of the page.

Step One
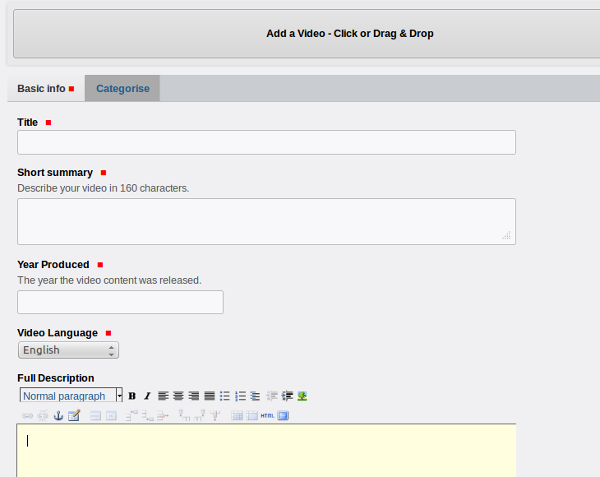
Add a video by clicking on the grey bar at the top, or dragging a video file onto it.
Then fill out the information in the Basic info Tab.
Add a Title, Short summary, Year Produced, and a Full Description of your video.

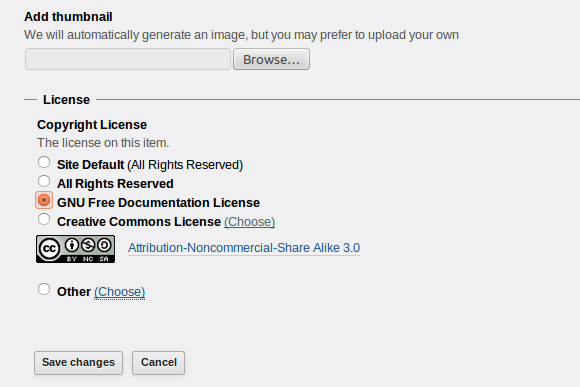
Add a still from your video or an associated image and choose a suitable licence.

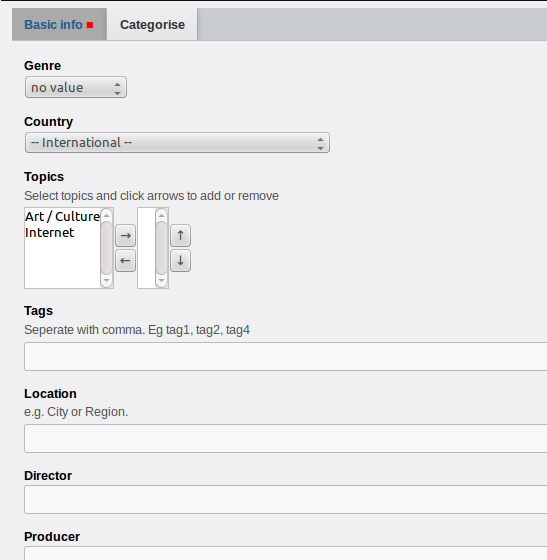
Now go back up to the top and click on the Categorise tab.
Fill out the information in this form. This will really help people to find your video, and make the browsing of the video sharing community a much better experience.

Now Click on Save Changes at the foot of the screen.
Your video will now go into the pending content state, awaiting publishing by a Reviewer or Manager (it will not be available within the site, for example on the front page, until it has been moderated).

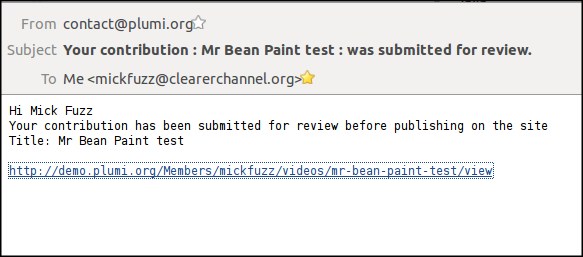
You may recieve an email to confirm your submission.

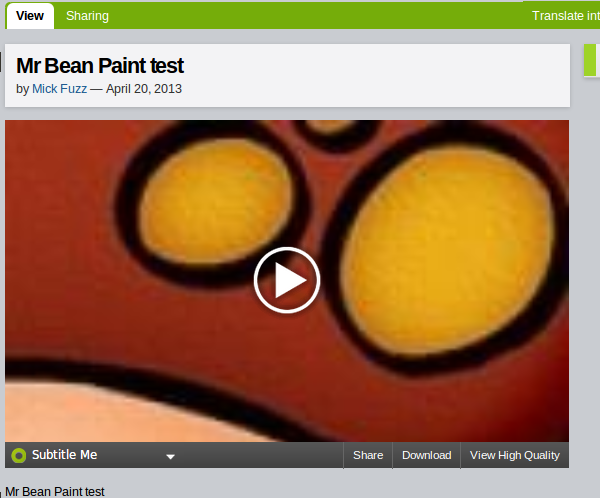
When it is approved, which is immediately on the demo site then clicking on this link will bring you to the View page of your uploaded video.

Sharing and Downloading
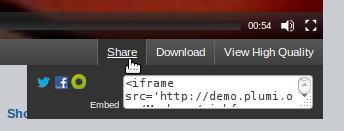
You can see that there is the ability to add Subtitles to the video using the Amara systems and that the Amara player also allows the ability to share via social networks, and by embedded in blogs / websites.

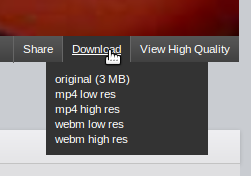
It is also easy to download the video file. You can grab the original video or choose from different quality versions of mp4 and the open format Webm.

Video Conversion: Using a Graphical User Interface vs Command Line
Over the past decades, video creation and distribution have become available to everyone. Moving from analog to digital recording devices has multiplied possible ways to create and distribute video. Whether you want to share your creativity and your creations on a physical medium (DVD) or via streaming, you should take a look at this chapter.
The chapter focuses on the compression/decompression file formats used by different cameras, video players, and editing software. A large variety of formats exist, some are current and still being used, others might have become obsolete, and you may never have even heard of them before. Most major media companies are members of the MPEG Consortium, so you might be familiar with the different versions of the MPEG format. But it is easy to be confused - MP3 is not version 3 of MPEG, for example, but a subchapter called "layer 3" of the "MPEG 1" standard.
We compare and contrast two tools. One is called VLC, an open-source cross-platform multimedia player and framework, which can also stream audio and video in a number of formats. The second is FFmpeg, an open source cross-platform solution to record, convert and stream audio and video. While VLC has a graphical user interface (GUI), FFmpeg uses a command-line interface, i.e. a text-base interface where the users enters commands. As a developer, you are already familiar with text-based interfaces and can draw on this experience as you work with open video. If you have never used a command-line interface, this is your chance to try it out and find out more about the code work underlying file compression.
The first things to do is to analyse your footage. This process indicate some important things to consider.
- Is this the same size of picture, is this full HD, HD, SD, web size ?
- Is this the same aspect, is this 4:3, 16:9, 21:9... ?
- Is this the same frame rate, is this 24 images pers second, 25/s, 30/s, 60/s, 120/s... ?
- Is this the same process of compression for video or audio, is this format, MPEG version, AVI, MOV, Webm...?
- Is this drastic compression in consequence many informations are missing or a high quality compression ?
- An if you are an adept of speciale effect the depht color is a chart of quality ; 4.2.0, 4.2.2, 4.4.4 ?
- Is this the same ideas of arts, another footage for an artistic cohesion, i don't think that VLC and FFMPEG can help you... Sorry
They are all the basic questions that you have to know about your footage.
How to analyse your footage :
By detecting the codec, the size of your image, the frame rate, the depht of color, the bitrate, you can improve your understanding and critical vision of codec quality. There are so many fromats from diffrent types of hardware, software and Operating Systems, you eventually have to juggle different formats and codes and perhaps some more exotic types.
To answer at the differents questions about the quality of your footage, size, aspect, framerate... you can use VLC. Open your footage with this tools, or drag on drop it on VLC to read it.

To be informed about the informations that contains your file and go to the Menu/Tools/Codecs information.

As you can see at the screen capture above showing codecs information, this footage contains two codecs for the compression video and the other for the video. Two methods of compression because by their nature, light for images and sound for audio are differents in our cerebral process of perception. This two compression are synchronised in a container the format, named by the extension of the file name.
There are two kinds of containers those who incorporate only the audio and video flux and those who contains chapter for navigation, subtitles, multilanguage choice... for authoring DVD, BluRay, for this last containers please see the chapter Hands on - DVD. This last container is called a Wrapper.
You know probably this wrapper format : QuickTime, MKV from the opensource project Matroska, VOB for the standard version MPEG2 for DVD and MXF from the MPEG Consortium.
For the traditionnal containers, you know certainly the AVI file format and ASF from microsoft, MPEG1, MPEG2, MPEG4 or MP1, MP2, MP4 from the differents version of MPEG consortium, in generical termes MPEG, Mov from Apple qnd for the professionnals some of these : AVC-Intra and DVC-Pro from Panasonic, DV and XD-Cam from Sony...
So differents containers who in theory can encapsulated differents kinds of codecs audio and video. Before to see what is a codec and how does it works. We have to response at the principals questions listed in the introduction. In fact the codecs information of VLC give us the responses.
For this example ;
- The size of picture is this full HD : resolution by 1920x1080
- The aspect : information is missing, aaaaaargh !
- The frame rate : 30 images per second
- The type of compression for video is MPEG4-AVC layer 10 called H.264
- The type of compression for audio is MPEG4 layer 3 called AAC (Advanced Audio Codec)
- The quality of the compression defined by the bitrate : information is missing, aaaaaargh !
- The depht color is standart for the diffusion ; 4.2.0
- Artistic cohesion ? effectively, no informations.
As you can see VLC gives most informations that can help us to define the different footage. Now, take a look about FFMPEG. For this you need the Terminal or Konsole software, for that in Ubuntu plateform searche with tehe dashBoard the Terminal and open it. Then, you type in it FFMPEG to call the application and the command -i for input. Like this : ffmpeg -i and drag and drop you file media or indicate the location of your file media.

Now, we've got the same informations, but it's more precise, ffmpeg indicates the quality of compression for video 9414 kb/s and for audio 36 kb/s, the total for the footage is also indicated 9459 kb/s
It gives also the duration of the footage : 00:09:46.26 that you can read like this : 00 hour:09 mn:46 sec.26 pictures/30.
FFMpeg uses in fact three different timestamps in different bases in order to work.
- tbn = the time base in AVStream that has come from the container
- tbc = the time base in AVCodecContext for the codec used for a particular stream
- tbr = tbr is guessed from the video stream and is the value users want to see when they look for the video frame rate
The information about the aspect of the film is given by the DAR, in this case : 22/9.
The PAR indicate the pixel ratio. The pixel can have differents dimensions, if this dimension is different of 1/1, we speack about anamophic
Now with this two methods, you can classify your footage and have an approach of your flux of production before editing your video.
Transcoding with the preset MPEG-4
Current presets in descending order of speed are: ultrafast,superfast, veryfast, faster, fast, medium, slow, slower, veryslow, placebo. The default preset is medium. Ignore placebo as it is not useful You can see a list of current presets with -preset help, and what settings they apply with x264 --fullhelp.
You can optionally use -tune to change settings based upon the specifics of your input. Current tunings include: film, animation, grain, stillimage, psnr, ssim, fastdecode, zerolatency. For example, if your input is animation then use the animation tuning, or if you want to preserve grain then use the grain tuning. If you are unsure of what to use or your input does not match any of tunings then omit the -tune option. You can see a list of current tunings with -tune help, and what settings they apply with x264 --fullhelp.
Another optional setting is -profile:v which will limit the output to a specific H.264 profile. This can generally be omitted unless the target device only supports a certain profile. Current profiles include: baseline, main, high, high10, high422, high444. Note that usage of -profile:v is incompatible with lossless encoding.
As a shortcut, you can also list all possible internal presets/tunes for FFmpeg by specifying no preset or tune option at all:
ffmpeg -i input -c:v libx264 -preset main -tune film dummy.mp4
Exchange with Apple Final Cut User
The ProRes codec is the product for the tools of editing video for the apple users. FFMPEG have some preset to share with them video files.
-vcodec prores
-acodec pcm_s24be
-vf setdar=4:3 ou 16:9 (Aspect)
-profile 0, 1, 2 ou 3
0 : ProRes Proxy
1 : ProRes LT
2 : ProRes 422 for SD (High Frequence)
3 : ProRes HQ for HD (Low Frequence)
ffmpeg -y -i '<inputfile.avi>' -vcodec prores -vf setdar=16:9 -profile 3 -acodec pcm_s24be '<outputfile.mov>'
Exchange with Avid user from Digidesign
The DNxHD codec is the product fort the tools of editing video for the Avid users. This is a simple command line that you can arrange if needed.
ffmpeg -y -i '<inputfile.avi>' -vcodec dnxhd -vb 185000k -acodec pcm_s16le '<outputfile.mov>'
You can add :
- To give interlaced video : -top 1 -flags +ilme+ildct
- To give dnxhd intraframes : -qscale 1 -qmin 1 -intra
Exchange with an uncompressed video file, RAW video file.
ffmpeg -y -i '<inputfile.avi>' -vcodec rawvideo -pix_fmt rgb24 -vtag 0x20776172 -acodec pcm_s16le '<outputfile.mov>'
Hands on - Using Popcorn Maker
The Popcorn Maker Tutorial
Objectives
Get a feel of the Popcorn Maker editor and understand how timelines, media clips and events work.
Task
On the Popcorn Webmaker site there's a great tutorial to get started. The tutorial is easy to understand and gives a clear overview of what it does and gives some hands on examples of enhancing video with elements from across the web.

Crafting your own Popcorn Maker experience
Objectives
Express your creativity in Popcorn Maker by making your own enhanced video experience.
Task
Had a look at the Popcorn Maker tutorial? Great! Now let's get creative! In this task you'll create your own dynamic and interactive time-based video experience.
Go to the Popcorn Maker home page and click 'Start a project':
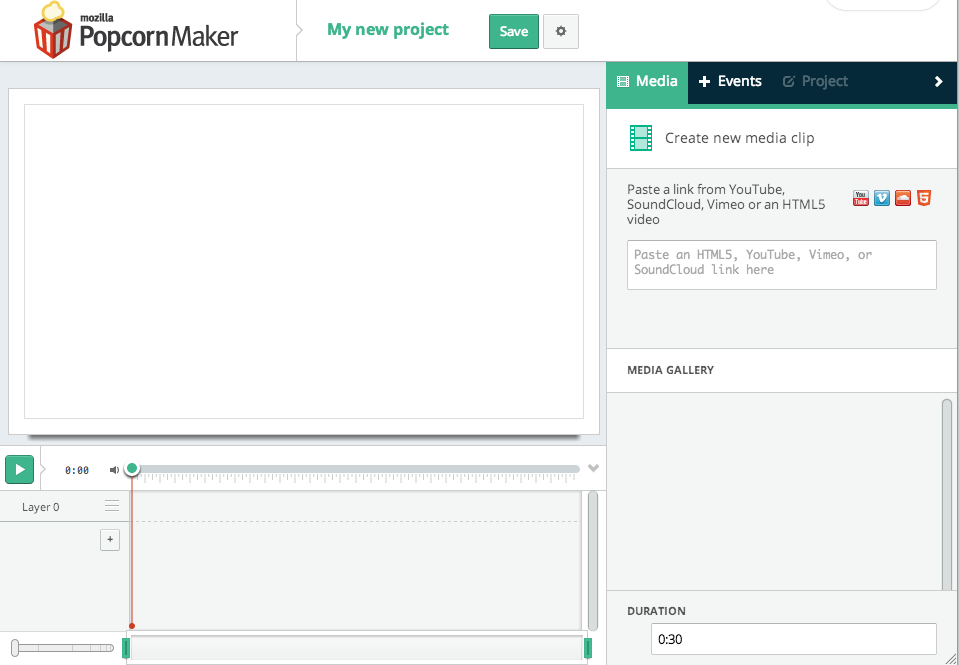
This gives your a fresh blank timeline to be filled with video and time-based web elements:
Choose a video about a recent event that is hosted somewhere online, either YouTube, Vimeo or somewhere where you have access to the source file (like you're own server or www.archive.org). Add it as a media clip to the Popcorn Maker editor and enhance it with at least 3 different kinds of events.
If you're unsure about how to use the different components of the editor, play around and try things out or have another look at the
Popcorn Maker tutorial.
Matching Events in Popcorn Maker and Popcorn.js
Objectives
Understand how events you've created in Popcorn Maker, correspond to events in the underlying Popcorn.js JavaScript code.
Task
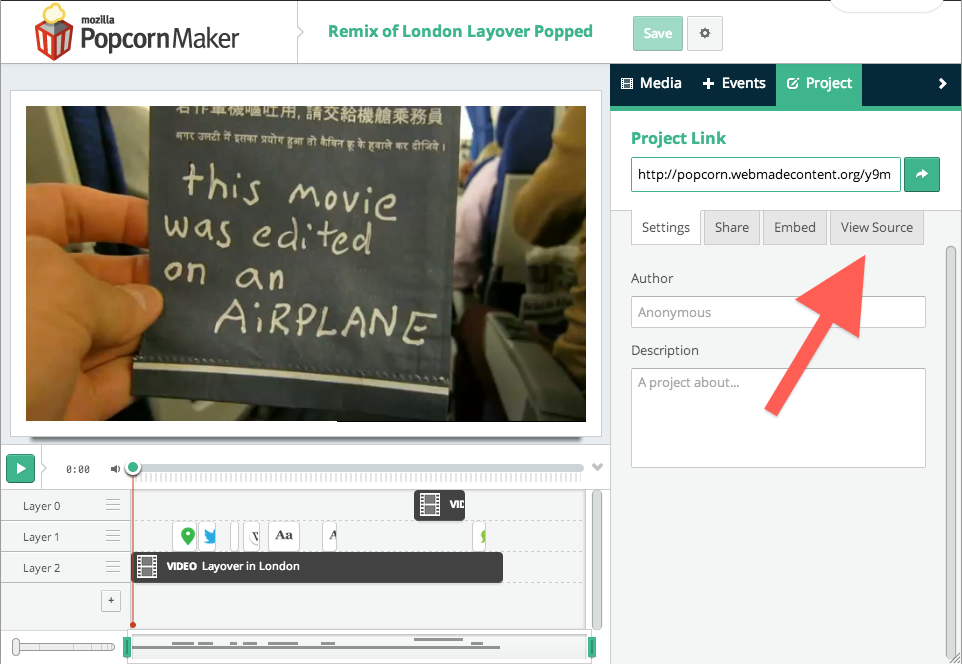
Take a project you've created in Popcorn Maker that includes at least 3 different types of events. Save your project (you need a free Mozilla Persona account for this). Now go to the 'Project' tab (next to the 'Events' tab). This is where you can adjust settings, share your creation, embed your project or view your project's source. This is what we're doing in this task.

Select 'View Source'. This opens up a new window that contains all the underlying HTML and JavaScript code that powers the project you have just created. Looking at the source code for the Popcorn Maker project allows us to start to think about coding Popcorn ourselves. For now, try to identify the parts of code that represent the 3 different events you have created in Popcorn Maker. Which types of event are they? Have a look at their parameters (like 'start' and 'stop' time code), do they match those of the events in the Popcorn Maker editor?
Hands on - Using Popcorn.js
Getting started with HTML
Objective
Learn the basic structure of a web page and how to include an image
Background
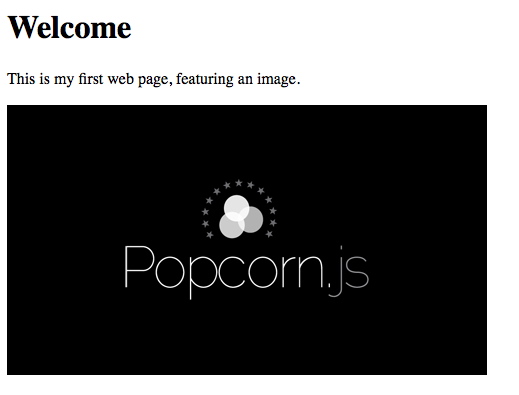
HTML stands for HyperText Markup Language and is the basis of almost every page on the internet. For example, if I were writing the homepage to my website, I might start with something like:
<!DOCTYPE html>
<html lang="en">
<head>
<title>My Web Page 1</title>
</head>
<body>
<h1>Welcome</h1>
<p>This is my web page, featuring an image using the img tag.</p>
</body>
</html>
A web browser (Firefox, Chrome, Internet Explorer, Opera, Safari, and others) converts this HTML into a page with a header, a paragraph and an image.
Task
You can see how the above example looks at: http://jsbin.com/odemem/latest. Click 'Edit in JS Bin' on the top right to see and edit the HTML source code in an online text editor.

Let's make that a little more personal.
Find an image that exists somewhere online and copy its URL. For most images online, you can right click the image and select 'Copy Image Location/URL/Address' (in Firefox/Chrome/Safari). Now back at the jsbin page, change the src URL of the img tag (the text between quotes after "src=") for your image's URL. See the change in the preview on the right? Nice one! You've now got a web page displaying your own custom image!
Including video in HTML5
Objective
Learn how to include video in a web page the open standard way with HTML5
Background: <video> in HTML5
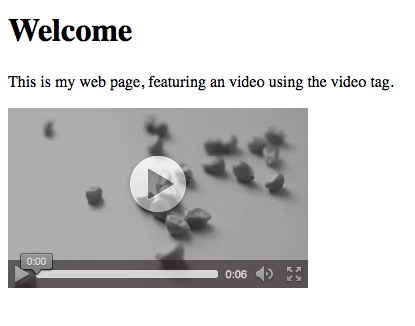
The possibility to include images via the <img> tag in HTML pages was added in 1993. Many years later, discussions started about adding video support, which have now resulted in the <video> tag as part of HTML5. HTML5 is a set of new tags and functions for HTML that has been in active development since 2008 [http://en.wikipedia.org/wiki/Html5]. Open-source web browsers were the first to explore running audio and video on their own, inside new <audio> and <video> tags. This makes it possible to access and edit the media directly, make your page interact with the video, create different-shaped frames, and many other cool tricks.
<!DOCTYPE html>
<html lang="en">
<head>
<title>My Web Page</title>
</head>
<body>
<h1>Welcome</h1>
<p>This is my first web page, featuring an image.</p>
<video height="180" width="300" id="ourvideo" controls>
</video>
</body>
</html>
Task
Have a look at the this page at: http://jsbin.com/agecem/latest and hit 'Edit in JS Bin' again to access the source. See how the <video> tag has the attributes "height" and "width", set to 180 and 300 pixels respectively? Change the values between quotes to modify the dimensions of the video element. Try making the video twice the size. Got it showing up correctly in the preview on the right? Cool! You are getting in control of your video the HTML5 way!
Using popcorn.js to add a time-based footnote to your HTML5 video
Objective
Learn how to include the popcorn.js library in your web page and use its functionality via plugins
Background: The Popcorn Project
Popcorn is a project developed by Mozilla that includes a JavaScript library that lets you use the <video> tag to create time-based interactive media on the web. The project aims to bring together filmmakers and web developers by letting them merge their technologies. Popcorn has good documentation and lots of tutorials online to get started at a not too technical level.
With the popcorn.js JavaScript library, you can make things happen like: 10 seconds in, show a map of Paris; 20 seconds in, show my Flickr photos; add subtitles that can be translated to the viewers' language and a lot more! These kinds of things are called "events" and are represented in JavaScript code.
Here is a simple example of how we can extend the previous example to a expanded video experience. Notice how, besides the <video> tags, we also include a <div> with the id of "footnotediv", which is where we'll display a footnote on a particular moment in our video.
The first step to use the popcorn functionality is to include the popcorn.js library. This is what we do on line 8 in the code below.
What follows is a block of JavaScript code between <script> tags. Line 12 starts a statement that wraps around the popcorn code to make sure it is run when the web page has loaded. The first piece of popcorn code is line 15, where we create a popcorn instance that takes the id of the HTML video element.
The next part from line 18 results a specific time trigger. Using the variable "pop", we add a footnote using the footnote plugin. Between the curly brackets ( '{' and '}' ) we specify the essential parameters that are necessary to display the footnote correctly (to find our about which parameters are required, have a look at the Popcorn plugin documentation [http://popcornjs.org/popcorn-docs/plugins/ Here we choose to display the text "Pop!" inside the target with the id "footnotediv" from second 2 until second 6.
The final piece of code uses the 'play()' method to start playing our popcorn video as soon as the web page has loaded.
<!DOCTYPE html>
<html lang="en">
<head>
<title>My Web Page 3</title>
<!-- load in the popcorn.js library -->
<script>
// ensure the web page (DOM) has loaded
document.addEventListener("DOMContentLoaded", function () {
// add a footnote at 2 seconds, and remove it at 6 seconds
pop.footnote({
start: 2,
end: 6,
text: "Pop!",
target: "footnotediv"
});
// play the video right away
pop.play();
}, false);
</script>
</head>
<body>
<h1>Welcome</h1>
<p>This is my web page, featuring a popped video using the footnote plugin.</p>
<video height="180" width="300" id="ourvideo" controls>
</video>
<div id="footnotediv"></div>
</body>
</html>
Task
See the live demo of this page at http://jsbin.com/ifekul/latest and hit 'Edit in JS Bin' to access the source. Let's remix that example to include something more visual. We can trigger all sorts of content from our video timeline using the different plugins that popcorn.js offers. One of these plugins is the Image plugin that, ... lets you display images!
.image({
// start seconds
start: 2,
// end seconds
end: 6,
// optional link to when the image is clicked
// the url of the image that you want to display
// the id of the document element that the iframe needs to be attached to, this target element must exist on the DOM
target: "imagediv"
});
Also replace the footnote div with the following image div:
<div id="imagediv"></div>
Now hit 'Run with JS' on the top right. See that image of the mozilla drum popping up? Yay! Now go ahead and drop in a URL of any image you like and change when it is displayed. Got that going? Great! Have a look at the References chapter of this section to see how you can further explore the possibilities to extend web video in your browser.
Hands-on: Video Projection Mapping
Little projection-mapping tool (LPMT) is an open source software based on OpenFrameworks, a C++ library, that enables video projection mapping to various surfaces and spaces. LPMT is a cross platform software which means it works on Linux, Mac OS and Windows machines.
The software enables various types of video and image manipulation and distortions which can be used for creative experimentation and production in the context of video installations. You will need a computer of standard capabilities, any video or data projector and a room in which you can control light for better projection results.
Below you will find a friendly step by step instruction on how to use LPMT to get you up to speed to make great projections.
Getting Started
Download and install LPMT in your computer from here: http://hv-a.com/lpmt/?page_id=9
Connect your computer to the video projector using a VGA cable.
Switch on the projector, then start your computer.
Duplicate your computer's display in order to see the same image on your computer's screen and on the projection.

LPMT Settings
Open LPMT (Little Projection Mapping Toolkit).

You should see the first page for Active QUAD settings.

The screen is split into 4 surfaces, numbered 0 to 3. The selected surface is name on the top left hand corner of the screen and highlighted in orange.
Press F to go full screen.
Press X
The Video and Camera menu will appear on the screen

Under the video menu left click on load video
*If you are in full screen while doing loading the video the software appears to crash. Exit the full screen before doing so.
Press F to come out of full screen, left click on load video, press F to go back into full screen.
Your video should appear on the highlighted surface – number 3 in this case.
If the video doesn't fill the QUAD as illustrated, left click on video scale from the video menu and move the cursor to resize the video in the quad.


LPMT Edit Mode
When you are happy with the scale press G to go into edit mode. The menu disappear when you do so.
Roll your mouse over the highlighted surface. As you roll over the corners of the surface will highlight in green.
Left click on one of the corners hold down and drag it.

Looking at the projection drag the top left hand corner to the top left hand corner of the object you wish to map.

Repeat this step with the other for corners to map your object entirely.
Congratulations! You've just mapped your first object!

Press the space bar to show/hide the menus.
Select Surface 2 by entering Edit mode (press G) and double left click in the centre of it.

Press G to exit the edit mode/ enter the menus mode.
Exit full screen, press X and load the next video.
Repeat step 14 to 19 to map your second surface.

Using LPMT you can load up to 36 videos, so get yourself prepared and have fun!
LPMT Shortcuts
’s’ – saves settings to xml (projection_settings.xml in data folder)
‘l’ – loads settings from xml file
‘a’ – adds new quad
‘>’ – go to next quad
‘<’ – go to previous quad
‘+’ – raise active quad position in layers pile
‘-’ – lower active quad position in layers pile
‘z’ or ‘F1'– selects first gui page for active quad settings
‘x’ or ‘F2'– selects second gui page for active quad settings
‘c’ or ‘F3'– selects gui page for active quad corner position fine-tuning
‘q’ – fills window with active quad
‘spacebar’ – toggles projection/setup modes
‘g’ – toggles gui (for quad warping with mouse gui must be switched off)
‘f’ – toggles fullscreen mode
‘w’ – toggles cam snapshot window background
‘r’ – resyncs all videos and slideshows in all quads to starting point
‘1’ – shows general settings page of gui
‘p’ – start projectionf
‘o’ – stop projection
‘m’ – connects to a MostPixelsEver sync server
‘h’ – display help dialog
shift + w
m - in edit mode is mask setup
b in grid editing to edit masks
How to Use the Open Video Workbook
Learning Open Video
BECOMING A FACILITATOR. We believe that if you can do it, you can teach it. Which is why these materials are meant to encourage and facilitate peer-to-peer approaches to education. If you want to share what you know, what we suggest is that you choose a few tasks from different levels to gauge the levels of experience and expertise on the group you are working with, then choose a entire set of tasks appropriate to the group depending on your workshop focus. Encourage people to work in groups and share outcomes.
BECOMING A COMMUNITY MEMBER. Part of why we like open video tools is that they are made by real people involved in communities of sharing. With free and open source software, you know who wrote the code. Most open video tools have their own support fora where users like yourself post questions and exchange experiences with other users and developers. User feedback provides developers with key information.
BECOMING A CONTRIBUTOR. The best way to teach may be to design your own tasks. We suggest you follow a few principles when you design a new task (which we hope you will add to this online course). If you want to introduce a new tool, find a case study that shows why the tool is exciting and worth exploring. Select one of the functionalities of the tool and create a specific task that can be accomplished by using that functionality. Try to gauge the level of complexity of the task (core, explore, command) and tag the tasks accordingly.
Help Create More Open Video Modules
If you want to help expand this resource you can contribute by creating new modules covering aspects of Open Video that has not been covered. During the Open video course sprint we came up with a simple template to help. We structured the modules into four short chapter types
- Terms and Techniques
- Case study
- Hands-on
- More resources
Terms and Techniques: Introduce your module by making it clear to the user what they will gain from it. Make sure to indicate the level of difficulty of the module. Write something like the following.
By the end of this module you will
- Example of a skill they will gain
- Example of something they will learn
Tools you will need for this module:
- List of tools needed to complete the module, like internet connection
Terminology: Make a list of terms used in the module and explain them to the user.
Case Study: Give a brief description of some real people and their story of doing something interesting with Open Video related to your module topic. Include for example why they chose to use Open Video tools, or what the benefit was of using these tools, or tools created along the way.
Hands-on: Introduce your task with a step-by-step guide. At the end of the section, create a fun task for the user for them to test their knowledge and reward them by restating what they have accomplished and learned. If there are several Open Video tools that can be applied to the task, feel free to create a chapter for each one.
Resources: Here is where you can go into detail about other resources relevant to the module topic, including any further discussions or explanations of pros and cons of using various options. Make it interesting and add images, screenshots and visualisations!
Once you have created your module, please add it to http://xmlab.booktype.pro/open-video-workbook/ or send it to : openvideo@xmlab.org
Modules for Self-Directed, Non-Linear Educational Processes
This workbook answers a call for resources which can be used to encourage and facilitate Hackathons, workshops and self-study on open video technology. If you are inspired by these resources and use them as part of your learning or teaching, please contribute other case studies and tutorials to this growing community of open video educators!
In line with its commitment to peer-to-peer educational processes, the Open Video Workbook is based on modules. Online display may call for linear display, but modules stand on their own and can be completed in any order, based on your interest.
All modules have the same structure: they begin with an overview of terms & techniques so users can see educational objectives at a glance, as well as the terms and techniques covered by the module. A case study showcases a really exciting example of how an open video tool has been used, providing a glimpse of the dynamic story of open video and some of the individuals and communities behind it. Specific tasks can be accomplished by using the suggested tool. Each section closes by reviewing educational objectives, a list of related resources, and attributions to sources used.
Modules address a specific area of open video and include one or more tasks.
The workbook acknowledges the need to speak to different audiences and user groups. Rather than taking all users through the same process, different task levels indicate the level of (relative, depending on what you already know) complexity. If you know what you are looking for, go directly to the module in question, or experiment with different task levels.
Task Levels to Deepen your Practical Knowledge of Open Video
Task levels vary from basic (core), intermediate (explore) and advanced (command) and address different audiences - with a special effort to speak to the needs of those not currently part of the open video conversation:
CORE: Tasks in this category cover fundamental processes and are designed to yield immediate outcomes. Because they introduce core terms and techniques, they form the 'core' of open video. For most of the tools suggested in these tasks, developers have made an effort to design graphical user interfaces (GUIs) to facilitate use.
EXPLORE: Tasks in this category encourage you to explore the range of functionality of the tools in question. They assume that you are already familiar with core terms and techniques (and won't provide explanation; in case of doubt, consult the glossary).
COMMAND: Tasks in this category involve interaction with a command-line interface rather than the graphical interfaces you may be used to. Typical tasks include the use of libraries.
Joining the Code Conversation
If you use this course in a workshop context, consider including a discussion about free and open source software. These terms have a history you don't need to be familiar with to use the tools. But if you want to join the 'code conversation' it helps to be familiar with the terms of the debate that continue to frame software development projects.
VLC vs FFmpeg : Graphical User Interface
Over the past decades, video creation and distribution have become available to everyone. Moving from analog to digital recording devices has multiplied possible ways to create and distribute video. Whether you want to share your creativity and your creations on a physical medium (DVD) or via streaming, you should take a look at this chapter.
The chapter focuses on the compression/decompression file formats used by different cameras, video players, and editing software. A large variety of formats exist, some are current and still being used, others might have become obsolete, and you may never have even heard of them before. Most major media companies are members of the MPEG Consortium, so you might be familiar with the different versions of the MPEG format. But it is easy to be confused - MP3 is not version 3 of MPEG, for example, but a subchapter called "layer 3" of the "MPEG 1" standard.
We compare and contrast two tools. One is called VLC, an open-source cross-platform multimedia player and framework, which can also stream audio and video in a number of formats. The second is FFmpeg, an open source cross-platform solution to record, convert and stream audio and video. While VLC has a graphical user interface (GUI), FFmpeg uses a command-line interface, i.e. a text-base interface where the users enters commands into a program (a command line shell) that converts commands to operating system functions.
As a developer, you are already familiar with text-based interfaces and can draw on this experience as you work with open video. If you have never used a command-line interface, this is your chance to try it out and find out more about the code work underlying file compression.
Other areas for Discussion
On Free Software
"Free software is software that gives you the user the freedom to share, study and modify it. We call this free software because the user is free. To use free software is to make a political and ethical choice asserting the right to learn, and share what we learn with others. Free software has become the foundation of a learning society where we share our knowledge in a way that others can build upon and enjoy." (FSF)
On the Future of Open Source and Free Software
"The difference between the two movements (open source and free software) is that Free Software is a social movement, and open source is a methodology. I do prefer free as in freedom software, even though I’m not a developer, but there are a few other freedoms that matter more to me:
- Freedom to run software that I’ve paid for on any device I want without hardware dongles or persistent online verification schemes.
- Freedom from the prying eyes of government and corporations.
- Freedom to move my data from one application to another.
- Freedom to move an application from one hosting provider to another.
- Freedom from contracts that lock me in to expensive monthly or annual plans.
- Freedom from terms and conditions that offer a binary “my way or the highway” decision.
The first of those is certainly part of the Free Software Movement, and the others are promoted today by advocates for the open web, federated web and/or indie web and vendor relationship management. I’m sure there are many more freedoms I’m not thinking of, but the groundwork is there for a new Free Software Movement that’s more in line with the needs of the users in our time."
Recent debates about open video
There are many blog posts online which outline a tension between pragmatism and trying to support and promote open video. Many of these are about the continued use of the patented h264 format despite attempts to move video distributors towards more open codecs. To communicate the importance of these issues we can invite people to look at of some of these blog posts.
We can give the advice not to get bogged down by the technical language and details but instead to get a flavour of the debate. It will give a sense of how contested the issue of open standards is, as commercial interests continue to clash with free software philosophies.
More Resources on DVDs
Making Buttons for DVDStyler
If you want to create more complicated buttons for DVDStyler there is a great blog post about it here. 1
OER Delivery and DVDs as part of the last mile distribution
The discussion of case study is supported by research on the delivery of Open Educational Resources, many of which are made available in video format.
Bridging the Bandwidth Gap: Open Educational Resources and the Digital Divide 2
Björn Haßler and Alan McNeil Jackson
The paper presents an overview of Digital Divide issues associated with the global disparity in availability and cost of bandwidth. We give examples and discuss the relevance of this to global use of Open Educational Resources. Strategies for mitigating low-bandwidth challenges are discussed
Transcoding you video for a DVD
At this step, we believe that you finished your video. You certainly want to provide your work on a material support like DVD. In this part, you will know how to encode in MPEG2 the format for the dvd authoring. At the end of this part, if you want to edit a DVD in the wrapper Vob, we invite you to see the chapter : Hands On - DVD.
The DVD use the compresion MPEG 2. The size or the resolution of the picture is 720x576 in a frame rate of 25 pictures by seconde for europa and for america 720x480 in a frame rate of 29.97 frames per second. The aspect can be in 4/3 or 16/9. The total bitrate is at maximum 9800 kb/s. Generally, the video bitrate is 8000 kb/s and the audio 1536 kb/s. The rate of compression depends of the duration of your video. You have to adapt the quality of your compression with the size of the memory of your optical support in this case the DVD.
Stay with your Terminal or Konsole, we'll use FFMPEG for this in the first case. Why ? Because FFMPEG has a preset for that. The method is very simple. Call FFMPEG, choose your video to encode, call the preset to encode for a DVD and name your new file media in MPEG2 format that will be generated.
ffmpeg -i your_video.mp4 -target pal-dvd your_dvd.mp2
And validate by Enter on your keyboard. The processus of encodage is starting. It will take a certain time.
Some basics commands can refine your project, change the letter x by your own value ;
- -b xxxk to define the bitrate of your video codec
- -ab xxxk to define the bitrate of you audio codec
- -aspect x:x to define 16/9 or 4/3
Let's go with VLC for the same process, go to the menu Open Media, choose Convert or use the shortcuts Alt+c

In the new windows, you will edit a new profile to create a process to encode in MPEG2 format. click on the icon Create a new profile.

Choose a name in the field Profile Name and choose Transmission MPEG (MPEG-TS) or Programm MPEG (MPEG-PS) and jump to the tab Video Codec.

Active the compression of the video by checking the box Video, choose MPEG-2, edit the bitrate and jump to the tab Audio codec.

Active the compression of the audio by checking the box Audio,Choose the MPEG audio codec, edit the bit rate and save.

Now, you have just to use your new profile. Be carreful in the field of destination file, don't omiss the name and the extension of the container.

- http://mikesgeneralblog.blogspot.co.uk/2006/08/creating-new-buttons-for-dvdstyler_04.html ^
- http://www.sciencemedianetwork.org/wiki/Bridging_the_Bandwidth_Gap_-_OER_and_the_Digital_Divide ^
More Resources for Video via the Internet
Hosted Video
When you have created your video you will want to upload it to the internet and share it with people. There are a lot of different ways you can do this. Here are some free options:
• The Internet Archive at archive.org - is a non-profit online archive that covers pretty much everything. This is their mission: The Internet Archive is working to prevent the Internet - a new medium with major historical significance - and other "born-digital" materials from disappearing into the past.

More sites include:
• Vimeo (commercial platform focusing on high-quality videos. Similar Terms of Use as Youtube, but you can chose your own license and version of Creative Commons, and there are more settings to chose from for privacy and publishing.)
• dailymotion.com (commercial platform with similar Terms of Use as Youtube.)
• flickr.com/explore/video/ (commercial platform with similar Terms of Use as Youtube.)
The most widely known is probably Youtube - which is an example of a commercial platform. See the EngageMedia case study for some of the reasons for why people chose not to use Youtube, and instead set up their own video hosting services.
Each of these websites will have their own very simple guidelines of how to upload your video. Usually the steps are:
- Create an account (choose username, password and insert your email address)
- Click upload
- Find the file you want to upload and add titles, information etc.
- Click upload and watch as your video is uploaded to the internet
Depending on how long your film is and how fast your internet is it can take some time for the full video to upload, so have patience!
WARNING: Make sure to keep a copy of your video locally on your computer or on an external hard drive, because a lot of free video hosting websites might delete your account or your video. In fact, try to always keep two back-ups in separate places!
Wikipedia has a list 1 that compares online video hosting services.
Create Your Own Online Video Aggregator Website
Mirocommunity.org - with Mirocommunity you can sign up to create your own video website, bringing in video from other online platforms, like archive.org, vimeo, engagemedia or youtube.
Self-hosted Video (more advanced)
If you want to host your own video on your webserver, there are several CMS (content management system) you can chose from,depending on what you want to do with your video.
Plumi.org - if you want to create your own online video channel, Plumi is an easy to use CMS that allows you to manage users and content for your own video publishing website.
Wordpress - if you want a blog or a simple website with some of your videos on, you might want to install Wordpress 2 and then get a video plugin for example this one 3
WARNING: Video files are usually quite large compared to text or image files. So if you are going to host a lot of video for your online channel and you have bought commercial hosting you need to keep an eye on your hosting plan so your bill doesn't go through the roof!
Hybrid Video Distribution
The internet is not always the best way to reach people with your video. Internet connections can be unreliable in many areas, or non-existent and still not everyone is comfortable using the internet. So when thinking through a strategy for publishing and distributing your video, a hybrid strategy that includes dvds, live screening events or aiming for tv and film festivals are also good ideas. Here is a guide to using FOSS software for hybrid distribution strategies: https://www.v4c.org/content/hybrid-distribution-guide
- http://en.wikipedia.org/wiki/Comparison_of_video_hosting_services
^
- http://wordpress.org/ ^
- http://wordpress.org/extend/plugins/wp-video-posts/ ^
Resources on Open Video Files
Making the Case for Open Video
In the context of this course, open video is a reference the use of Free Software tools for creating and distributing video and the adoption of freely-licensed formats, or at least formats using open standards.
Free software tools have a long history; digital media is unthinkable without open formats, protocols, and standards. And the more complex our creative work becomes, the more important questions of interoperability: as long as media is stored in an open format, there will be a way to access it.
To promote open video, is it important to make material available in free and open formats. However, practically you may have to also provide versions in more restrictive formats like h264 to reach users on closed platforms like iOS. This is because vendors prevent their users from using free formats. There are pragmatic reasons preventing video developers from taking a purist approach to video distribution.
Whenever possible, it is good to pressure vendors to adopt the use of free and open formats. We aim to support free and open standards by the creation of this course and other materials. While h264 may not we free of restrictions we can use free tools to take it apart, create it and deepen our knowledge of the subject in general.
Other tools for creating Open Video Files
There are many tools for creating and transcoding files to open, patent free standards. Here are a few of recommendations for different situations:
HandBrake
HandBrake was created to convert DVD discs into smaller video files suitable for viewing and sharing on the Internet. This is called DVD ripping. HandBrake is popular and available on many different operating systems. There are now more features including transcoding, which means changing one type for video file into another. This is very useful for video makers wanting to make their video projects small enough to fit on a CD or share online. You can also create video files with subtitles burned into them or specialised mkv files (matroska format) which can contain more than one subtitle file at one time allowing viewers to select their language in their video playing application. It can be used for converting a DVD to a video file with the option to include multiple subtitles in different languages. There are good help files online. 1
Screencasting Software
Screen casting software lets you record what is happening on the screen of your computer as a video file. This can be used together with an audio narration to create useful video guides. Windows has at least two good open source options; Cam Studio and Webinaria. They allow you to record audio from your microphone or choose another sound source. You can select the whole screen or just part of it to be recorded. Record My Desktop offers the same functionality in Linux and you can record screencasts in Quick Time player on Mac.
If you want to try the process using an online service instead of local software, then you can try screenr.com or screen-o-matic which allow you to do this for free. They host the video you create and you can also download it for offline use.
Avidemux
Avidemux is available for Linux, BSD, Microsoft Windows and Mac OS X and is designed for simple cutting, filtering and encoding tasks of video files. It supports many file types, including AVI, DVD compatible MPEG files and MP4. There is a manuals for use on FLOSS Manuals. 2
More detailed information on video files
Video Containers: You may think of video files as “AVI files” or “MP4 files.” In reality, “AVI” and “MP4” are just container formats. Just like a ZIP file can contain any sort of file within it, video container formats only define how to store things within them, not what kinds of data are stored. (It’s a little more complicated than that, because not all video streams are compatible with all container formats, but never mind that for now.)
A video file usually contains multiple tracks — a video track (without audio), one or more audio tracks (without video) and some containers even contains one or more subtitletracks or picture tracks. Tracks are usually interrelated. An audio track contains markers within it to help synchronize the audio with the video. Individual tracks can have metadata, such as the aspect ratio of a video track, or the language of an audio track. Containers can also have metadata, such as the title of the video itself, cover art for the video, episode numbers (for television shows), and so on.
There are lots of video container formats. Some of the most popular include
- MPEG 4, usually with an
.mp4 or .m4v extension. The MPEG 4 container is based on Apple’s older QuickTime container (.mov). Movie trailers on Apple’s website still use the older QuickTime container, but movies that you rent from iTunes are delivered in an MPEG 4 container.
- Flash Video, usually with an
.flv extension. Flash Video is, unsurprisingly, used by Adobe Flash. Prior to Flash 9.0.60.184 (a.k.a. Flash Player 9 Update 3), this was the only container format that Flash supported. More recent versions of Flash also support the MPEG 4 container.
- Ogg, usually with an
.ogv extension. Ogg is an open standard, open source–friendly, and unencumbered by any known patents. Firefox 3.5, Chrome 4, and Opera 10.5 support — natively, without platform-specific plugins — the Ogg container format, Ogg video (called “Theora”), and Ogg audio (called “Vorbis”). On the desktop, Ogg is supported out-of-the-box by all major Linux distributions, and you can use it on Mac and Windows by installing the QuickTime components or DirectShow filters, respectively. It is also playable with the excellent VLC on all platforms.
- WebM is a new container format. It is technically similar to another format, called Matroska. WebM was announced in May, 2010. It is designed to be used exclusively with the VP8 video codec and Vorbis audio codec. (More on these in a minute.) It is supported natively, without platform-specific plugins, in the latest versions of Chromium, Google Chrome, Mozilla Firefox, and Opera. Adobe has also announced that a future version of Flash will support WebM video.
- Audio Video Interleave, usually with an
.avi extension. The AVI container format was invented by Microsoft in a simpler time, when the fact that computers could play video at all was considered pretty amazing. It does not officially support features of more recent container formats like embedded metadata. It does not even officially support most of the modern video and audio codecs in use today. Over time, companies have tried to extend it in generally incompatible ways to support this or that, and it is still the default container format for popular encoders such as MEncoder.
Video Codecs: When you talk about “watching a video,” you’re probably talking about a combination of one video stream and one audio stream. But you don’t have two different files; you just have “the video.” Maybe it’s an AVI file, or an MP4 file. These are just container formats, like a ZIP file that contains multiple kinds of files within it. The container format defines how to store the video and audio streams in a single file.
When you “watch a video,” your video player is doing at least three things at once:
- Interpreting the container format to find out which video and audio tracks are available, and how they are stored within the file so that it can find the data it needs to decode next
- Decoding the video stream and displaying a series of images on the screen
- Decoding the audio stream and sending the sound to your speakers
A video codec is an algorithm by which a video stream is encoded, i.e. it specifies how to do #2 above. (The word “codec” is a portmanteau, a combination of the words “coder” and “decoder.”) Your video player decodes the video stream according to the video codec, then displays a series of images, or “frames,” on the screen. Most modern video codecs use all sorts of tricks to minimize the amount of information required to display one frame after the next. For example, instead of storing each individual frame (like a screenshot), they will only store the differences between frames. Most videos don’t actually change all that much from one frame to the next, so this allows for high compression rates, which results in smaller file sizes.
There are lossy and lossless video codecs. Lossless video is much too big to be useful on the web, so I’ll concentrate on lossy codecs. A lossy video codec means that information is being irretrievably lost during encoding. Like copying an audio cassette tape, you’re losing information about the source video, and degrading the quality, every time you encode. Instead of the “hiss” of an audio cassette, a re-re-re-encoded video may look blocky, especially during scenes with a lot of motion. (Actually, this can happen even if you encode straight from the original source, if you choose a poor video codec or pass it the wrong set of parameters.) On the bright side, lossy video codecs can offer amazing compression rates by smoothing over blockiness during playback, to make the loss less noticeable to the human eye.
There are tons of video codecs. The three most relevant codecs are H.264, Theora, and VP8.
Open Video codecs: Free formats like Ogg Theora or WebM don't have licensing restrictions. Where proprietary codecs charge licensing fees for use of their codecs, open video codecs allow anyone to freely create tools and distribute content as they like. An open specification should allow anyone to implement their own player, encoder or other tools to encode or decode videos in a free codec. It is important that this can be done without requiring a special contract or patent agreement.
While H.264 is a big step forward compared to proprietary codecs owned by a single vendor like Real or Microsoft, it still requires anyone implementing an encoder or decoder and even anyone distributing a video in H.264 offline to pay license fees for patents covering algorithms used in the format to do so. For videos distributed on the web for free this has been removed but if you sell or distribute videos on disks or broadcast you need to pay up.
For more info you can read this article about The H.264 Licensing Labyrinth
BY:
- The section 'More detailed information on video files' and guide to encoding using firefogg and Miro encoder is adapted from 'Dive into HTML5' by Mark Pilgrim.
- http://en.flossmanuals.net/handbrake & https://trac.handbrake.fr/wiki/HandBrakeGuide ^
- http://en.flossmanuals.net/avidemux/ ^
Resources: Projection
There are many possible ways to employ video projection in your work, from outdoor video installations to more traditional and conventional gallery spaces, using one or more projectors, or as a live video performance sometimes known as VJing. Below you will find information on a selection of open source software useful for live video as well as video mapping:
Video Projection Mapping
VVVV - VVVV is described by publisher as a “toolkit for real time video synthesis, is designed to handle a large number of objects in real-time. 1
Pure Data (Pd) - Pd is a real-time graphical programming environment for audio, video, and graphical processing. 2
Live video mixing / Vjing software
FreeJ : Free Vision Mixer ; FreeJ 3 is an 100% free instrument for realtime video manipulation used in the fields of dance teather, veejaying, medical visualisation and TV. It consists of a commandline application on GNU/Linux, a graphical application on Apple/OSX, a C++ multimedia framework library and a javascript engine for efficient live video manipulation. It can be controlled in different ways: Joystick, MIDI, OSC, sensors, keyboard etc.
freemix - freemix 4 is a live video performance software, intended for and made by freedom loving live video artists. powered by python, gstreamer, and gtk.
VeejayHQ - Veejay 5 is a visual instrument and realtime video sampler
Lives - Lives 6 mixes realtime video performance and non-linear editing in one professional quality application. It will let you start editing and making video right away, without having to worry about formats, frame sizes, or framerates.
- http://vvvv.org ^
- http://puredata.info/ ^
- http://freej.dyne.org/ ^
- http://freemix.forja.rediris.es/ ^
- http://www.veejayhq.net/ ^
- http://lives.sourceforge.net/ ^
Resources: Streaming
Most of the time streaming with VLC will be the easiest way to quickly get a feed from a webcam or a file up and available. Sometimes however, there will be situations where you will need more flexible tools. In this section we will give a few short examples from a selection of other available tools. We will start with the Liquidsoap software from Savonet and add more including CVLC, Gstreamer and oggfwd
Liquidsoap
http://savonet.sourceforge.net
Liquidsoap is powerful and flexible language for managing streams. Initially it was used for creating sophisticated web-radio streams it now has the ability to stream video. Expanding on the paradigms of radio, the creations of webtv becomes easy using the integrated playlst, scheduling and compositing tools.
It can use Gstreamer as the video back-end so all the tools and codecs available there also become available to liquidsoap, the Frei0r plugins are also available for applying video effects and there are native tools for compositing logos and scrolling news ticker style text. It also has the capability to receive Open Sound Control (OSC) messages so integration with hard and software controllers becomes possible.
A simple script written to encode, loop and stream a video file to an ogg theora mountpoint on an Icecast server as looks like this:
#############################
# Define a video file to stream:
source = single(“video.avi”)
# Adding some scrolling text:
source = video.add_text.sdl(
font="/usr/share/fonts/truetype/ttf-dejavu/DejaVuSans.ttf”, “Hello world!”, source)
# and a logo:
source = video.add_image(
width=30,height=30,
x=10,y=10,
file="logo.jpg”,
source)
# then stream the result to an icecast server:
output.icecast(
%ogg(%theora(quality=25,width=320,height=240),%vorbis),
host="localhost”,
port=8000,
password="hackme”,
mount="/videostream”,
source)
#############################
The above code can be saved in a file called video.liq and then run by typing liquidsoap video.liq
More comprehensive documentation showing off the more possibilities can be found here: http://savonet.sourceforge.net/doc-svn/video.html
More Resources on Subtitling
This chapter gives some background information on subtitle files and pointers to other useful software.

Different types of subtitles
Burned-in subtitles (or "hard subs" or "open captions" ): These are subtitles that are built-in to the image and cannot be removed as they totally become part of the image.
Internal Soft subtitles (Closed Captions): They are hidden within the video file and not built-in to the image thus can be removed temporarily, if not required, using the video player menu. You may find different languages for these soft subtitles (for example up to 8 different languages in the same file!) Those soft subtitles will appear in the subtitle menu of your player and the viewer can select which ever suits their needs.
External Soft subtitles (Closed Captions): These are external individual files: most common are .srt files which contain only 1 language, but you may also find sub + .idx files that may contain many different languages. Most often, if you want those external subtitles files to be opened automatically when the video file is opened in a player, then the subtitles file should have the same name as the movie file. For example:
 Open_Video_Tutorial.avi <= the movie file
 Open_Video_Tutorial.srt <= the external subtitle file
About SubRip Files (srt)
SubRip is the most used format for subtitling and it may have the file format .srt
To create your own SubRip subtitling file, we will need a text editor. Open your text editor and save your file with a .srt extension. Note that encoding must be UTF-8 so that special characters can be used
SRT files have been widely adopted. They are a very simple standard and they do the job well.
If we open up a SRT file we will see that it is really pretty simple listing times and the text to be displayed over the video.

Format:
n
h1:m1:s1,d1 --> h2:m2:s2,d2
Some text to display beneath this scene
n = sequential number. This may also appear on the same line as start/stop times.
h1:m1:s1,d1 = start time of this frame, in hours minutes and seconds to three decimal places.
h2:m2:s2,d2 = stop time. i.e time when this subtitle text should disappear from the screen
Extensions : Some subtitles feature html tags inside the SubRip text:
<b>...</b>: bold
<s>...</s>: strikethrough
<u>...</u>: underline
<i>...</i>: italic
<font color=... face=...>: font attributes
Playing SRT Subtitles Offline with VLC player
Now that we have downloaded our video file and subtitle file we can also download them on our desktop computer.
To do this, open your video file in VLC player. If you subtitle file is in the same directory and called a very similar name to your video file, it may be automatically recognised and played by VLC. If not then you can select Video >

Other Ways of Creating SRT Files
There are many tools on the desktop which we can use to create these files. This can be handy if we want to subtitle our files off line.
- Jubler- Mac, LInux, Windows
- Subtitle Workshop - Windows
- Gnome subtitles - Linux
- The pan.do/ra tool Speedtrans - Mac, Linux, Windows
- http://www.barebones.com/products/textwrangler/
- http://www.michaelcinquin.com/tools/subtitles
BY:
- First Draft - The Authors at Open Video Forum Berlin 2012
- Screenshots use Engagemedia.org videos and website
- Second Draft - The Authors Open Video Course Sprint London 2013
More Resources on Popcorn
Popcorn Maker
Popcorn Maker sample projects: Here are some projects made with Popcorn Maker. On the front page of their website.
https://popcorn.webmaker.org/ 1
Popcorn Maker Tutorials: Take an interactive tutorial using Popcorn Maker. 2
Popcorn.js
Mozilla Popcorn.js Tutorials: Here is some general Popcorn.js Documentation 3
Other Tutorials: We found a P2PU Interactive Guide to Popcorn.js 4
Detailed Documentation Popcorn.js: A more detailed look at Popcorn plugins 5 for different media types with examples.
Mailing list: There is a very helpful and responsive mailing list for Popcorn. 6
More on Javascript
Popcorn is based on javascript. There are a lot of great resources online which will tell you how to understand and code with javascript. If this area is new to you a good place to start is the free interactive JavaScript courses at CodeCademy 7:
BY:
- Nicholas Doiron's writing on HTML5 video at https://p2pu.org/en/groups/interactive-open-video-with-popcornjs/content/tell-us-what-you-know-about-video/
- Mark Pilgrim's Dive into HTML5 at http://diveintohtml5.info/video.html
- https://popcorn.webmaker.org/ ^
- https://popcorn.webmaker.org/templates/basic/?savedDataUrl=tutorial.json ^
- http://popcornjs.org/documentation ^
- https://p2pu.org/en/groups/interactive-open-video-with-popcornjs/ ^
- http://popcornjs.org/popcorn-docs/plugins/ ^
- https://mail.mozilla.org/listinfo/community-popcorn ^
- http://www.codecademy.com/tracks/javascript ^
Resources: Using Command Line
Advantages of Using Commands
Many people who give the command line a try are so amazed by its possibilities that they do not even want to go back to a Graphical User Interface(GUI)! Why? Well, in brief, the command line offers the following main advantages over common graphical software:
- Flexibility-With graphical programs, you sometimes hit a limit; you just can't do what you want or you need to find cumbersome work-arounds to program limits. With the command line, you can combine commands to yield a virtually infinite range of new and interesting functions. By combining commands creatively, you can make the command line do exactly what you want; it puts you in control of your computer.
- Reliability-Graphical programs are often immature or even unstable. In contrast, most of the tools that the command line offers are highly reliable. One of the reasons for this reliability is their maturity; the oldest command line programs have been around since the late 1970s. This means that these command lines have been tested for over three decades. They also tend to work the same way across different operating systems, unlike most graphical tools. If you want a Swiss Army knife you can rely on, the command line is for you.
- Speed. Fancy graphics consume a lot of your hardware's resources, often resulting in slowness or instability. The command line, on the other hand, uses the computer's resources much more sparingly, leaving memory and processing power for the tasks that you actually want to accomplish. The command line is also intrinsically faster; instead of clicking through long chains of graphical menus, you can type commands in a dozen or so keystrokes, and often apply them to multiple files or other objects. If you can type fast, this will enable you to drastically increase your productivity.
- Experience. Using the command line is a great learning experience. When you use the command line, you communicate with your computer more directly than with the graphical programs, thus learning a lot about its inner workings. Using the command line on a regular basis is the way to becoming a GNU/Linux guru.
- Fun. Have you ever wanted to be like those cool computer hackers who can make a GNU/Linux machine do things that you have not even dreamed of? Once you learn to use this powerful tool, you will find yourself doing funny and interesting stuff that you have never imagined.
BY:
- This chapter is taken from the Floss manuals guide Introduction to the Command Line. 1
- http://www.flossmanuals.net/command-line/ ^
Resources: Video Production
Here are other open guides that we would would like to let you know about that may be useful to your video making that outline tools, issues of publishing and tactics.
Free Software video editing
Cinelerra: http://cinelerra.org/
Pitivi: http://www.pitivi.org/
Licencing your video
Make Internet TV: http://makeinternettv.org/license/cc.php
Free Software Foundation: http://www.gnu.org/licenses/license-list.html#OtherLicenses
V4C video guides
There are guides online from the V4C (Video For Change) network. The recent guides are on Secure My Video 1, Hybrid Video Distributionn 2 and Video Making on Android Devices
Witness video-making guides
Witness have produced a series of guides and videos covering many areas of using video for change and evidence recording. These include the Video For Change book2, the chapters of which are available as a free downloads on the Witness website, and the Video Advocacy Toolkit which is an online learning resources with 32 videos and lots of supporting documents.
All of these resources are available on the How To page of Witness - http://www.witness.org/how-to
Tactical Tech - tactics for information Activism
Tactical Tech have several guides on Informaion Activism and using technology for advocacy, of which the use of video is an important aspect. The guides are visually striking and can be used as a great source of information and inspiration.
BY:
- The Hands On guide in this module is based on Guide to Open Source Video Editing using Kdenlive by Anna Morris and Mick Chesterman
- https://www.v4c.org/content/secure-my-video-version-20 ^
- https://www.v4c.org/content/hybrid-distribution-guide ^
Terms and Techniques: Video Editing
By the end of this module you will
- have a good understanding of how a video editor works
- be able to apply this knowledge to a wide range of other projects.
Tools you will need for this module:
- Internet Connection
- a computer able to run Kdenlive or similar video editing application
- video footage to edit with
Video Editing: A process of taking video footage shot on video cameras and rearranging it to make it easier to watch.
Kdenlive: Kdenlive is a Free Software video editing application that works with a large number of different video formats
Top and Tail: To cut off the beginning and end of video clips
Video Clip: A video clip is a short section of video footage.
Timeline: A timeline is a series of video clips arranged in a narrative order one after the other.
Rendering: Rendering is the process where a video editing application takes your edited timeline and creates a new video file that can be viewed with other programs
Terms & Techniques: DVD Authoring
By the end of this module you will
- understand the different elements and processes of creating a DVD
- be able to create a DVD with DVD Styler
Tools you will need for this module:
- a computer able to run DVD Styler or similar video editing application
- video files in mpeg2 format or an internet connection to download some
DVD: A DVD is a digital versatile disc, which indicates that it can be used for more than video. However it is commonly called a digital videodisc as this is by far the most common use.
DVD Authoring: Authoring a DVD involves getting your video files into the right format and creating a menu to display on DVD Players.
Terms & Techniques: Enhancing Web Video
By the end of this module you will
- be able to add additions to online video files including a
- be familiar with the concept of enhancing web video
- be able to use the online tool Popcorn Maker
- have an understanding of the Popcorn.js tool
Tools you will need for this module:
- Internet Connection
- An up-to-date Browser
Web Video: Web video are videos that are already online. They may be hosted at a video sharing site like YouTube or Vimeo. They may also be a simple video file uploaded to the internet.
Hosted Video File: A 'hosted' video file refers to a file that has been uploaded to web-server. To use this in a context of Popcorn tool you will need to have a direct link to the online video file.
Javascript libraries: Technically speacking, Popcorn.js is a whole bunch of java script code called a javascript library. One of the advatanges to tools like Popcorn Maker and Popcorn.js is that you don't need to understand what is going on the background with this code to take advantage of what it can do.
Enhanced Web Video: There are many terms for the concept of adding extra related information to videos displayed in the web browser. These include augmented web video, extended web video, expanded web video. Popcorn Maker is just one tool and approach to creating enhanced web video. This is a rapidly growing area in open video and we can look forward to lots of innovation.
Terms & Techniques: Online Video Distribution
By the end of this module you will
- be able to distribute video fvia the Internet using
- understand different options and tools available to you to distribute video on the Internet
Tools you will need for this module:
- Internet Connection
- A video file suitable for uploading to the Internet
Video CMS: A CMS is a content management system. It is a way of organising your text and media in a more flexible way than a series of web pages. Common CMS's include Wordpress, Joomla and Drupal. A Video CMS is specifically aimed at distributing video. It may include ability to allow your video to be downloaded in different formats.
engagemedia.org - a non-profit online video sharingsite that focuses on social justice and environmental issues int the Asia´Pacific.
Platform: In the context of this chapter, 'platform' refers to any of the websites available for you to publish your video online.
Data: Structured information. In this case, data about online behavior of people surfing the internet, structured in a way where it can be analysed and used for other purposes, in the example of Google - mapping trends in order to target advertisments.
Online behavior: What you look at, click on or scroll through on the internet.
Terms & Techniques: Open Video Files
By the end of this module you will
- know more about the components of video files and difference between a container and codec
- understand why using open video codecs gives you more freedom
- be able to create video files in an open format
Tools you will need for this module:
- Firefogg (a plugin for FireFox)
- Miro Video Converter
- Internet Connection
The following text is adapted from 'Dive into HTML5' by Mark Pilgrim.
Open Video codecs:
A video codec is an algorithm by which a video stream is encoded, i.e. it specifies how to do #2 above. (The word “codec” is a combination of the words “coder” and “decoder.”) Most modern video codecs use all sorts of tricks to minimize the amount of information required to display one frame after the next.
Free formats like Ogg Theora or WebM don't have licensing restrictions. Where proprietary codecs charge licensing fees for use of their codecs, open video codecs allow anyone to freely create tools and distribute content as they like.
Video Containers: You may think of video files as “AVI files” or “MP4 files.” In reality, “AVI” and “MP4” are just container formats. Just like a ZIP file can contain any sort of file within it, video container formats only define how to store things within them, not what kinds of data are stored. (It’s a little more complicated than that, because not all video streams are compatible with all container formats, but never mind that for now.)
A video file usually contains multiple tracks — a video track (without audio), one or more audio tracks (without video) and some containers even contains one or more subtitle tracks or picture tracks. Containers can also have metadata, such as the title of the video itself, cover art for the video, episode numbers (for television shows), and so on.
Terms & Techniques: Subtitling
By the end of this module you will
- be able to create subtitles for a video online
- be familiar with the terms transcript, subtitles, closed captions
Tools you will need for this module:
Transcript: A transcript is a written version of the spoken words in your video: the dialogue, interviews and narration.. Adding a transcript to your video has several advantages: it makes the video accessible to anyone who may have issues hearing or understanding the spoken words, it make tranalting the video easier, it allows search engines like Google to index the content of the film, and will help people to find it when searching for related terms.
Subtitles: Subtitles contain the same text as a transcript. What makes them different is that they are timed and placed on top of the video, for example, for the hard of hearing, or to translate what the person on screen is saying into another language.
Closed captions. Closed captions are a kind of subtitle. Closed captions can be part of a video file (internal) or one or more separate file(s) (external) and they can be turned on and off. Any given video can have a number of separate versions of closed captions, e.g. different language subtitles.
Terms & Techniques: Video Projection
By the end of this module you will
- be able to use Free Software to do Projection Mapping
- be more familiar with Free Software tools for video mixing
Tools you will need for this module:
- Projector and cables
- Computer able to output to a projector
Projection Mapping: Projection Mapping is a technology that allows you to adjust the shape of one or more videos to a two or three dimensional surface.
Vjing - vjing is realtime visual performance. Characteristics of VJing are the creation or manipulation of imagery in realtime through technological mediation and for an audience, in synchronization to music.
