Hands On - Editing an Interview with Kdenlive
Kdenlive is a Free Software video editing application that works with a large number of different video formats. It is designed for linux but can sometimes be installed on Mac. If you are not able to install Kdenlive on your operating system. You can follow the techniques of this tutorial with most video editing software.
The contents here are an extract of a longer manual called a Guide to Open Source Video Editing using Kdenlive 1. If you are not sure how to install the application of if you get stuck then please refer to the full manual.
Workflow
For this project we will complete the following tasks:
- Import your files
- Top and tail the footage
- Cut out redundant footage
- Trim the fat
- Add a title to identify the speaker
- Add transitions
By the end of this hands-on task you should have a good understanding of how a video editor works and should be able to apply this knowledge to a wide range of other projects.
Import your files
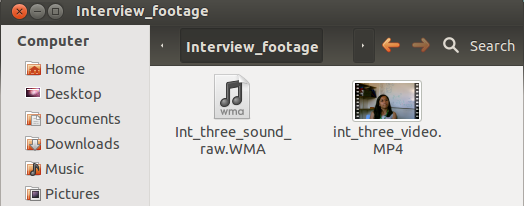
Firstly, make sure all original video files for your edit are in the same folder. This will become your project folder. If you only have one video file, just put the one file in a folder. The folder should have a name that identifies it in a memorable way.
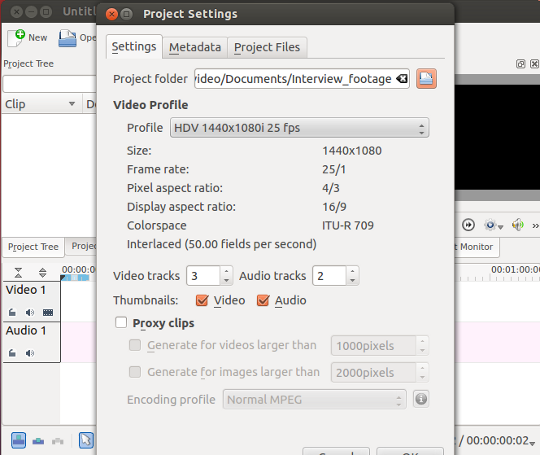
Now open your video editor, and click File > New to make a new Project: make sure you set your Project folder to be the same as where your video files are.
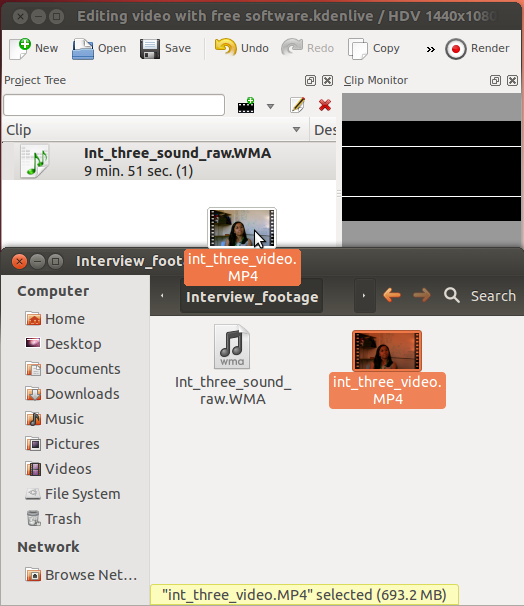
Now you need to import your clips into your project. You can do this by dragging them from your Project Folder and dropping them into the Project Tree.
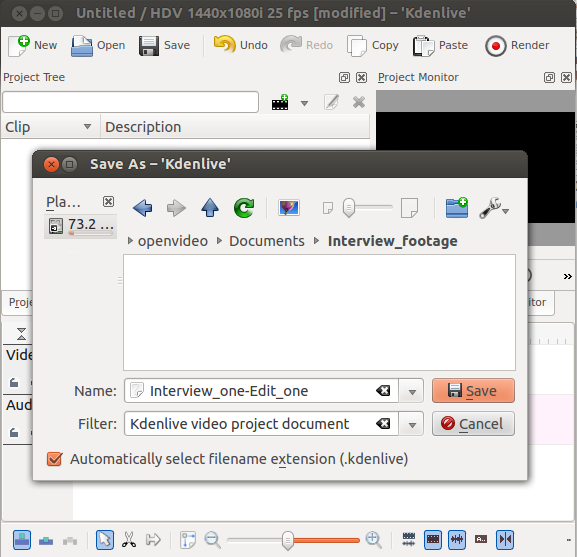
Next, save your edit: click File > Save As and choose a suitable name. This is different to setting the Project Folder: you can have many different edits, in the same Project folder - however, this is your first one, so perhaps name this edit "edit one".
Top and Tail: cut off the beginning and end of clips
You are now ready to start editing. Don't worry, this won't damage your original footage in any way.
Any changes you make to the video clips in the timeline do not affect the original clip. This remains the same on the hard drive, project tree and in the clip monitor window. So don’t worry about not being able to undo anything, you can always start again with the original clip.
At the start and end your video there will probably be a few minutes of waste footage, for example the interviewee and interviewer chatting about the weather or the public transport links to the event. To cut out this material you can follow the guide below.
Adjust your clip
You can shorten your clip by dragging the start or end of the clip inwards. This will remove some of the footage. If you remove too much, simply drag the edge outwards again. Keep adjusting in and outwards until you are happy.

For very fine adjustments, double click on the clip and adjust the clip more precisely.

Cut out redundant footage
Next you need to remove, to cut out, any large areas of the footage that are not required. For example, if there was a fire alarm test in your interview which resulted in several minutes of noise or inactivity, or if the participant contacted you to ask for a redaction of a particular statement or section of statements. You can achieve this by following the guide below
Finding the cut points
With any luck you will have some idea where the problem areas of footage are. For example, you may have an email request such as:
"Hi, to follow up on our video/interview. Can the last question be removed from the interview please, the one where they ask about the time I spent working in Germany. I think its about 20 minutes into the interview. I was really tired and I was really stammering. I don't think I really did the topic justice. Perhaps you could just link to the project website instead?"
To find the descirbed selection use the Project Monitor window to play, forward and rewind your video. See that the position indicator on the Timeline moves along as your video plays: it can be helpful to use the position indicator to guide you when you cut or change a clip.
If you have a rough idea of what time the area to edit out starts, you can navigate to it using the time information located above your timeline or in the bottom right of your kdenlive window.

Remove a section from the middle
To remove a section from within the clip you need to cut it out using the Razor tool, which is located in the tools rack at the bottom of the editor window.

Select your razor tool from the tool rack and click on the place you want to cut, using your position indicator as a guide if you wish.
Next you need to mark the end of the area to remove. Press play till you have found the end point of the section that you wish to cut out, and use your Razor Tool to make another cut.

You have now isolated a section of the video and you can delete it. First, switch back to your selection tool in the toolbar:

Then select the area of your clip that you wish to remove and hit delete on your keyboard. You will now see a blank space in your timeline.

Line them up
Next, drag and drop the remaining so that they line up like one long clip. Make sure the first clip touches the very beginning of the timeline.

Trim the Fat – condense and refine the footage
When people talk in monologue about complex, personal or exciting topics, they often pause to gather their thoughts, repeat the same information in different ways, correct themselves or stammer/mince their words. In an academic setting this information might be kept for analysis, but most of the time the focus is on keeping the attention of your audience, and so this sort of deadweight footage simply must be removed.
There are several ways to approach this. You could first remove larger chunks of repetition, and then run through the footage again to remove over-long pauses, and then once more to remove any stammering or self-correction. You could, on the other hand, simply do all of these edits at once and aim for 100% condensement on only one run through the video.
Avoid manipulation
Be aware that there can be a fine line between removing excess words and changing the meaning of what is said. There is a nice guide here to what is acceptable: http://j-source.ca/article/ethical-guidelines-editing-audio and below is a condensed list of what may be unnaceptable taken from this wiki: http://tvtropes.org/pmwiki/pmwiki.php/Main/ManipulativeEditing
- Creating a relationship between two unrelated events or quotes, or manipulating the timing of events (order switchting for example);
- Cutting out the buts and excepts that would otherwise soften a statement;
- Cherry-picking scenes to show the individual in a poor light, especially when the context is removed;
- Causal deletion, for example, showing someone who is angry without showing the cause of the outburst;
- Hiding the interviewer when they have asked a very pointed question which the interviewee may not have otherwise talked about;
- Adding music which changes the mood dramatically.
How to trim the fat
The skills taught in the previous two sections should provide you with most of the tools you need, particularly the two points which are repeated below:

"Select your razor tool from the tool rack and click on the place you want to cut, using your position indicator as a guide if you wish. Next you need to mark the end of the area to remove. Press play till you have found the end point of the section that you wish to cut out, and use your Razor Tool to make another cut.You have now isolated a section of the video and you can delete it. First, switch back to your selection tool in the toolbar. Then select the area of your clip that you wish to remove and hit delete on your keyboard. You will now see a blank space in your timeline."
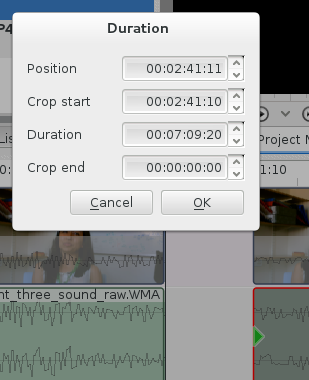
And for the fine tuning, for example cutting out the beginning or end of a word. If your new clip is not quite the right length, you can change it by dragging the edge of the clip left or right. For very fine adjustments, double click on the clip and adjust the clip more precisely.

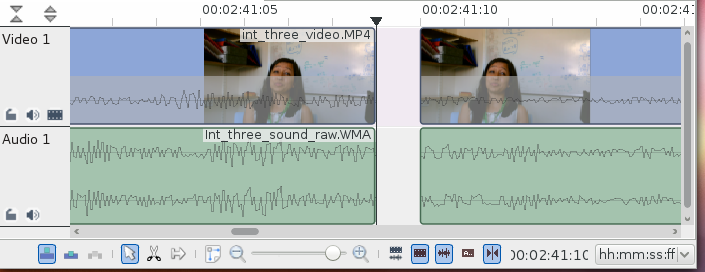
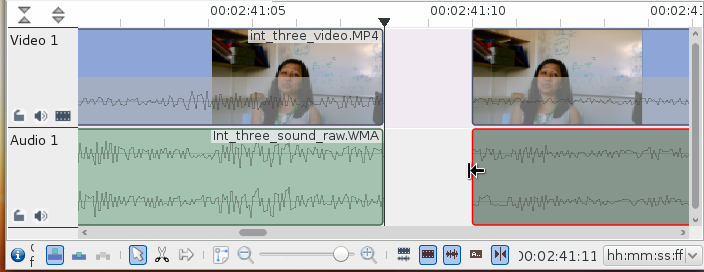
This part is the most time consuming and fiddly part of editing an interview. If your interview is a fast talker, you may have to go over the beginning or end of some cut points many many times before you can get a natural sounding break in the speech. Zooming in using the zoom level slider may help, you may be able to see the sound you are trying to remove in the waveform. See the screenshots below for an example:
Hands on: identifying a speaker with titles
In this task, you will identify the interviewee using a title, showing their name and position/organisation for a few seconds as they start speaking. It is a quick and simple method of introducing them, and so focus remains on their message.
First, right click in your Project Tree and select Add Title Clip

You will now see the Title Clip editor window.

If you see a grey and white squares, this means that the background of the slide is transparent, which is correct for this task because we will need to see the video footage beneath the title. If you do not see transparency, you need to change the opacity of the Background to zero.

Next, create your text by clicking on the T button. If you do not see all the buttons displayed in the image below, try expanding the title editor window to full screen.

Click somewhere on the transparent are and type the name of your interviewee - there may not be a spell checker so proof read things carefully.


You can adjust the size and colour of the text using the menus, and move it by drag and drop. Use a new text box (by clicking T again) for each new line or phrase.

Next, to improve the visibility and style, add a shadow to sit behind the text.

You can do this by clicking the Add Rectangle tool.

Finishing up
Before you render/export your edit into a whole new video you need to check that there are no gaps between cuts, all the clips should be lined up so that they are touching each other. You could also consider adding a titles or a slate at the end with your name on as editor, the logs of any organisations involved and the licence that you wish to release your work under.
Rendering
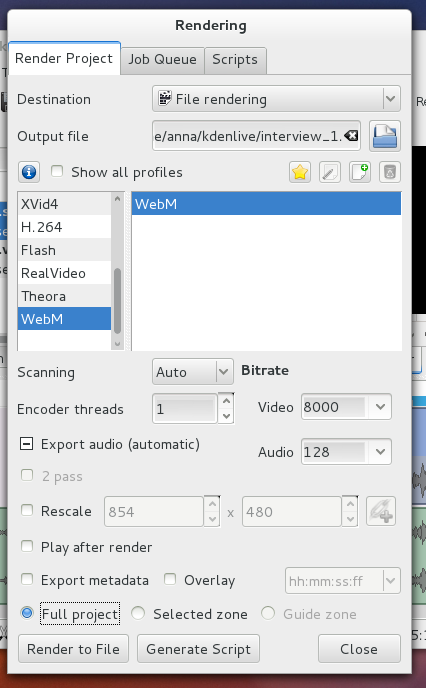
Rendering is the process where Kdenlive takes your edits and creates a new video file that can be viewed with other programs. When you are ready to export your video so you can, for example, upload it to the internet, you need to click the "render" button.

On kdenlive there are plenty of presets to make this rendering process simple. Try choosing the WEBM profile. You should give the video a name, and if you want to, you can ajust the size of the video (smaller videos make smaller files).
