


How to change the status of (approve, close) loan accounts
How to approve or close a single loan account
Before loans can be disbursed, they must be approved by someone with the appropriate permissions. The same procedure is used to cancel loan applications.
The following table explains the meanings of the statuses that a loan can have. When you configure Mifos, you can decide which of these statuses is available for use. See the Configuration guide for information.
|
Status |
Description |
|
Partial Application |
Save the loan account in this status when: The information entered is not complete; or Is required by the MFI as part of the loan approval process; or Want to save it with this status for the time being. Most loan account attributes can be modified when the account is in this status. Use the Save for later button when saving the loan account |
|
Pending Approval |
This is an optional status showing that loan account information is complete information. This status allows the MFI to execute offline process with regard to the loan account before approving it in the system. The loan account can be cancelled when it is in this status. Use the Submit for Approval button when saving the loan account |
|
Approved |
The loan amount and repayment schedule have been approved by the MFI. All loan account parameters including the interest amount, loan term and funding source of the account are frozen and cannot be changed at this state The loan account can be canceled when it is in this status. If there is a need, it is possible to approve loan in the past. It can be done by setting the past approval date (which can be even before the creation date) while changing the status to Approved. |
|
Active in good standing |
|
|
Closed - Rescheduled |
A loan can be rescheduled if the MFI allows rescheduling. The current loan account has to be closed with the status marked as Closed- Rescheduled, and a new loan account must be created; it can have the same or different conditions and rules compared to the previous loan. The system will not link the old and new accounts. Transactions can still be applied to accounts in this status, but the user will be given a warning before proceeding. In performance reporting and other reporting, this loan will not be counted as part of the loan cycle. |
|
Closed - Obligations met |
|
|
Active- Bad standing |
The system moves to this status any time the loan account terms are violated, for example, if there is nonpayment of an installment. The system automatically moves the account to Active in Good Standing once the amount overdue has been paid. |
|
Closed- Written Off |
The loan account can be written off if the MFI or Loan Officer determines that the loan cannot be repaid. |
|
Cancelled |
A loan can be cancelled before it gets to Active and in Good Standing status. The loan can be cancelled if the customer withdraws the application or an officer of the MFI rejects the application. |
To approve (or cancel) a loan, follow these instructions:
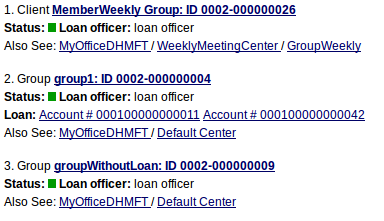
- From any Search screen, search for the borrower name (client or group), or the loan account number if you know it.
- In the list of clients or groups that appears, click the correct one.
- In the Account Information section, find the loan you need to approve (all loans that need approval have a yellow square next to them). Click that link.
- Click Edit Account Status.
A screen like the following appears:
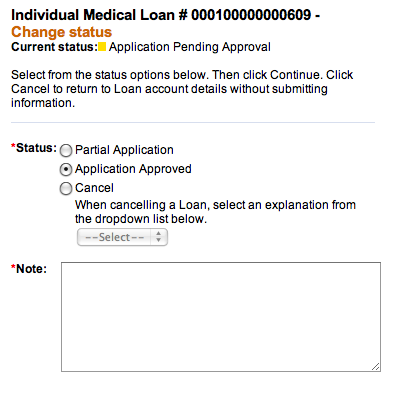
- Click either Partial Application, Application Approved, or Cancel. If you click Cancel, you must click an explanation from the list that appears, such as Rejected. If the application was withdrawn, click Withdraw. If neither explanation fits, click Other.
If there is a need to back date transactions and record disbursements that have happened in the past, simply enter the past approval date (which can be before creation date) and then approve account. Disbursal would still follow the rule that it must happen on or after the date of the approval.
NOTE: To be able to approve loans in the past, 'Back-date approvals' and 'BackDatedApprovalsAllowed' option should be enabled in Mifos configuration file.
- In the Note box, type a note explaining any reasons for your action.
- Click Preview to review your work.
- If a survey is required for this loan product, you must check the Client has Completed Loan Survey box.
- Click Submit.
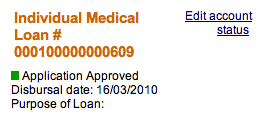
The loan now appears on the details page with a green square, showing that it is approved.
How to approve multiple accounts
See How to approve multiple loans (bulk loan approval) under bulk transactions.
How to approve loan amounts by different loan amount ranges
Mifos provides functionality which allows to approve loans by different loan amount ranges.
Loan amounts in a specific range can be approved only by the person who has the permission to approve loans with that amounts.
Follow the steps below to see how to specify maximum loan approval amount in role and what impact does it have on Loan approval process:
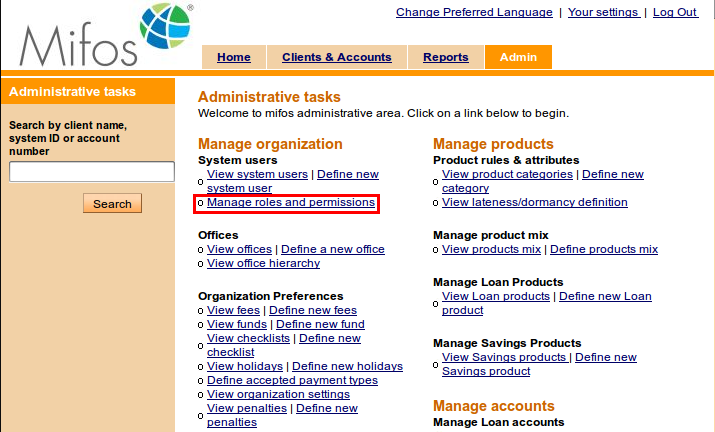
1. Go to Admin tab and click on Manage roles and Permissions link.
2. Select one of the roles on the list and then navigate to the "Can change state to Approved" permission.
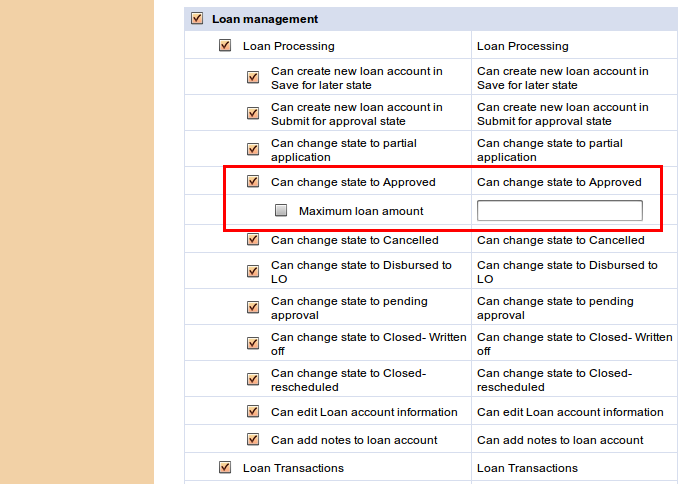
3. Check 'Maximum loan amount' checkbox and enter the maximum loan amount that the role is allowed to approve.
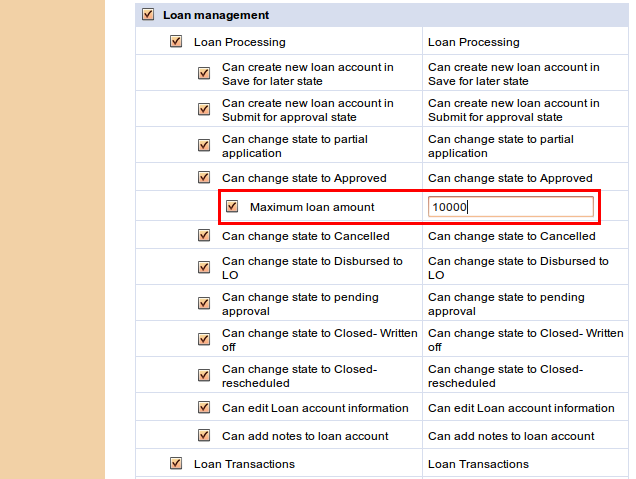
4. Click on Submit button.
After that, Mifos allows this role only to approve loan which amount is less than specified.
Follow the steps below, to see how Mifos handles situation when user tries to approve loan with amount greater then allowed in his role:
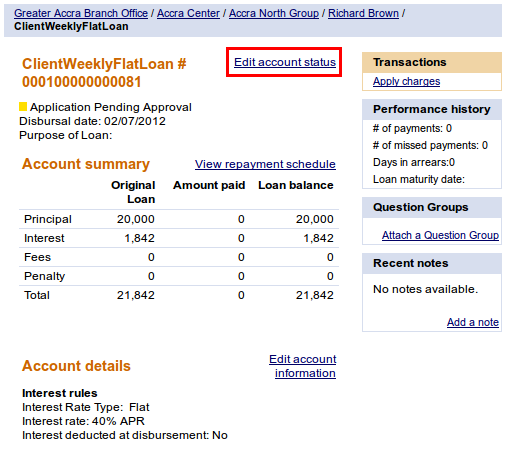
1. If Maximum loan amount is set as 10000 for the role, then create a new Loan Account with greater amount e.g. 20000, as it is shown below:

2. Then, while account is still in 'Pending Approval' state, click on Edit account status link to approve Loan.
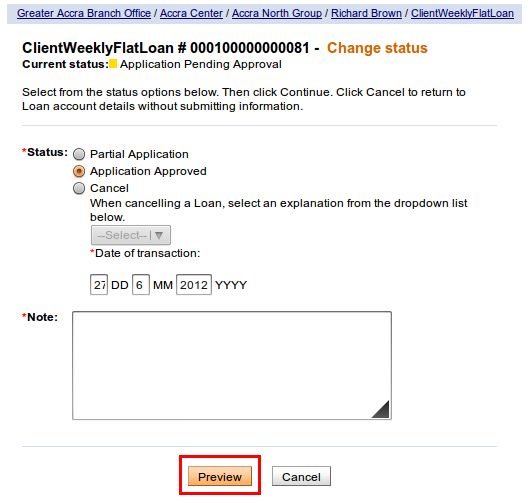
3. Select 'Application Approved' status, fill notes and click on Preview button.
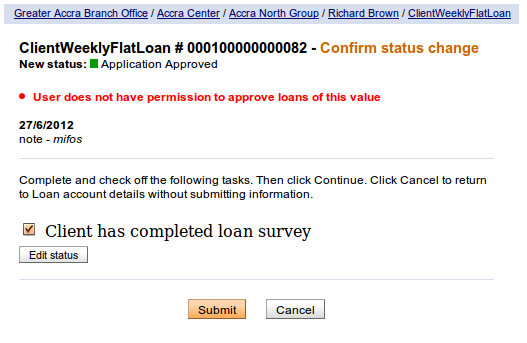
4. Click Submit button to confirm the status change.
Validation message appears that user is not allowed to approve Loan with that amount, as it is shown below:
How to writing off a loan
Mifos provides functionality to write off transactions. You may specify a date for writing off loan, it can be current date or backdate.
To write off loan account, follow instructions below. Status of Loan Account will be changed to “Closed- Written Off”.
1. Click on Clients&Accounts tab, type a name of group or client and click Search. You will see a list of groups/clients with Loan Accounts assigned to them.
2. Choose appropriate loan account and click on it to display its details.
You will see a page like following.

3. Click Edit account status to write-off transaction .
You will see a screen like following:

4. Date of transaction is default set as current date. You can specify different transaction date e.g. enter backdate, but it can not be less then the last payment date or the last meeting date.
Note:
You will be able to write off loan with backdate only if 'Back dated transactions allowed: Yes' option is enabled in the system. You can check if this option is enabled in your system in Admin tab on 'View organization settings' page.
If LSIM option is enabled, only the last payment matters and you can enter date which cannot be before the last payment date. If LSIM is disabled, then transaction date must not be before the previous meeting date or last payment date.
-
Type all necessary fields and click Preview to check your entries or Cancel if you don't want to change anything at this time.
-
If you like to change anything, click Edit status to return to the earlier screen.
-
When the entries are correct, click Submit to save them or if you decide not to change any label at this time, click Cancel.