How to manage administrative documents
How to upload administrative documents
- Click Admin > Upload admin documents.
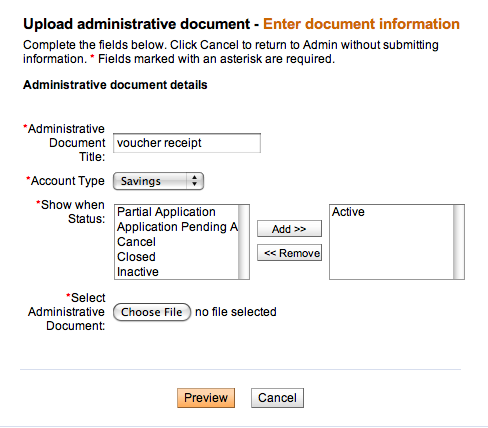
This screen appears:

- Enter information using the descriptions in the following table:
Field
Description
Example
Administrative Document title
The title for this document
Voucher receipt
Account Type
Savings or Loan
Savings
Show When Status
The status during which this document will be available to the user to print. Click the status and click Add>>. The document can be available in more than one status.
Active
Select Administrative Document
Click Choose File, browse your computer for a BIRT-created administrative document, and double-click it. Its name appears next to the box.
- Click Preview to review your choices.
- If you want to make changes, click Edit document information, make changes, and click Submit again.
- When you are satisfied with your choices, click Submit.
How to view and edit administrative documents
To view the entire list of administrative documents that have already been uploaded, click View admin documents.You will see following site.
If you want to edit the basic fields of the document, as in the table above, click Edit, make changes, and click Preview and then Submit. If you want to change the layout or the data fields, click Download, make changes in BIRT, and upload the document to Mifos again.
How to attach administrative documents
MFIs can use Pentaho Report Designer, the same reporting tool used to create reports at the head office level, to create a set of administrative documents that can be attached to specific loan and savings accounts and printed as needed. The following might be available as administrative documents: a voucher, payment book, disbursal receipt, and payment receipt.
How to generate/print administrative documents
There is possible to generate/print receipts or voucher in the following cases:
1. Loan Agreement for each loan
2. Details of the account
3. Apply Payment
If you want to be able to attach and print ‘Administrative documents’ you have to upload them first (see: How to upload administrative documents).
Note: During uploading administrative document chose appropriate ‘Type’ and ‘Show when Status’ because it will have influence, where documents will be displayed and available to download.
Loan Agreement for each loan
If you want to download/print Loan Agreement, you need to first upload previously prepared (in Pentaho Report Designer) document as an administrative document. You can also use sample file which can be downloaded from here.
Loan Agreement is displayed while status of Loan is changed to Application Approved, so on ‘Upload Administrative documents’ page, from the box ‘Show when status’, you need to select ‘Application pending approval’ status and type: ‘Loan Administrative Document’.
Once document is uploaded, you will see the Loan Agreement every time when you change status of Loan from Pending Approval to Application Approved, as it is shown below:
Details of the account
If you want to download/print the details of the Loan/Savings account then you need to first upload previously prepared (in Pentaho Report Designer) document as an administrative document. You can also use sample file which can be downloaded from here for Savings and for here Loans.
Loan/Savings Details document is displayed on Loan/Savings details page depending on the status of the Loan/Savings. During document upload you need to select from the box ‘Show when status’, in which Loan/Savings statuses this document should be displayed and also you need to select type: ‘Loan Administrative Document’ / ‘Savings Administrative Document’.
Once document is uploaded, you will see this document on every Loan/Savings details page which has status selected during upload.
Payment Receipt
If you want to generate and print payment receipt during apply payment, you need to first upload previously prepared (in Pentaho Report Designer) document as an administrative document. You can also use sample file which can be downloaded from here.
Payment receipt is available to download/print after you apply payment. So, during document upload you need to select type: ‘Payment Receipts’ and from ‘Show when status’ box you need to select ‘Loan Repayment’.
Once document is successfully uploaded, you will see additional checkbox ‘Check to print payment receipt’ option on ‘Apply payment’ page, as it is shown below:
Complete all mandatory fields and click on Review transaction and then Submit.
If payment is done correctly, you will see additional page which allow you to download receipt in PDF format and print it.
Click on document link (in this case: “Repayment receipt”) to download and print receipt.


