


Installation
This is a guide for installing Plumi 4.x on a Debian or Ubuntu Linux server using an Apache2 web server.
Plumi is untested on other operating systems. You can find more information about installing Plone on different kinds of servers here, which should aid you in installing the Plumi buildout on other operating systems. Please contribute your installation notes on these or different OSs via the Plumi email list and/or by editing this manual chapter here on FLOSSmanuals.
Prior Knowledge
This guide requires that you already have intermediate knowledge of systems administration, Debian or Ubuntu Linux, the shell and Apache. A basic knowledge of Python is desirable for installation. Knowledge of Zope and Plone will aid in set up of your Plumi site.
Requirements
- Debian or Ubuntu Linux server machine with these system requirements and Apache2 web server & domain set up in which to run your Plumi site (a tutorial on setting up an Ubuntu web server can be found here and one for a Debian web server is here).
- Shell access to server and an account with permissions over domain's directory.
- The server will need to have:
-
- GCC development tools.
- make.
- Subversion version control system (svn).
- Plumi 4.x is built on Plone 4.x which requires Python 2.6 to operate correctly. It will be installed as part of the installation detailed in this chapter.
Two Domains Required
Plumi requires two domains to operate although they can point to the same server:
- The Plumi Site (eg: example.org)
- Plumi Transcode Daemon and transcoded files (videos.example.org)
Please ensure that these domains are set up in advance of your site installation and have had sufficient time to propagate through the Internet (eg: 24-48 hours).
NOTE: If you server is not going to be accessed from the Internet, you still need to set up the domains within your private network (eg: internal DNS server, /etc/hosts files on all workstations, etc). If you want to run a development version to test plumi, you do not need to set up these domains. Plumi development setup will work out of the box on localhost.
Setting up Python, yasm, libjpeg and zlib, groff-base
You can install Python and other required tools by running these commands:
sudo apt-get install python-setuptools yasm subversion python2.6-dev
sudo apt-get install libjpeg62-dev zlib1g-dev groff-base build-essential
sudo apt-get install libssl-dev python-profiler libjpeg62-dev
sudo apt-get install libreadline5-dev libxml2-dev
Creating a Python Virtual Environment
If you are running other applications and web sites on your server, it may be worth while creating a python virtual environment for developing in - this can avoid problems between python packages installed by your operating system and those installed by easy_install. You will need to have the virtualenv package installed first - in Debian and Ubuntu systems you can apt-get install python-virtualenv, then:
$ virtualenv -p /usr/bin/python2.6 --no-site-packages src/pyvirt
. src/pyvirt/bin/activate
$ easy_install http://dist.repoze.org/PIL-1.1.6.tar.gz
This will install the virtual env into src/pyvirt, activate it and then install the (required) Python Imaging Library into the virtual env.
Installing via Buildout
Here you will find information on how to install Plumi from buildout, which is the recommended process. A buildout puts together Zope, Plone, the third-party products and all customisations into one package. This makes it very easy for you to get everything up and running quickly. The buildout tutorial on Plone.org is available here.
Some links for background reading on buildout/setuptools/disutils/virtualenv : http://us.pycon.org/2009/tutorials/schedule/1PM3/
NOTE: Plumi uses ports 8080 to run Zope, 8100 to run zep and 8888 as the listen port for the transcode daemon. In production buildouts you can see and change all the ports used by editing the site.cfg file. If you have other systems using these ports, please configure your buildout prior to running it (see the buildout configuration section for details).
Buildout Installation Process
This process assumes that you are creating a Plumi site called "plumi" at www.example.com. Before installing Plumi, you need to answer the following questions:
Where are you going to put your Plumi files on your web server?
- We are using /opt/plumi but you could use /home/zope or something similar.
- NOTE: Do not install the files into /var/www or any other publicly accessible space on your server.
Which version of Plumi do you want to get?
- The trunk version of Plumi contains the latest development code and may therefore be unstable. If you are contributing to the development of Plumi by coding or testing then this is the version you should install.
- Tagged versions of Plumi are releases that have been packaged and may include Beta Releases, Release Candidates or full production versions.
Do I want to create a development site or a production site?
- If you wish to run a production site you can use the fully-fledged production build with caching, multiple load balanced zope instances, etc.
- If you simply want to evaluate or develop Plumi, then a much more lightweight buildout is provided instead in the development buildout.
Download Plumi from SVN
Plumi is available from the Plone SVN server. To download the latest Trunk version of Plumi, run the following command:
svn co https://svn.plone.org/svn/collective/plumi.app/trunk/ target_folder_name
To download the latest Tagged version of Plumi, run the following command:
svn co https://svn.plone.org/svn/collective/plumi.app/tags/Tag_Name target_folder_name
NOTE: target_folder_name is where you want the code to go (eg: /opt/plumi/4.0-final or /home/zope/plumi) and Tag_Name is tagged version you want to get (eg: 4.0, etc)
Download Plumi as a Packaged Release
Plumi can be downloaded as a fully packaged release in an archive using the tar or zip format. Only tagged versions are available this way, not the current trunk. To download a packaged release, visit the Plone product page here:
http://plone.org/products/plumi/releases/
Find the release you want, copy the download link and follow the instructions below e.g.:
mkdir /opt/plumi
wget Download_Link
tar -xzvf Zip_File
cd Created_Directory
NOTE: Download_Link is the link to the package file from Plone.org / PyPI e.g. http://pypi.python.org/packages/source/p/plumi.app/plumi.app-4.0.zip#md5=807dbf4f54b2845351dd74087b2c2e80, Zip_File is the name of the archive file (eg: plumi.app-4.0.zip) and Created_Directory is the name of the directory created after the archive is extracted (eg: plumi4.1beta).
Set Site Configuration Information
Configure the specific information about this Plumi installation in the site.cfg, including:
- Change all references to hostname & email address
- Check the ports and change them if the defaults are already in use
- Set the effective user for both zeo and zope to the name of the user account that each is to be installed under (NOTE: This user should already be set up - the Plumi installation script will not create it/them)
- Set the default Zope admin user & password if you want them to be different (recommended)
NOTE: It is best to use the default 'localhost' URLs unless you are putting the transcoder on a separate machine.
Devel buildout : Run the buildout then setup & configure Plumi
- Prepare to run the buildout (bootstrap is a Python script that creates a number of directories and scripts based on the buildout configuration file, and downloads the latest version of the zc.buildout egg).
$ python2.6 bootstrap.py -c devel.cfg
- Run the buildout (in verbose mode). This will take between 5 to 10 minutes, possibly more depending on your server's configuration & load. Sit down, grab a coffee and wait till it finishes!
$ ./bin/buildout -c devel.cfg
- Supervisor will be managing the ZEO server and the transcode daemon. Start supervisor like this
./bin/supervisord
Confirm that zeo and transcode daemon are up and running:./bin/supervisorctl status
Now start your dev instance in the foreground./bin/instance-debug fg
Production buildout : Run the buildout then setup & configure Plumi
- Prepare to run the buildout (bootstrap is a Python script that creates a number of directories and scripts based on the buildout configuration file, and downloads the latest version of the zc.buildout egg).
$ python2.6 bootstrap.py -c production.cfg
- Run the buildout (in verbose mode). This will take between 5 to 10 minutes, possibly more depending on your server's configuration & load. Sit down, grab a coffee and wait till it finishes!
$ ./bin/buildout -v -c production.cfg
- Supervisor will be managing the ZEO, Zope instances, load balancer cache server and the transcode daemon. Start supervisor like this
sudo ./bin/supervisord
You can check that all the services have started via :
sudo ./bin/supervisorctl status
Production buildout sets up and configures an nginx web server based on your site.cfg setup. However, if your server already has Apache set up on it (eg: for hosting other, non-Plumi sites), you can stop nginx and use configure apache to use with plumi. Here is the apache configuration for demo.plumi.org to help get you started:
<VirtualHost *:80>

        ServerName  demo.plumi.org
        ServerAdmin contact@engagemedia.org

        <Directory />
                Options FollowSymLinks
                AllowOverride None
                Order allow,deny
                allow from all
                deny from 60.224.93.59,203.184.26.179
        </Directory>

        ErrorLog /var/log/apache2/plumidemo/plumidemo-error.log
        # Possible values include: debug, info, notice, warn, error, crit,
        # alert, emerg.
        LogLevel warn

        CustomLog /var/log/apache2/plumidemo/plumidemo-access.log combined
        ServerSignature On
        RewriteEngine On

 # Normalize URLs by removing trailing /'s
 RewriteRule ^/(.*)/$ http://127.0.0.1:8381/VirtualHostBase/http/%{SERVER_NAME}:80/demo/VirtualHostRoot/ [L,P]
 # Pass all other urls straight through
 RewriteRule ^/(.*)$  http://127.0.0.1:8381/VirtualHostBase/http/%{SERVER_NAME}:80/demo/VirtualHostRoot/ [L,P]

  <Location />
   Order Allow,Deny
   Deny from none
   Allow from all
  </Location>

</VirtualHost>

<VirtualHost *:80>

    ServerName videos.demo.plumi.org

    RewriteEngine On
    RewriteLog /var/log/apache2/demo.plumi.org/rewrite_videos.demo.plumi.org.log
    RewriteLogLevel 0

    CustomLog /var/log/apache2/demo.plumi.org/access_videos.demo.plumi.org.log common
    ErrorLog /var/log/apache2/demo.plumi.org/error_videos.demo.plumi.org.log

    <Proxy http://127.0.0.1:8338>
      Allow from all
    </Proxy>

    #Alias /transcoded /var/log/apache2/demo-41.plumi.org/transcoded
    Alias /transcoded /home/plone/demo-41.plumi.org/transcoded
    <Directory /home/plone/demo-41.plumi.org/transcoded>
       Order allow,deny
       Allow from all
    </Directory>

    RewriteRule ^/transcoded - [L]
    RewriteRule ^(.*)$ - [E=BACKEND_LOCATION:127.0.0.1]
    RewriteRule ^(.*)$ - [E=BACKEND_PORT:8338]
    RewriteRule ^(.*)$ - [E=HOST:videos.demo.plumi.org]
    RewriteRule ^(.*)$ - [E=PORT:80]
    RewriteRule ^(.*)$ - [E=PROTO:http]
    RewriteRule  ^/(.*)/$ http://%{ENV:BACKEND_LOCATION}:%{ENV:BACKEND_PORT}/ [L,P]
    RewriteRule  ^/(.*)$ http://%{ENV:BACKEND_LOCATION}:%{ENV:BACKEND_PORT}/ [L,P]

</VirtualHost>
- Once the instance is running, go to the Zope Management Interface (ZMI).
http://www.example.org:8080/manage
If you've used a non-standard port for Zope, replace the 8080 in the URL above with the port you have specified when configuring the buildout.
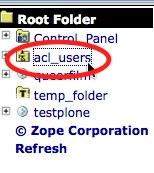
- Log in to the ZMI using the admin login details you specified in site.cfg (eg: username: admin, password: admin). If you want to change the admin user's ZMI password once logged in, navigate to the acl_users folder in the left-hand sidebar.
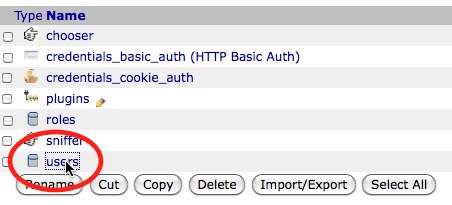
Click on users.
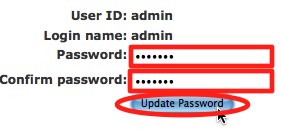
Click password.

Enter password and confirm by re-entering, then click Update Password.
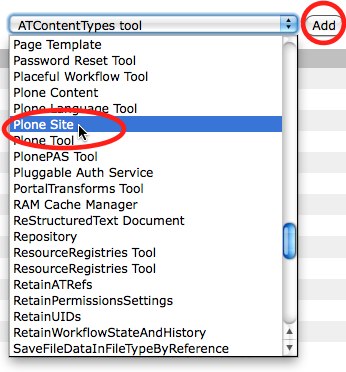
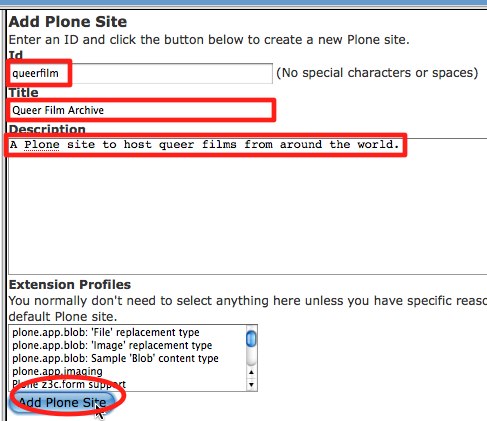
- Add a Plone site or instance in the ZMI.
Click “Root Folder” in the left-hand sidebar. Choose Plone site from the Select type to add... drop-down menu and click Add.
Enter the ID, Name and Description, e.g. ID "plumi" and Name "Plumi Site". Click Add Plone Site.
- Visit your new plone site by entering this URL: http://www.example.org:8080/plumi
If you've used a non-standard port for Zope, replace the 8080 in the URL above with the port you have specified when configuring the buildout.
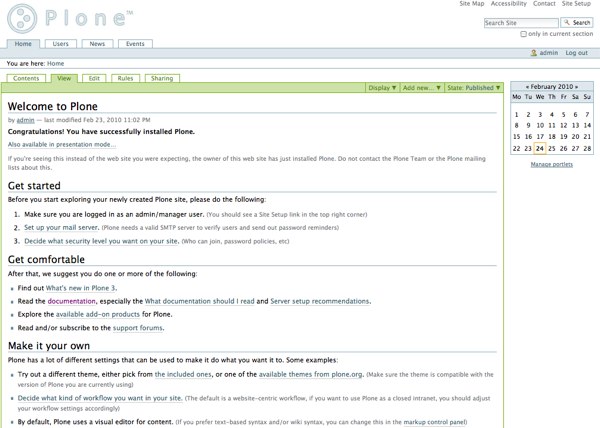
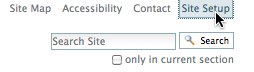
- Click site setup in the top right corner.
- Follow the prompt to change your mail settings.

- Change/add your mail settings and click Save.

- Click Add/Remove Products from Site Setup sidebar.
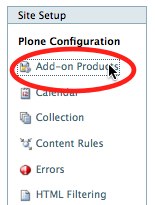
- Tick the tick box next to Plumi.
- Click Install.

- Wait a few minutes for your Plumi site to install.
- Click Add/Remove Products from Site Setup sidebar again.
- Tick the tick box next to Plumi skin.
- When it is done, the page will reload and you should see a freshly installed Plumi site complete with the Plumi skin/theme.
- Add a new user to your Plumi site for testing (the admin user may not have the correct folders created for them, as this user is created before the Plumi site is generated).
Click log out.
Register a new user by clicking register.

Log in with new user account details by clicking log in.
- Try publishing a video in your new Plumi site (logged in as this new testing user).
- Check the video after it has uploaded to see if it has been created and transcoded correctly.
Configuring Plumi to start automatically
To ensure that Plumi will start automatically whenever your server is turned on, add the following lines to your /etc/rc.local file:
./bin/instance start
./bin/squid-instance
su zope -c './bin/transcodedaemon start'
./bin/apachectl start
NOTE: Replace the "zope" in "su zope -c" with the name of the user you installed Plumi under (the "effective-user" from site.cfg)
Troubleshooting
If you are having trouble installing Plumi please join one of our email lists or IRC channels listed here or contact the Plumi maintainers here.
Running Multiple Plumi Buildouts
You may encounter difficulties if you are already running a Plumi site from another buildout on this webserver (note that you would usually add another Plone site within the one buildout rather than run multiple sites from different buildouts). If you must run multiple Plumi installations on the same server, you will need to set up Apache & Squid yourself & not use the default configurations included in the buildout process. You will also need to change the default ports in the installation's site.cfg file. If you are running more than one transcode daemon as well, you will need to change the name of the Transcode Daemon process ID file.
Development Map
The development map chapter describes the anatomy of the Plumi buildout, and explains the products and packages that are installed.