


Configuration
Plumi and Plone itself (upon which Plumi is built) are highly configurable. The complexity of what you wish to customise will vary, but this chapter covers some of the aspects of Plumi which you can configure easily, with links to further documentation about customisation.
Changing the logo and the site title are covered later in this chapter. Information covered here includes changing the portlets (content areas in the sidebars), changing the design and configuring the transcoding framework.
This chapter will briefly discuss these options:
- Site Setup - configuring Plumi using the built-in Plone Site Setup.
- Configuring Through-The-Web - using the Zope Management Interface.
- Further Configuration - links to further information on Plone.org.
- Customisation and Development - links to further information for developers.
1. Site Setup
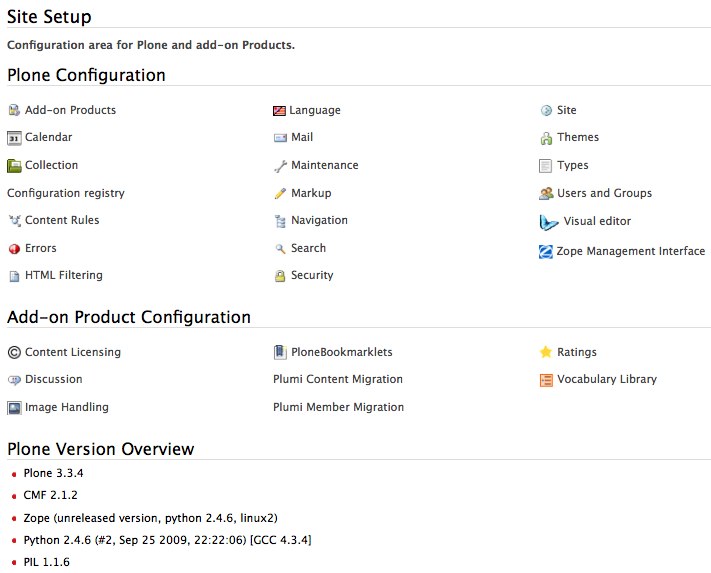
The Admin user of your Plumi site, or any user with Manager privileges, can access the Site Setup area of Plumi. You can access Site Setup by clicking the site setup link in the top right. Please note that you must be logged in as a Manager to do this.

Links to different options for Plone Configuration are available, as well as configuration of Add-On Products, and an overview of the Plone version you have installed.
 ⁞
⁞
Using the options found in Site Setup you can:
- Add/Remove Products. Tells you which products (Plone software modules) have been added and are now available to implement on your Plumi site
- Calendar. Change calendar settings such as the first day of the calendar week, and the workflow states that will appear in the calendar
- Configuration Registry. This stores settings for products that need to manage some configurable, user-editable values. Here you can change options for allowing comments from anonymous users, or showing the profile image of a user next to their comment.
- Content Rules. Here you can set up rules which will automatically perform actions on content when certain triggers take place. You can apply these rules to specific folders.
- Errors. This page lists a log of the most recent errors which have occurred on the site.
- HTML Filter. Plone filters HTML tags that are considered security risks. Here you can change the settings for which tags are stripped and which are allowed.
- Language Settings. Here you can define which languages are available on your site. Plumi currently offers both English and Indonesian with more languages to follow.
- Mail. Here you can change your mail settings, including SMTP server details and the "From:" address for emails sent by your website.
- Maintenance. Here you can restart the Zope application server (which runs Plone, and your Plumi site) and change other maintenance options.
- Markup. Allows you to change your settings from the default HTML to other kinds of markup such as plain or structured text.
- Navigation. Change your navigation settings, including what kinds of content appear in the navigation tree.
- Search. Change the kinds of content which are searched on the site.
- Security. Change settings including self-registration and passwords.
- Site. Change site title and description plus various site-wide settings including enabling/disabling inline editing and link integrity checking.
- Theme. Choose the default theme or skin for your Plumi site, and enable/disable other settings such as external link and content type icons.
- Types. Workflow, visibility and versioning settings for your content types.
- Users and Groups. Add or remove users, change a user details, add or remove users in groups, assign roles (permissions) to users and to groups.
- Visual Editor. Change settings for the Kupu visual or WYSIWYG editor.
- Zope Management Interface. Takes you to the ZMI for further configuration settings.
2. Configuring Through-The-Web (TTW) Using Zope Management Interface (ZMI)
Visit this page for a how-to on configuring your Plumi site using the ZMI. This is no longer recommended as a method for configuring a Plone site, given that the modifications that are made cannot easily be brought across to an upgraded buildout. It could still be useful for minor changes in the short-term.
3. Further Configuration
For more information on configuring your Plumi site please consult the Configuration and Set Up pages on Plone.org. This includes info on other add-on products (Plone software modules), backup procedures, optimising performance and caching with Squid, connecting to MySQL databases and more.
4. Customisation and Development
For more information on how to customise your Plumi site please consult the Plone developers manual.
This slideshow by Martin Aspeli introduces you to extending and customising Plone 3: