Star Tool
Stars and polygons are special shapes, difficult to draw by hand while maintaining a regular shape. The Star Tool enables stars and regular polygons to be drawn easily in the document. This tool is very convenient even though it may be less often used than the Rectangle Tool and Ellipse Tool.
Inkscape stars are Live Shapes, and can thus be infinitely modified after creation, with handles or tool control parameters. By modifying some of the following parameters, this tool can be used to draw triangles and other regular polygons with any number of sides. The included deformation methods allow for some amazing shapes, all while keeping the powerful aspects of easy editability of an SVG Primitive.
How to Use
To switch to the Star Tool, you can either
- click the Toolbox icon

-
or press * ( Shift+8 )
Options
The tool options can be accessed in the Tool Controls bar
![]()
Drawing a Regular Polygon or Star
The left icons allow respectively to use the Regular Polygon Mode
or the Star Mode
.
The next polygon/star will be created in the Selected Mode. An object's mode and shape will be changed if it is selected while one of these icon is clicked.
In Regular Polygon Mode, the shape has no spokes. Only one handle is available, allowing modification of the size and orientation of the polygon.
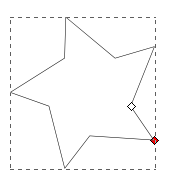
In Star Mode, spokes start from regular polygon corners. There are two handles - the red handle is the same as for polygons, allowing modification of size and orientation of the object; the white handle at an interior spoke angle allows simultaneous modification of all the spokes' shapes and sizes.
Corners
You can define the number of corners and spokes of the shape by adjusting the corners parameter - it can either be specified before drawing a polygon or dynamically modified after selecting an existing polygon. Corner counts are limited from 3 to 1024.
Spoke Ratio
Only accessible in Star Mode, it allows you to define the ratio of spoke length between the star core and its spoke tips. This parameter range is from 0.0 to 1.0.
Rounded
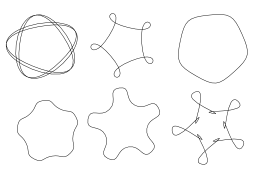
This setting allows you to round the corners of the shape in both Polygon Mode and Star Modes of this tool. The range value is from -10.0 to 10.0. Press Shift and drag either handle to modify the rounding of the shape on-canvas.
Note that dragging each handle gives different results because the degree of rounding is proportional to the angle of displacement from the center of the shape - thus a drag of the middle handle will create a greater degree of rounding than a same-length drag of the outer handle.
The following image shows some rounding examples, with regular polygons on the first line and stars at the second. There are infinitely more possibilities than shown here.
 There is a Spirograph Tool ( Effects > > ) which can produce similar effects and much more.
Randomised
The Randomised option of Star Tool displaces the inner and outer points of the spokes to random coordinates around the center of the star. The range value runs from -10.0 to 10.0. Near 0.0, the randomness of the displacement ratio low, and it increases as the parameter approaches -10.0 or 10.0.
You can also change the power of the randomised effect on-screen by pressing Alt and dragging the handle.
Default
Reset shape parameters to defaults.
Additional information
Polygons are always drawn with their geometric centers at the cursor origin - this cannot be changed
Ctrl - Constrain the star shape to follow some angles. The cursor move allow to modify angle by regular increment. The increment value can be defined in the general preferences window: > Steps tab.


