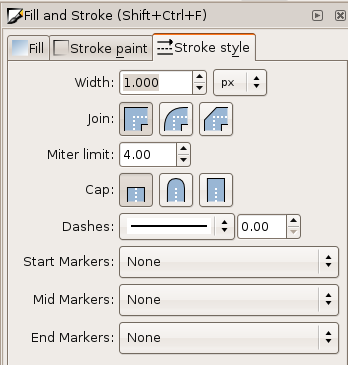
Stroke Style
Object strokes or outlines can have various styles applied to them from the Stroke Style panel on the Fill and Stroke dialog. (Stroke paint is applied from the Stroke Paint dialog and is not covered in this chapter.)
The center of an object's stroke follows the path of the object. For example, if the stroke is 10 pixels wide, the stroke will be drawn 5 pixels in opposite directions on either side of the path.
How to Use
While an object is selected, activate the Fill and Stroke dialog by pressing Shift+Ctrl+F or selecting > . Changes in the dialogue will immediately affect the selected object(s).

A brief list of stroke style options follows:
- Width controls how thick the stroke is and your desired measurement unit.
- Join controls the type of angle on a non-curve joint - miter (angled corners), round (rounded corners) or bevel (flat corners). This affects the outside of the join only.
- Miter limit keeps corners mitered at set limits of corner angle; the higher the miter limit setting, the sharper the corner can be while retaining its miter.
- Cap controls the type of cap that is on the end of an open path - butt cap (flat), round cap (half-circle) or end cap (flat but extended).
- Dashes controls the dash pattern and its offset from the primary node.
- Start Markers, Mid Markers and End Markers set a marker selection from the dropdown (there is a pre-set selection of arrow-heads, etc). Mid Markers places only one marker at the middle of the path.
Creating New Markers
Create your object on the canvas, select it and then select > . Your marker will appear in the selection box for markers.
If you are putting markers on a path and want to match them to the color of the path, select > > .


