Gradients
The Gradient Tool allows the progressive passage of one color to another (or multiple others) in an object. It can be used on any shape, closed or opened, as a fill or a stroke (applied separately). Any number of selected objects can simultaneously display handles and direction lines for the linear and radial gradients in their fills or strokes. You can drag these handles directly in the drawing, to interactively adjust gradient positions.
The gradient can be set in the Fill and in the Stroke Paint dialog to replace of any other type of coloration.
How to use
To invoke, either click the Gradient Tool icon ![]() or press Ctrl +F1.
or press Ctrl +F1.
Types of gradients

There are two types of gradients:
-
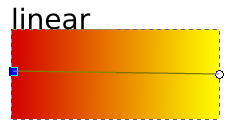
Linear gradients transition the color change from one point to another in a straight line. Just click where the gradient should begin, hold and drag, and release where it should end. Two handles now appear: the handle of the beginning is square and the end is a circle. The two handles can now be used to change the color (select each one and choose the color for it from the fill and stroke dialog) or move and change the gradient direction.

-
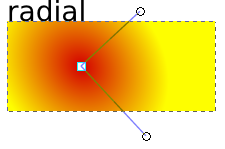
Radial gradients work as colored circles with the color transition beginning at the center. Three handles are available : the square one is the center of the gradient, and the circle ones change the radius of the gradient. When the radius is the same for both circle handle, the gradient is perfectly circular. To move the placement of a radial gradient in the object, drag the square handle.

Once a gradient is created it is automatically saved in the drop-down list of the Gradient Tool Options bar so that it can be easily reused on other shapes.
More colors
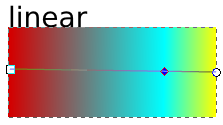
To have more than two colors on a gradient, just double-click on the gradient base path to make a new handle (stop) appear.
By default first and last color stops have fill color that matches original flat color fill of the object, but opacity drops from 100% to 0% accordingly. All new color stops in between will inherit original fill color, but have various opacity depending on position of each color stops on the gradient line (i.e. percentage of the radius).
Click in the swatch to set the color. You can move this handle to adjust the position of this stop. To delete a stop, just press the Backspace key.

Selecting multiple stops
More than one gradient stop can be selected at a time. Shortcuts for working with multiple stop selections are generally modeled on the Node tool.
- Add a stop to the selected stops by Shift+click.
- Press Ctrl+A to select all stops in the selected objects.
- Shift+drag around stops to add them to selection.
Multiple selected stops:
- Can be moved together by mouse drag or by arrow keys. For example, creating a linear gradient, then press Ctrl+A to select all stops and use arrow keys to move the entire gradient as a whole.
- Can be deleted at the same time by pressing Del.
An always up-to-date description of the current handle selection is provided in the statusbar in the Gradient tool, including the number of selected handles (and the type of the single selected handle), as well as the total number of handles and selected objects.
Editing intermediate stops
Intermediate stops in gradients can be added, deleted, and edited right on canvas.
Stops can be added by double clicking or by Ctrl+Alt+Click on the gradient line. Also, you can drag-and-drop a color from the palette onto the gradient line to create a new stop with this color. Dropping a color on an existing stop changes the color of that stop.
When two or more adjacent stops are selected, pressing Ins adds stops in the middles of all selected stop intervals.
Intermediate stops can be mouse-dragged or moved by arrow keys along their gradient line, within the limits of the adjacent unselected stops (or end handles).
- Dragging with Ctrl moves the selected stops snapping them to 1/10 fractions of the available range.
- Dragging with Alt moves the selected stops depending on how close each one is to the stop being dragged, using a smooth bell-like curve similar to the node sculpting feature in Node tool. This makes it easy to approximate different gradient profiles; for example, if you have a two-stop gradient that you want to shape according to a curve profile, select both ends of the gradient, press Ins a few times to add a number of intermediate nodes, then Alt+drag a node in the middle to smoothly profile the gradient.
Stops can also be moved by arrow keys with all the regular modifiers (Shift for 10× movement, Alt for pixel-size movement at the current zoom, Shift+Alt for 10 pixels movement at the current zoom).
Stops can be deleted by Ctrl+Alt+Click on a stop or by the Del key for all the selected stop(s).
- When you delete an end stop, the nearest intermediate stop becomes the new end stop of the gradient (without moving — i.e., the gradient span becomes shorter).
- When you delete an end stop and there are no intermediate stops, the object will be painted with a solid fill taken from the color & opacity of the remaining stop.
Pressing Ctrl+L with some intermediate stops selected attempts to simplify the selected portion of the gradient, removing those stops that can be removed without too much change in the way the gradient looks. In particular, new stops created by double-clicking or pressing Ins initially do not change the appearance of the gradient, so if you press Ctrl+L, all redundant stops that weren't moved or repainted since creation will be deleted.
Automatic duplication of gradients
When copy/pasting or duplicating an object with gradient, it automatically gets a copy of the original gradient, so modifying it does not affect the source object's gradient anymore .
However, to accommodate the needs of users who rely on sharing the same gradient definition across objects, this behavior can be optionally suppressed. The Prevent sharing of gradient definitions checkbox on the Misc tab of Inkscape Preferences is by default checked; if you uncheck it, Inkscape does not automatically copy gradient definitions for new objects, which means that copy/pasting, duplicating, pasting style, and explicit assignment of a gradient to an object via the Gradient tool controls results in a shared gradient definition, so that changing the colors or mid-stop positions of the gradient on one object (but not changing the coordinates of the end handles) affects all other objects that share the same definition.


