Layers
Layers are a type of object group within an SVG document. As the name indicates, they are like stacked slices of the image which can be stacked, arranged, added and removed. In addition, layers can be locked and made invisible to ease editing of objects within other layers of the document.
Layers can be very useful for several purposes:
- Arranging sets of objects by z-order (or stacking);
- Grouping objects which should be made visible/invisible or locked/unlocked together;
- Setting background layers which are visible but not selectable;
- etc (limited only by your imagination)
The Layers Widget on the Status Bar
The quickest and easiest way to work with layers is to use the layers widget on the statusbar.
![]()
Once you have created multiple layers in your drawing, you can select a layer easily from the combo box. You can also hide / unhide or lock / unlock the current layer from this widget.
The Layers Dialog
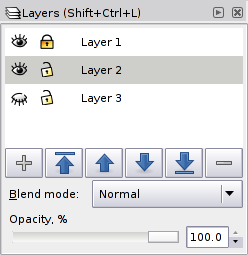
The Layers dialog controls all layer functions - adding new layers, renaming, deleting, arranging, toggling visibility and edit-locking, and setting Blend mode and opacity.

Blend Mode and Opacity
You can choose to apply a Blend mode to layers, which makes all objects in a layer blend together as if they were one object - i.e., the two objects within the same layer will not blend with each other when layer blend modes are used. The available modes are the common Multiply, Screen, Darken, and Lighten.
Opacity for an entire layer operates in a similar manner - objects within the layer have their opacity set as if they were a single object, so that one will not show through the others. Only objects from layers beneath will show through the affected layers.
How to Use
Adding Layers
New documents created by Inkscape using the default template have only one layer. It is simple to create new layers which can be used right away.
To create a new layer, click "Create a new layer" on the Layers dialog.Note : Although it is possible to have the same name for multiple layers (since each is given a different ID automatically), this is not the SVG standard. It is good practice to name each layer differently.
Renaming Layer
To rename a layer, double-click on the layer name in the Layers dialog or right-click the layer and select Rename Layer.
Selecting Layers
To select a layer (in order to make it active), simply click on the layer once in the Layers dialog or select it from the layers widget on the status bar.
Moving a Selection Between Layers
To move the current selection to the previous or next layer press Shift+PgUp or Shift+PgDn .
Moving Layers
To raise a layer one level press Shift+Ctrl+PgUp or click the "raise the current layer" arrow in the Layers dialog.
 To lower a layer one level press Ctrl or click the "lower the current layer" arrow in the Layers
To raise a layer to the top press Shift+Ctrl+Home or click the "raise the current layer to the top" arrow in the Layers dialog.
To lower a layer to the bottom press Shift+Ctrl+End or click the "lower the curent layer to the bottom" arrow in the Layers dialog.
Deleting Layers
To delete a layer, it must be selected. Click the "delete the current layer" button in the Layers dialog.
Locking Layers
To lock or unlock layers, click on the lock icon to the left of the layer name in the Layers dialog or the status bar. The icon changes to reflect the current edit-lock status.
Hiding Layers
To make a layer invisible or visible, click on the eye icon to the left of the layer name in the Layers dialog or the status bar. The icon changes to reflect the current visibility status.
Blend Mode
To change the blend mode, click on the blend mode dropdown in the Layers dialog and select a new mode.
Opacity
To change the opacity of a layer, move the opacity slider in the Layers dialog to the right or left.


