WordPress network admin
This chapter looks at some of the things you should know about admin for WordPress networks. The way that networks work is a little bit different than single site installs.
Creating a Site
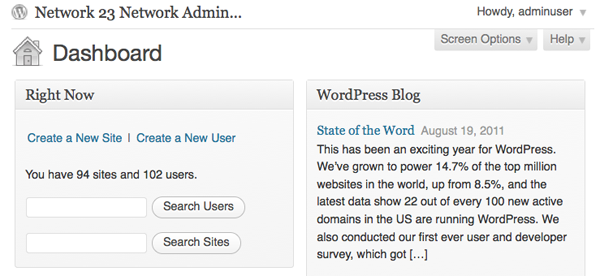
To create a site you should be logged in to your WordPress network as a user with the Super Admin role. When logged in, navigate to the Network Dashboard by clicking My Sites > Network Admin > Dashboard on your top navigation bar.

It's important to recognise the difference between the Dashboards of your blogs and the Dashboard of the WordPress Network - otherwise you may end up doing things to the whole network that you only wanted to apply to your own blog.

The Network Admin page has a section at the top left of the page where you can:
- Create a New Site
- Create a New User
- Search Users
- Search Sites
It also lets you know how many sites and users you currently have using the system.
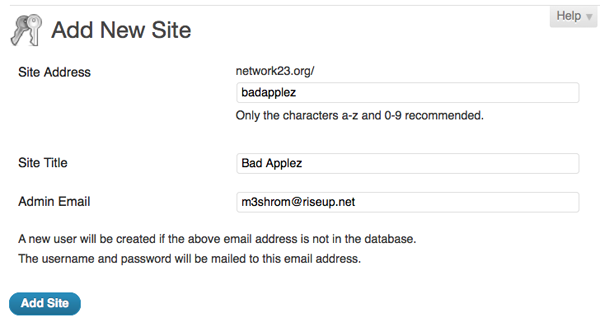
To add a new site, click Create a New Site in this panel or click Add New under the Sites Menu on the left of the screen.
User Access
Creating a WordPress network creates the need for a new user role, Super Admin. A Super Admin can create new sites and make changes to the configuration that affect the whole network. Super Admins can access the Network Admin section, which is a dashboard to control the whole network.
By default, all users who are added to your network will have subscriber access to all sites on your network. To allocate a different default role for users on individual sites, you must use a plugin, such as Multisite User Management.
The capabilities of the site administrator role are also reduced in a WordPress Network. Site admins cannot install new themes or plugins and cannot edit the profiles of users on their site. Only the Network Admin (aka Super Admin) has the ability to perform these tasks in a WordPress network.
Installing Themes and Plugins
Installing themes and plugins to a WordPress network is a similar process to installing them on a WordPress single site. You need to be in the Network Admin part of the site as shown above.
When you have installed the plugin, you then need to perform an additional step which is to Network Enable the new theme or plugin. To do this, navigate to the Themes or Plugins page and search for the plugins you have just installed, then click Network Enable.


