


How to work with user checklists
Checklists are lists of things that should be done before an action is completed.
If you have the appropriate permissions, you can set up checklists that your users will see every time they start an action, such as approving a loan. The checklist serves as a reminder to the user to see that all processes are completed. Checklists are defined by the head office and associated with certain states of customer records or accounts.
For example, if the head office defines a checklist for the state “Pending approval” of a loan account, every time a user attempts to change the state of a loan account to “Pending Approval” (no matter what the state of the loan application was up to this point), the checklist appears.
The user can then go through the list and make sure that all items on the checklist have been satisfied. Each state for clients, groups, and products can only have one checklist attached.
Note: You can change an existing checklist, but you may not delete it.
How to define a checklist
- Click Admin > Define New Checklist. (You can also click Admin > View Checklists and click the Define a New Checklist from that screen.). The following screen appears.
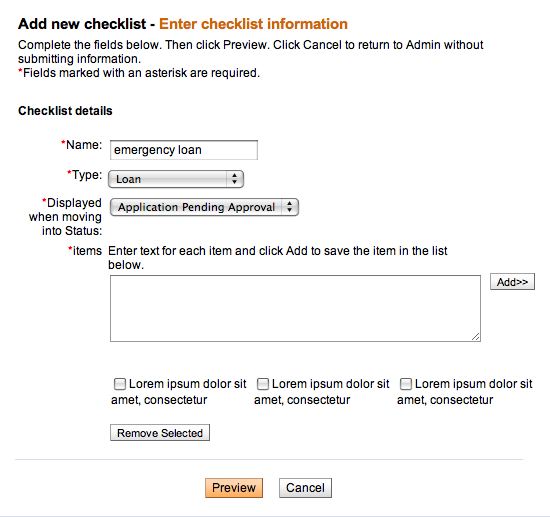
- Enter information about the checklist using the descriptions in the following table:
Field name Description Example Name Type a unique name for the checklist Chk Delete Member Type Click the type of checklist you want to create from the list of values. The list includes: Center, Group, Client, Loan, Savings. Client Displayed When Moving Status To Select the status that the checklist will be displayed for, if that status is attached to the type above.
For example, if the checklist type is Clients and the status is Pending Approval, the checklist is displayed whenever any client record status is changed to Pending Approval.
Pending Approval Items Type the text for the checklist item and click Add>> to include the item in the checklist below the item field. The text can accept a maximum of 250 characters. The checklist can have any number of check items defined for it.
All the listed check items will be considered mandatory and will have to be checked before the status change can be accepted by the system.
The member has been registered Remove Selected To remove a checklist item, click the item and click Remove Selected. - When you have finished typing all the items in the checklist, click Preview to review the list.
- If you want to change anything in the checklist, click Edit Checklist Information, make the changes, and click Preview again.
- When you are satisfied with the checklist, click Submit. (or click Cancel if you decide not to create a checklist at this time)
How to view existing checklists
- Click Admin > View Checklists.
If any checklists are defined, they appear, divided by type. The screen might look like this:

- To see the details of a checklist, click the link for that checklist.
How to change a checklist
From the Admin > View Checklists screen, click the link for a checklist, and then click Edit Checklist Information. Follow the instructions above to make and save changes.