About Chromium
 When Google released the Chrome web browser in 2008, it also released its source code to the public through the Chromium project. The code was issued under the BSD (Berkeley Software Distribution) license, which meant that the source code for Chromium may be freely used, copied, modified, and distributed for use in other programs.
The goal of the Chromium project is to improve web browser technology, which leads to a better web user experience for everyone. Chromium is designed to load web pages quickly via a clean, minimal, tabbed interface free of extraneous applications. By openly releasing source code through the Chromium project, Google facilitates the sharing of innovative codes between Chromium and other open source programs, improving the performance, security, and reliability of web applications in general. Through the Chromium project, the open source community can find ways to make Chromium and Chrome run even faster, contribute to the development of web browser technology, and begin to pioneer the next generation of web applications.
Chromium Versus Chrome
Since Chromium is the open source version of Google Chrome, the two web browsers share similar functions and features. In fact, their user interfaces appear to be virtually identical. However, there are some noteworthy differences between Chromium and Chrome, as outlined in the following table.
| |
Chromium
|
Chrome
|
Logo
|

|

|
Source code
|
Open
|
Closed
|
Integrated Flash player
|
No
|
Adobe Flash Player
|
Automatic software updating
|
No |
Google Update |
Installation licensing agreement
|
No |
Yes |
Collection and delivery of usage statistics and browser crash reports
|
No |
Yes
|
About This Manual
This manual was written from January to April 2011. It was written primarily written by Edward Cheung, who was given the framework and scope of the project by Scott Nesbitt. Scott also contributed to the writing and the editing of the document. Additional editing was done by Mark Hancock.
In addition, certain chapters contain information that was reused or adapted from the following sources:
Installing Chromium on Windows
Note: The following steps are specific to Windows 7 Professional. They should work with earlier versions of Windows.
Since Chromium is an ongoing open source project, you will not find an official Chromium browser download page. Instead, to install Chromium, visit the web page where developers post the latest hourly builds, or code updates, of Chromium for download.
To install Chromium on Windows, do the following:
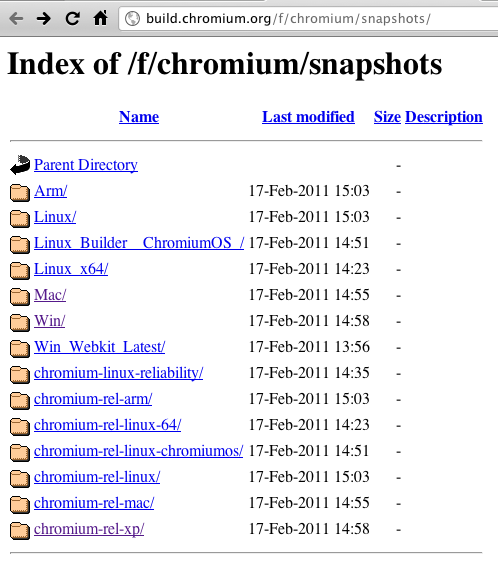
- Go to http://build.chromium.org/f/chromium/snapshots/chromium-rel-xp/.
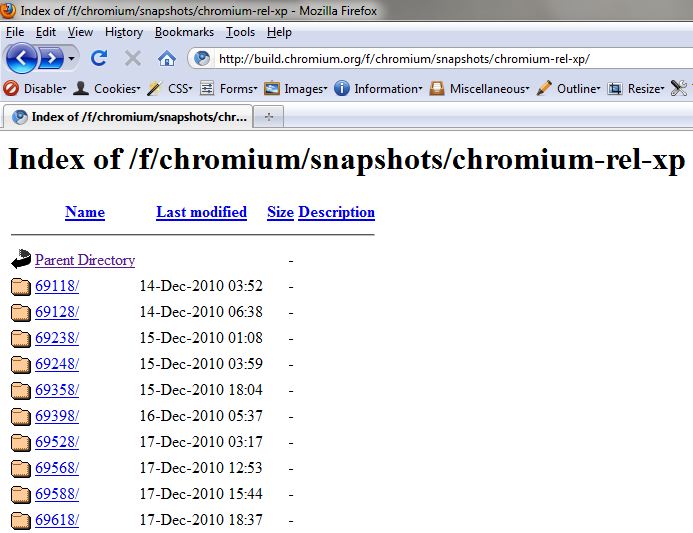
- Scroll down to the bottom of the page and click on Latest.
- Note the number that appears on screen. This is the number of the latest Chromium build. You should download and install this version.
- Press the Back button in your browser to return to the Chromium build index, and click on the latest build number.
- Click mini_installer.exe.
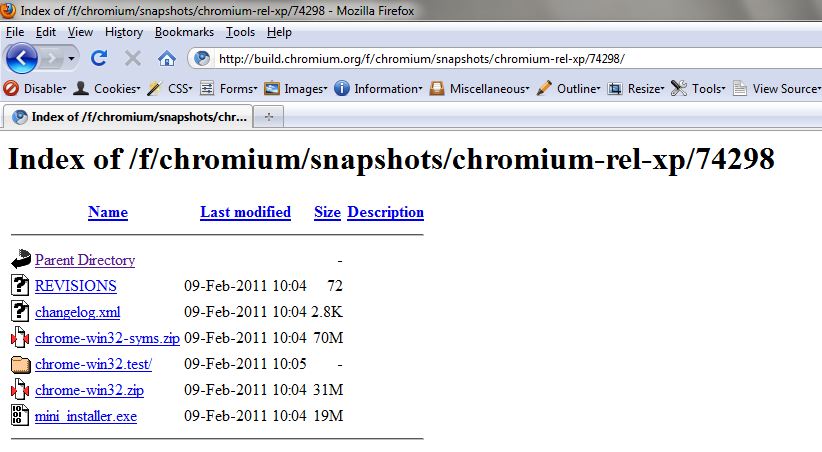
- Save the file to a folder on your computer.
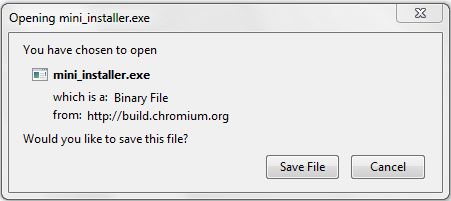
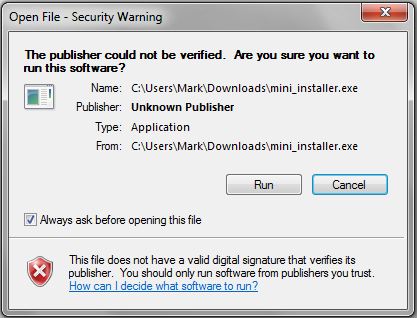
After the file mini_installer.exe has finished downloading, double click the file to open it.
- Your computer prompts you to confirm that you would like to open a program from an unverified publisher. Click Run.
The Chromium browser should start up. You should also find shortcuts to the program on your desktop and under the Start Menu in the Windows taskbar.
Installing Chromium on Mac OS X
Note: The following steps are specific to Mac OS X 10.6. They should work with earlier versions of Mac OS.
Since Chromium is an ongoing open source project, you will not find an official Chromium browser download page. Instead, to install Chromium, visit the web page where developers post the latest hourly builds, or code updates, of Chromium for download.
Downloading and installing Chromium
To download and install Chromium, do the following:
- Go to http://build.chromium.org/f/chromium/snapshots/chromium-rel-mac/.
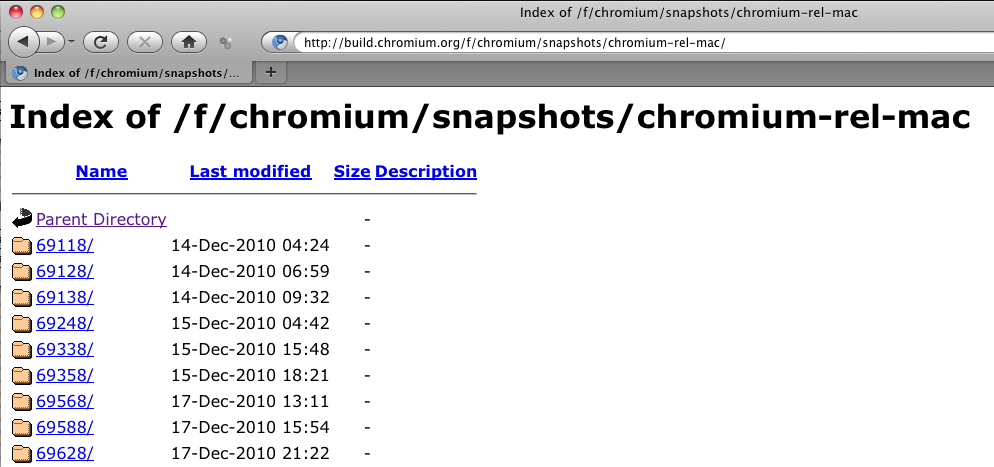
- Scroll down to the bottom of the page and click on Latest.
- Note the number that appears onscreen. This is the number of the latest Chromium build. You should download and install this version.
- Press the Back button in your web browser to return to the Chromium build index, and click on the latest build number.
- Click on chrome-mac.zip.
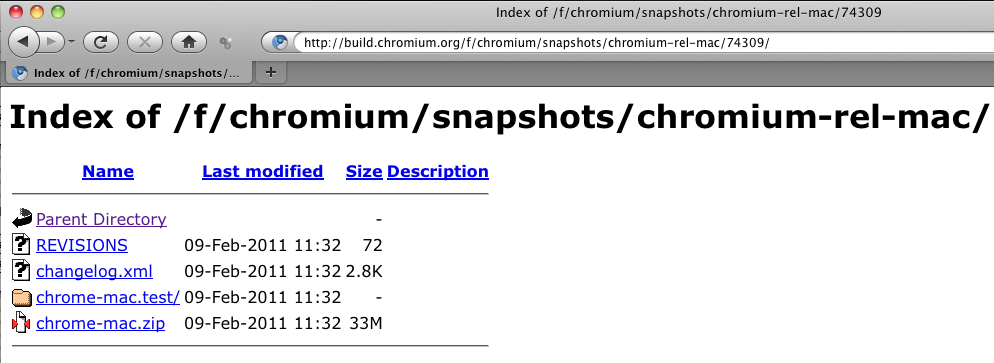
- Save the zip file at a location on your computer.
Opening Chromium for the first time
To open Chromium for the first time, do the following:
- Double click on the file chrome-mac.zip file on your computer to unzip it.
- Double click on the unzipped folder to open it.
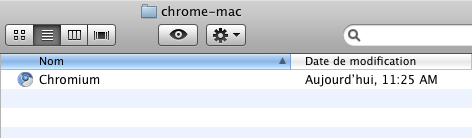
You should see the Chromium application icon.
- Drag and drop the Chromium application icon to the desired folder on your computer.
- Double click on the Chromium icon to open the program.
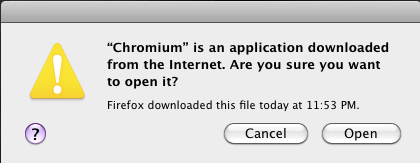
- Your computer asks you if you'd like to open a program downloaded from the Internet. Click Open to continue.
- In the next window, Chromium asks you to select a search engine for integrated use in the Chromium browser.

After you make your selection, Chromium opens.
Installing Chromium on Ubuntu
There are two procedures for installing Chromium on Ubuntu: using the Ubuntu Software Center or installing Chromium from a Personal Package Archive. We take a look at both below.
Using the Ubuntu Software Center
If you're using Ubuntu 10.04 or newer, the easiest way to install Chromium is through the Ubuntu Software Center.
To install Chromium from the Ubuntu Software Center, do the following:
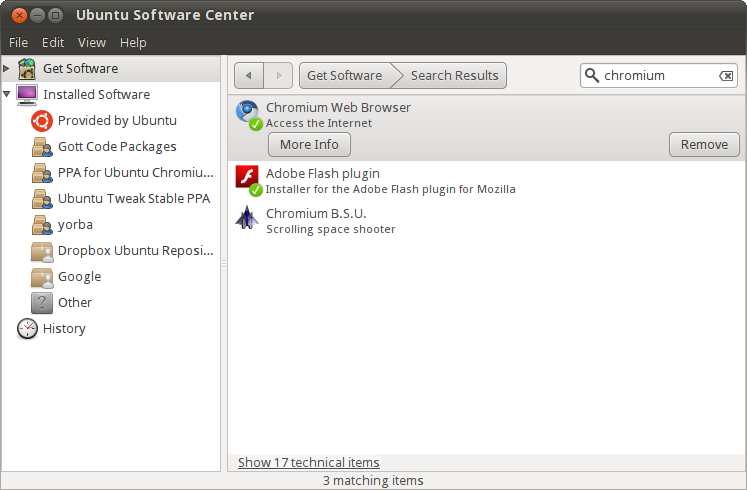
- Click Ubuntu Software Center under the Applications menu.

- Type "Chromium" in the search box and press Enter on your keyboard. The Ubuntu Software Center finds Chromium in its list of available software.
- Click the Install button. If Chromium needs any additional libraries (software it requires to run), the Ubuntu Software Center alerts you and installs them along with Chromium.
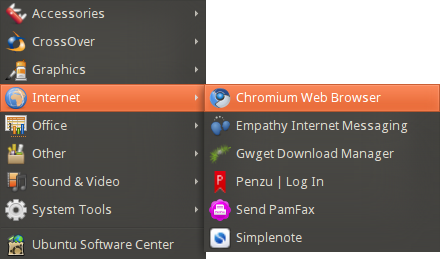
You can find the shortcut to start Chromium in the Internet option under the Applications menu:
Installing from a Personal Package Archive
If you're using an earlier version of Ubuntu, or just want to stay on the cutting edge of Chromium, you can install it from a Personal Package Archive (PPA). A PPA is a special repository for Ubuntu software that's separate from ones you would normally use either with the Ubuntu Software Center or Synaptic Package Manager. A PPA contains more frequent updates to software - updates which are often created nightly.
Remember that the software that you get from a PPA is 'cutting edge.' It may be buggy or unstable. Use it at your own risk.
To install Chromium from a PPA, do the following:
- Go to the Chromium Beta PPA at https://launchpad.net/~chromium-daily/+archive/beta.
- At the Chromium PPA site, select your version of Ubuntu from the Display sources.list entries for: list. Two lines, which look like the following, appear below the list:
deb http://ppa.launchpad.net/chromium-daily/beta/ubuntu maverick main
deb-src http://ppa.launchpad.net/chromium-daily/beta/ubuntu maverick main
- In Ubuntu, click Administration under the System Menu and then click Software Sources.
- You are asked to enter your root password. This is the password that you use to log into Ubuntu. The Software Sources window then appears.

- In the Software Sources window, click the Other Software tab and then click Add.

- Copy the first line from the list of sources that you created in step 2, paste it into the APT Line field, and then click Add Source.
- Repeat steps 5 and 6 for the second line from list of sources that you created in step 2.
- In the Software Sources window, click Close. Ubuntu updates the list of software sources that it uses.
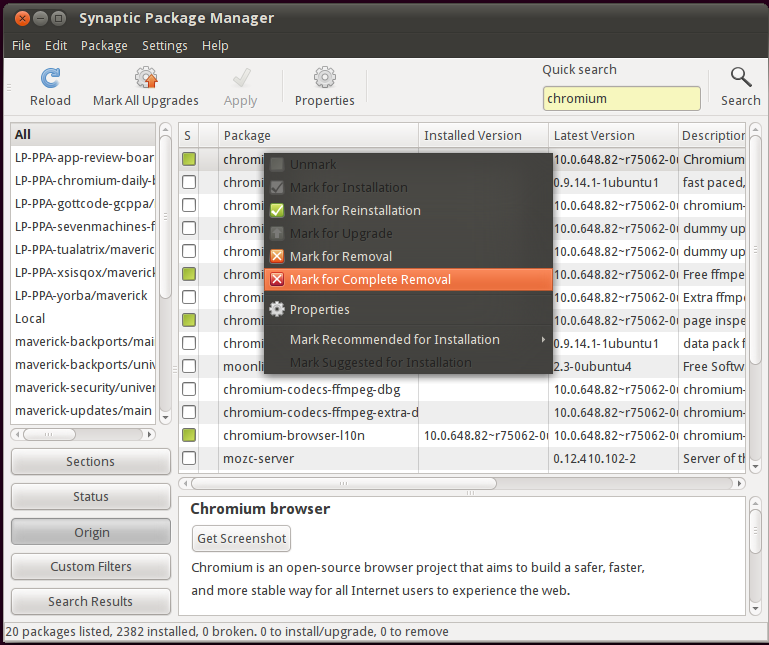
- Once that's done, click Administration under the System menu, then click Synaptic Package Manager.

- You are asked to enter your root password. This is the password that you use to log into Ubuntu.
- In the Quick search box, type Chromium and then press Enter on your keyboard.
A list of software that you can install (called packages) appears.
- Find Chromium in the list, right click on it, and then click on Mark for installation from the menu that appears.
- If Chromium needs any additional libraries, Synaptic Package Manager alerts you and marks those packages for installation along with Chromium.
- Click the Apply button.
Installing Chromium in Other Linux Distributions
Ubuntu is not the only Linux distribution out there. You might be able to install Chromium on any Linux distribution using that distribution's package manager. For example, use YaST in OpenSUSE or yum in Fedora.
But, if your distribution's package manager doesn't include Chromium, you can visit the index page where developers post the latest hourly builds, or code updates of Chromium for download.
To install Chromium, do the following:
- Go to http://build.chromium.org/f/chromium/snapshots/Linux/.
- Scroll down to the bottom of the index and click on Latest.
- Note the number that appears in your browser window. This is the number of the latest Chromium build. You should install this version.
- Press the Back button on your browser to return to the Chromium build index, and click on the latest build number.
- Click the file chrome-linux.zip to download the software.
- Open a terminal window and enter superuser mode. You are prompted for your root password.
$ su
- Copy the file you downloaded to the /usr/local directory.
$ cp -a directory/filename /usr/local
- directory is the name of the directory in which you downloaded the file, for example downloads.
- filename is the name of the file, for example chrome-linux.zip.
- Extract the archive to the installation directory. This creates the /usr/local/chrome-linux directory and copies the Thunderbird program into it.
$ cd /usr/local
$ tar -xjvf filename.tar.bz2
- Delete the archive. When you are prompted, enter y on your keyboard.
$ rm filename
- Create a symbolic link to the Chromium executable.
$ ln -s ../../usr/local/chrome-linux/chrome /usr/bin/chrome
- Finally, create a shortcut on your desktop that points to /usr/bin/chrome and double-click that shortcut to start Chromium .
Updating Chromium
Unlike Google Chrome, which has an automatic software update included, Chromium does not update itself or prompt the user to install an update. Since it is an ongoing open source project, keeping Chromium updated means downloading the hourly builds or snapshots from the Chromium snapshots page, where the latest updates for Chromium are available for download.
- Go to http://build.chromium.org/f/chromium/snapshots/.
- Click on the link beside the folder for your operating system (Linux, Mac, or Win).
- Scroll down to the bottom of the index and click on Latest.
- Note the number that appears. This is the latest version of Chromium. You should download this version.
- Press the Back button to return to the index page, and click on the latest update number.
- Click on the zip file for Mac OS, or the mini_installer.exe file for Windows, and save the file to your computer.
- Install and open the latest Chromium update as you would for the first installation of the browser.
Updating Chromium in Ubuntu
In Ubuntu, Chromium (like other pieces of software that are installed on your computer) will update automatically when a new version is available. Updates are controlled by an application called Update Manager.
Depending on how you've configured Update Manager, it will check for updates at the following intervals:
- Daily
- Every two days
- Weekly
- Every two weeks
When Update Manager finds updated software, it will automatically launch. You can also launch Update Manager by selecting System > Administration > Update Manager. If you manually launch Update Manager, you'll need to click the Check button for Update Manager to check for new versions of software.
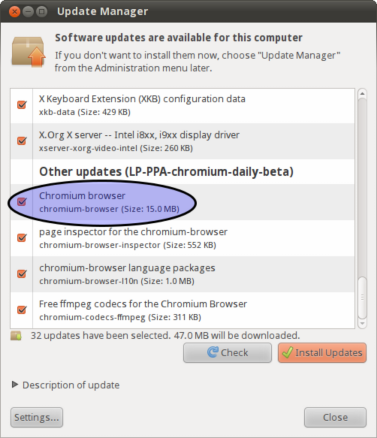
Click the Install Updates button and, when prompted, type the password that you use to log into Ubuntu and then click OK.
Removing Chromium from Windows
Note: The following steps are specific to Windows 7 Professional. They should work with earlier versions of Windows.
Removing Chromium through the All Programs List
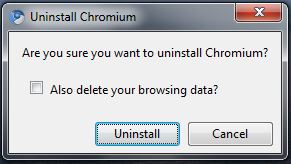
To remove Chromium through the All Programs list, do the following:
- Click on the Start Menu, and then choose All Programs.
- Click on the Chromium folder, and then choose Uninstall Chromium.
- Click Uninstall in the confirmation dialog box.
Removing Chromium using the Control Panel
To remove Chromium using the Control Panel, do the following:
- Open the Control Panel, and then choose Uninstall a program.
- Choose Chromium from the list of programs, and then click on the Uninstall button at the header of the list.
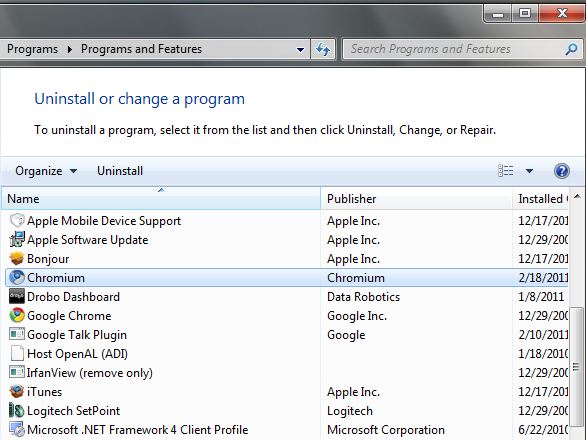
- Click Uninstall in the confirmation dialog dialog box.
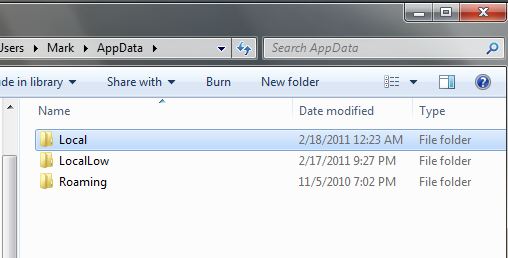
Removing Chromium user data and settings
To clear your computer of Chromium bookmarks, browsing history, and cookies, do the following:
- Click on the Start Menu in the Windows taskbar, and search for Folder Options.
- Click on Folder Options, and under the View tab. enable Show hidden files, folders, and drives.
- Go to Computer/Local Disk (C:)/Users/(your username)/AppData/.
- Open the Local and Roaming folders, and if you see a Chromium folder inside either of them, remove it.
Removing Chromium from Mac OS X
Note: The following steps are specific to Mac OS X 10.6. They should work with earlier versions of Mac OS.
To remove Chromium, do the following:
- Go to the folder on your computer where you placed the Chromium application file, and move it to Trash.
If you've created any aliases for Chromium, move them to Trash as well.
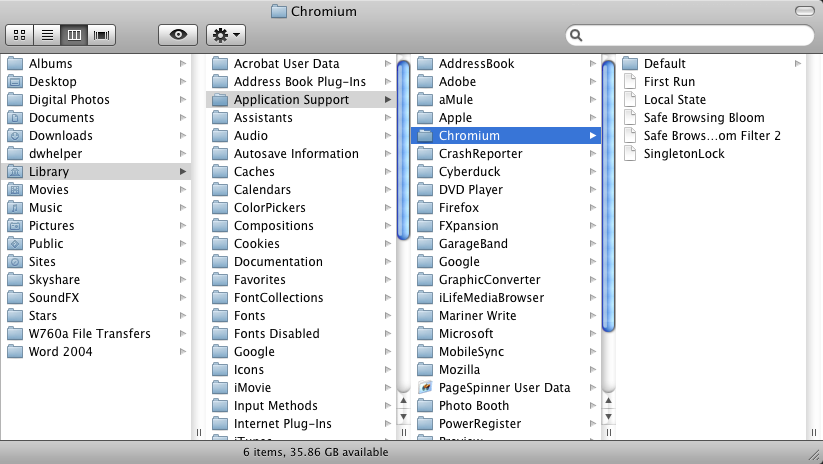
- To remove Chromium user data and settings (like bookmarks, browsing history, and cookies), go to Machintosh HD/Users/(your home folder)/Library/Application Support/Chromium, and move the Chromium folder to Trash.
Removing Chromium from Ubuntu
There are two procedures for removing Chromium on Ubuntu. Which one you use will depend on whether you installed Chromium using the Ubuntu Software Center or from a Personal Package Archive. We take a look at both below:
Removing Chromium with Ubuntu Software Center
If you're using Ubuntu 10.04 or newer, the easiest way to remove Chromium is through the Ubuntu Software Center.
To remove Chromium with the Ubuntu Software Center, do the following:
- Click Ubuntu Software Center under the Applications menu.
- Type Chromium in the search box and press the Enter on your keyboard. The Ubuntu Software Center finds Chromium in its list of available software.
- Click the Remove button.
Removing Chromium using the Synaptic Package Manager
If you installed Chromium using a Personal Package Archive, you can remove it using Synaptic Package Manager. Here's how:
- Click Administration under the System menu, then click Synaptic Package Manager.
- When prompted, type the password that you use to log into Ubuntu and then click OK.
- In the Quick search box, type "Chromium" and then press Enter on your keyboard. A list of software that is installed on your computer (called packages) appears.
- Find Chromium in the list, right click on it, and then click on Mark for complete removal in the menu that appears.
- Click the Apply button.
Removing Chromium from Other Linux Distributions
If you installed Chromium on a Linux distribution other than Ubuntu, using that distribution's package manager, you can remove Chromium from your system using the package manager. If, however, you installed Chromium from a zip archive, you'll need to manually remove it from your system. Here's how:
- Open a terminal window and enter superuser mode. You will be prompted for your root password.
$ su
- Change to the directory above the directory where you installed Chromium. For example, if you installed Chromium in /usr/local/chrome-linux, type the following command:
$ cd /usr/local
- Type the following command to delete the directory chrome-linux and everything under it:
$ rm -rf chrome-linux
- If you added a shortcut to your desktop, delete it.
Using the Chromium Interface
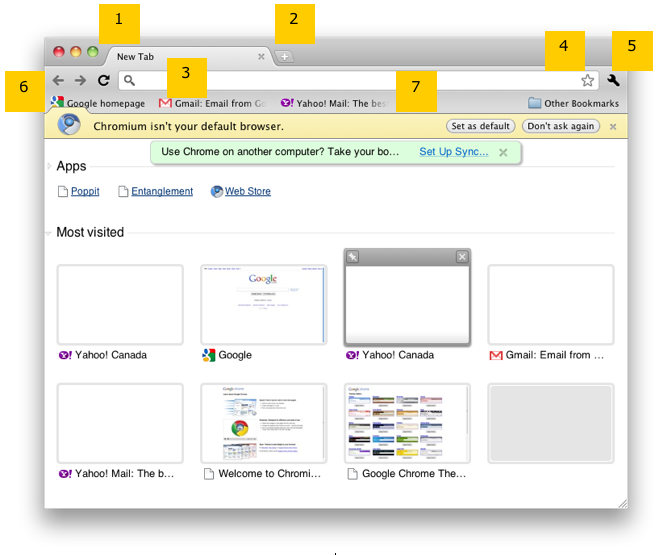
Label
|
Browser feature
|
Description
|
| 1 |
Browsing tab
|
Allows the user to browse the internet.
|
| 2 |
New tab
|
Creates a new tab for browsing in multiple tabs.
|
3
|
Omnibox (address and search bar)
|
Allows the user to visit a website by typing in a URL or a set of search keywords.
|
| 4 |
Add Bookmark button
|
Adds the current web page as a bookmark.
|
| 5 |
Wrench icon
|
Accesses additional Chromium functions and the settings to configure the browser.
|
| 6 |
Back and Forward buttons; Reload/Stop button
|
Navigate to previously visited web pages; refreshes or stops the loading of the current page.
|
| 7 |
Bookmarks Bar (hidden by default)
|
Displays added bookmarks.
|
Navigating the Web
To start browsing the Internet with Chromium, type the URL of the website you wish to visit into the Omnibox, or type keywords into the Omnibox to search for web pages that contain the information you're looking for.
Navigating by URL
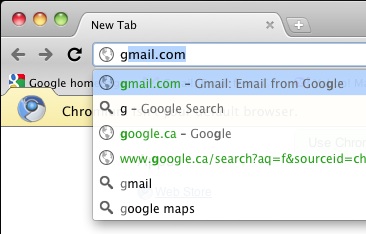
While typing the URL into the Omnibox, Chromium displays suggested web addresses based on your browsing history and bookmarks. This saves you the time and effort of remembering and typing out an entire URL.
If one of the suggested web addresses matches what you're looking for, use your mouse or the arrow keys on your keyboard to choose it, then mouse click or press Enter on your keyboard to select it and navigate to the suggested web page.
Alternatively, if the suggested web addresses are not what you're looking for, continue typing the entire URL, and press Enter on your keyboard to visit the page.
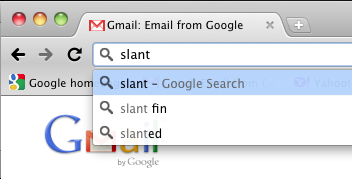
Navigating by keywords
If you don't know or remember the URL of the website you wish to visit, or if you would like to perform a web search for information, type in the name of the website or some search keywords into the Omnibox.
Much like typing the URL into the Omnibox, Chromium will display suggested web searches and addresses as you type in keywords, based on keyword relevancy, your browsing history, and your bookmarks. If one of the suggestions matches what you're looking for, use your mouse or the arrow keys on your keyboard to choose it, and mouse click or press Enter on your keyboard to select it.
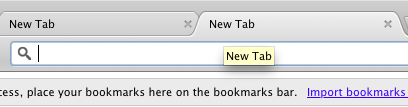
Opening a new tab
To open a new tab for browsing multiple web pages at once, click on the New Tab button located to the right of the current tab header, or press Control (Windows and Linux OSs) or Command (Mac OS) + T on your keyboard.
Retracing Your Steps
Back button
To return to a web page that you previously visited, click the Back button.
If you have visited several pages during your browsing session, click and hold the Back button to see a list of previously visited web pages. While holding down the mouse button, move the mouse to choose from your previously visited web pages, and release the mouse button to visit the specified page.
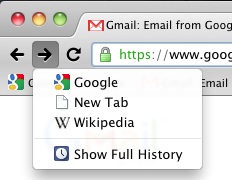
Forward button
Once you've used the Back button to visit a web page, the Forward button becomes active. It allows you to return to the web page you were browsing before you pressed the Back button.
Similar to the Back button, if you have visited several pages during your browsing session, click and hold the Forward button to see a list of previously-visited web pages. While holding down the mouse button, move the mouse to choose from your previously visited web pages, and release the mouse button to visit a page.
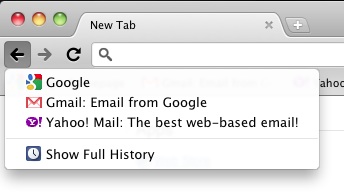
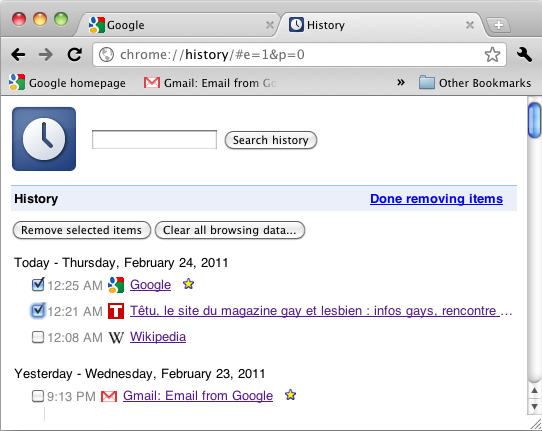
History tab
Chromium remembers the sites and pages that you visited within the previous 10 weeks. If you would like to see your web page browsing history, do one of the following:
- Click on the Wrench icon and select History.
- Hold down on the Back or Forward button and select Show Full History.
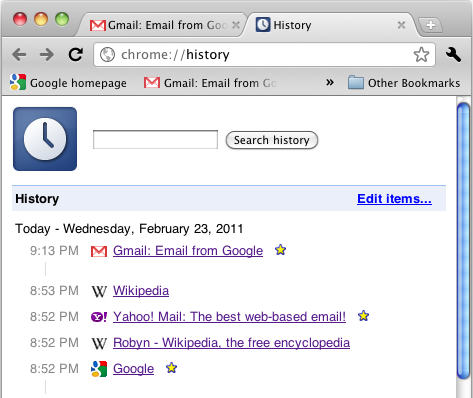
You can search through your browsing history by typing keywords or web page titles in the search field.
Also, by clicking Edit items..., you can remove certain pages from your browsing history by clicking the option box beside a page and then clicking Remove selected items.
The Clear all browsing data... button opens a menu that allows you to remove other types of browser-related history, such as download history, cache, and cookies.
Finally, once you are done editing your browsing history, click Done removing items.
Stopping and Reloading
In Chromium, the Stop button and the Reload button are combined. You see the Reload button when Chromium has finished loading a web page.

The button changes into the Stop button when Chromium is loading a web page, to allow you to stop a slow-loading page or the loading of a faulty web page.
Bookmarking a Page
Bookmarks (also called Favorites in some browsers) are links to web pages. By saving bookmarks in Chromium, you can easily revisit pages without having to remember the address or search for them again, much like using bookmarks in a book.
To bookmark a page, do the following:
- Bookmark the web page you are browsing by clicking the star-shaped Add Bookmark button located at the right end of the Omnibox.
Alternatively, press the keyboard shortcut Control or Command + D to bookmark a web page.
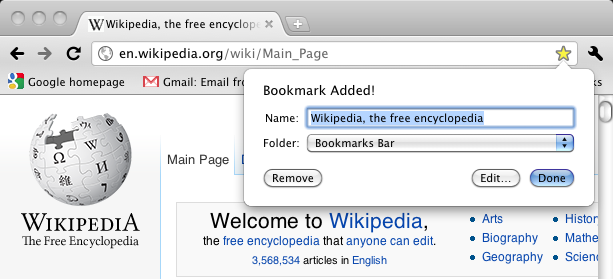
- Confirm that you'd like to add the bookmark by clicking the Done button or by pressing Enter on your keyboard.
If you'd like to rename the bookmark or save it in another folder, click on the Edit... button.
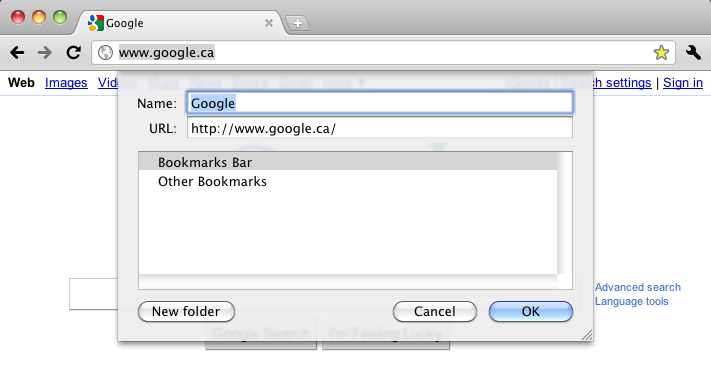
Type the new name of the bookmark in the Name field to rename the bookmark. Click on New folder to create a new folder for the bookmark. Once you are finished, click OK.
Where to Find Bookmarks
To find your bookmarks, use the Bookmarks Bar or the Bookmark Manager.
Bookmarks Bar
The Bookmarks Bar is located below the Omnibox and displays the bookmarks you've added to the default Bookmarks Bar folder.
To show the Bookmarks Bar, click on the Wrench icon, choose Tools, and select Always Show Bookmarks Bar. You can also press the keyboard command Shift + Control (or Command) + B to show the bar.
By default, the Bookmarks Bar is hidden from view, to simplify Chromium's interface.
You can drag and drop the bookmarks in the Bookmarks Bar to rearrange them, including the bookmarks filed under the >> button.
You can also drag the icon just to the left of the current URL in the Omnibox down to the Bookmarks Bar to quickly add a bookmark.

Bookmark Manager
The Bookmark Manager allows you to view all the bookmarks you've added into the default Chromium bookmark folders (Bookmarks Bar and Other Bookmarks), as well as those added into the folders you've created.
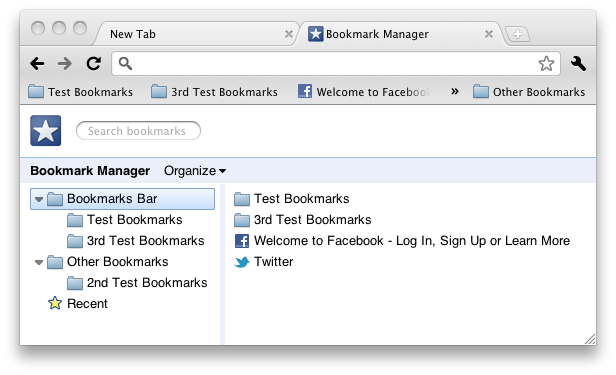
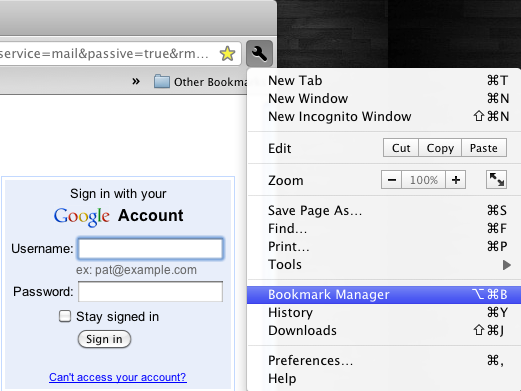
To access the Bookmark Manager, click on the Wrench icon and select Bookmark Manager in the menu.
Managing Your Bookmarks
While you can use the Bookmarks Bar to manage your bookmarks, the Bookmark Manager is a better-organized and more user-friendly way to manage the bookmarks you've added.
To access the Bookmark Manager, click on the Wrench icon and select Bookmark Manager.
You can view all your bookmarks and the folders that contain them via the index on the left side of the page.
To move and reorder bookmarks and folders, drag and drop them to the desired location.
At the top of the page, you can search for a bookmark by typing keywords into the search field.
By clicking on the Organize menu, you can also do the following:
- Add a new bookmark or a new folder.
- Edit the name and URL of a bookmark.
- Rename a folder.
- Cut, copy, or delete a bookmark or folder.
- Import and Export bookmarks between Chromium and another browser.
Also, if you right-click on a bookmark or a folder, you can perform many of the same actions as in the Organize menu, in addition to opening bookmarks in new tabs, in a new window, or in an Incognito window.
Synchronizing Your Bookmarks
What is bookmark synchronization?
Synchronizing your bookmarks saves them to your Google Account. By doing this, you can access and edit them on any computer by logging into your Google Account. Along with synchronizing extensions, apps, themes, and browser preferences, bookmark synchronization gives you the same browsing experience at work, at home, or anywhere else you're using a computer connected to the Internet.
Syncing your bookmarks
To sync your bookmarks, do the following:
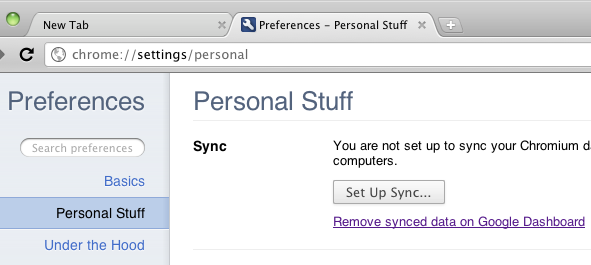
- Click on the Wrench icon and select Options (Windows OS) or Preferences (Mac and Linux OSs).
- In the Options/Preferences menu, select Personal Stuff from the index at the left side of the page.
- In the Sync section, click on the Set Up Sync... button.
- Enter your Google Account username and password and click Sign in.
- In the Configure Sync section of the pop-up window, click on Choose what to sync.
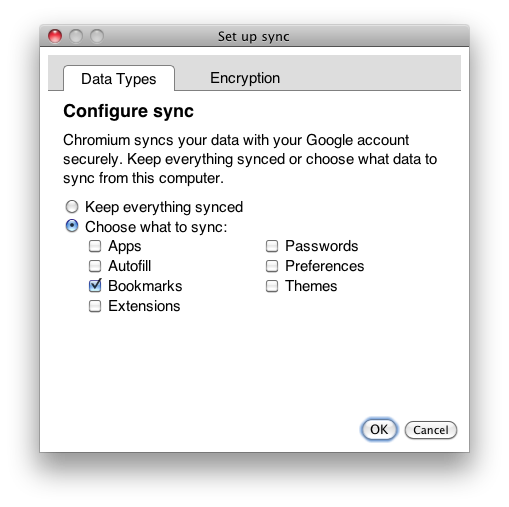
- Ensure that Bookmarks is selected, and click OK.
Disabling bookmark synchronization
To disable bookmark synchronization, do the following:
- Click on the Wrench icon and select Options (Windows OS) or Preferences (Mac and Linux OSs).
- In the Options/Preferences menu, select Personal Stuff from the index at the left side of the page.
- In the Sync section, click on Stop syncing to this account.
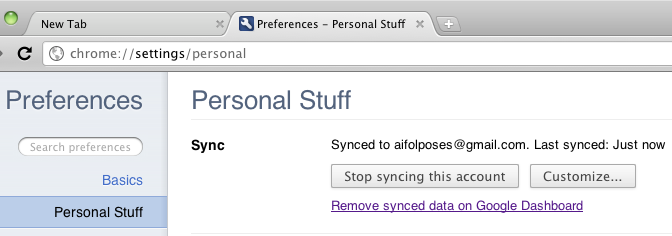
- Click on Stop syncing in the confirmation dialog box.
Accessing Chromium's Options/Preferences
If you would like to configure Chromium, click on the Wrench icon and select Options (Windows OS) or Preferences (Mac and Linux OSs).
The Options/Preferences menu is organized into three tabs that are displayed on the left side of the page: Basics, Personal Stuff, and Under the Hood.
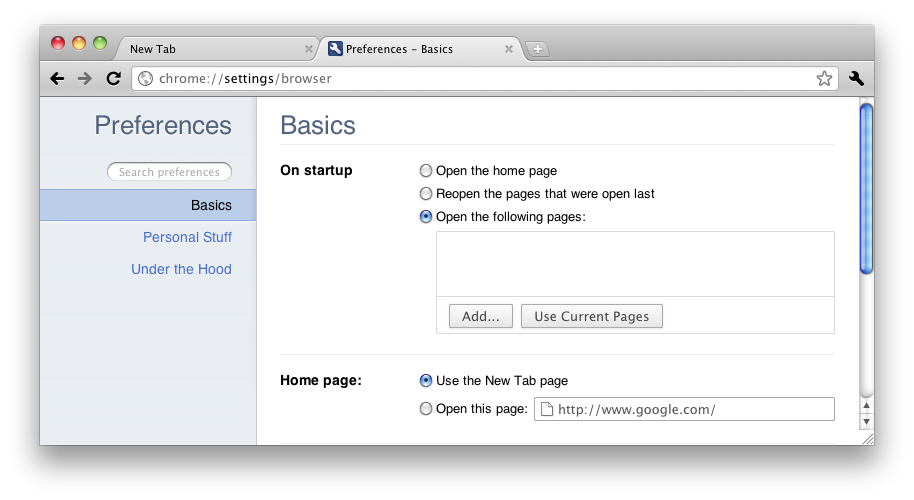
The Basics tab
The Basics tab allows you to configure the following:
- The page Chromium will display when you open the browser.
- The web page selected as the home page.
- To show or hide the home page button in the toolbar.
- The search engine used in the Omnibox.
- To set Chromium as your default browser.
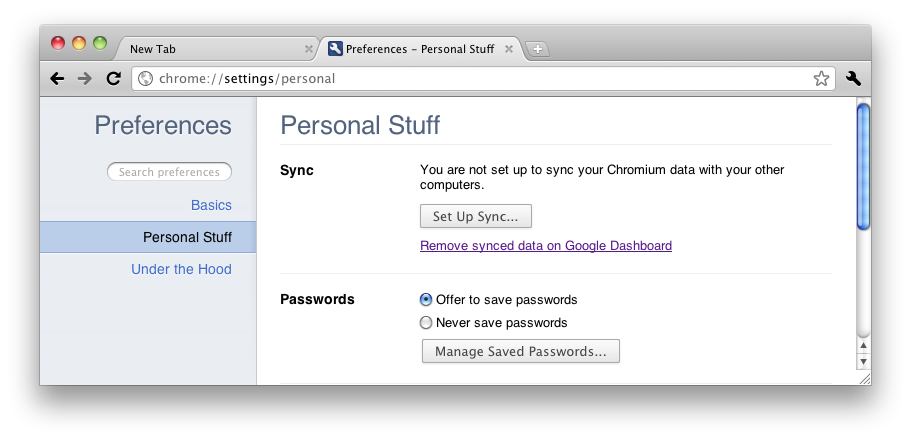
The Personal Stuff tab
The Personal Stuff tab allows you to configure the following:
- Synchronization of your browser settings via your Google Account.
- Password saving.
- Form Autofill.
- To import browsing data (like browsing history and bookmarks) from another browser.
- Browser themes.
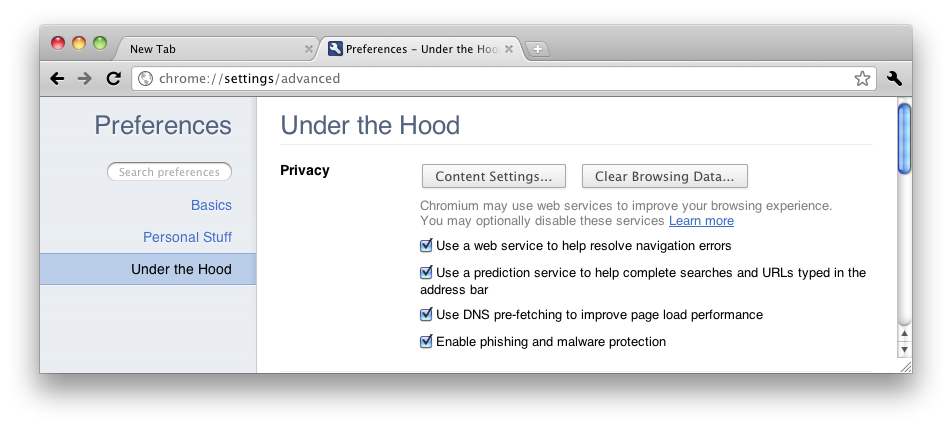
The Under the Hood tab
The Under the Hood tab allows you to configure the following:
- Privacy settings.
- Font size, page zoom, language and spelling checker.
- Network settings.
- Language settings.
- Download settings.
- Security settings.
For more information on the Options/Preferences menu, visit this Google Chrome Help web page: http://www.google.com/support/chrome/bin/answer.py?hl=en&answer=1183665.
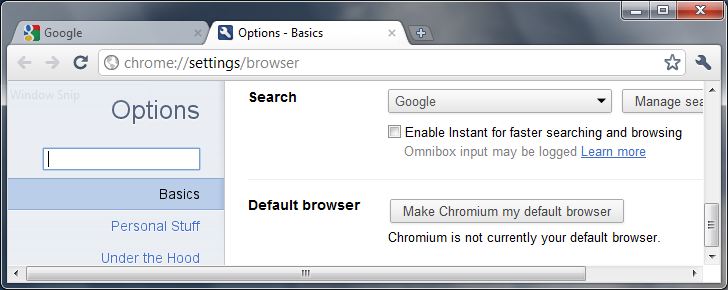
Making Chromium Your Default Browser
To make Chromium your default browser, do the following:
- Click on the Wrench icon and select Options (Windows OS) or Preferences (Mac and Linux OSs).
- In the Basics tab, click on Make Chromium my default browser in the Default browser section.
Setting Startup and Start Page Options
You can configure Chromium's startup and home page settings in the Basics tab in the Options (Windows OS) or Preferences (Mac and Linux OSs) menu.
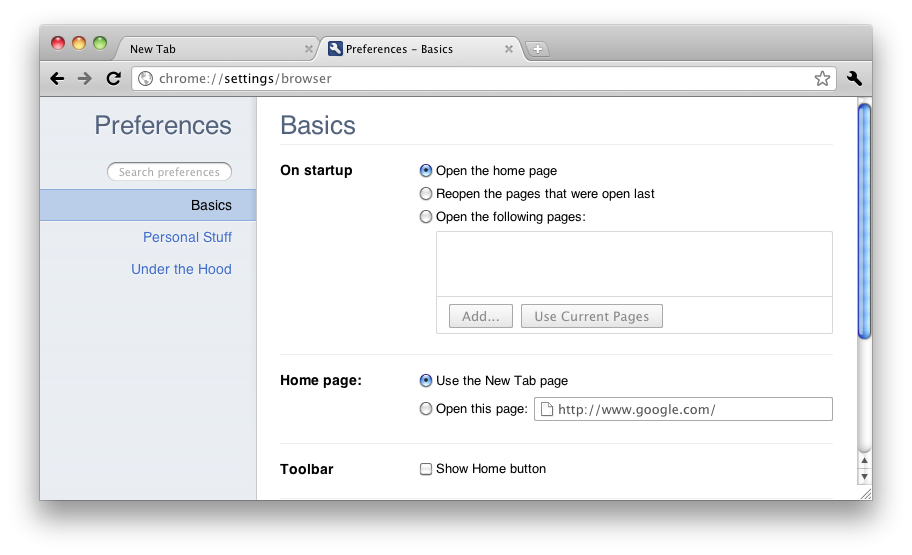
Startup options
Using the option buttons in the On Startup section, you can set Chromium to open the home page when you start up the browser, or to return to the pages that were open when the browser was previously closed, or to open specific pages. The latter option requires you to enter the URL(s) of the specific web page(s) you'd like to see on startup.
Home page options
Using the option buttons in the Home page section, you can set Chromium to use the New Tab page (which displays installed apps, most visited pages, and recently closed pages) as the home page, or to use a specific web page. To use the latter option, enter the URL of the web page that you'd like to use -- for example, http://booki.flossmanuals.net.
Show Home button
In the Toolbar section, click on the box beside Show Home button to add a shortcut icon to your home page. The Home button is located to the left of the Omnibox.
Choosing and Using a Search Engine
The search engine you choose to use for Chromium affects the search results you get when you type keywords into the Omnibox.
To select the search engine you'd like to use, do the following:
- Click on the Wrench icon and select Options (Windows OS) or Preferences (Mac and Linux OSs).
- Under the Basics tab, in the Search section, the left button displays your current Chromium search engine. Click on this button to view the other default search engines, and to select the one you'd like to use.
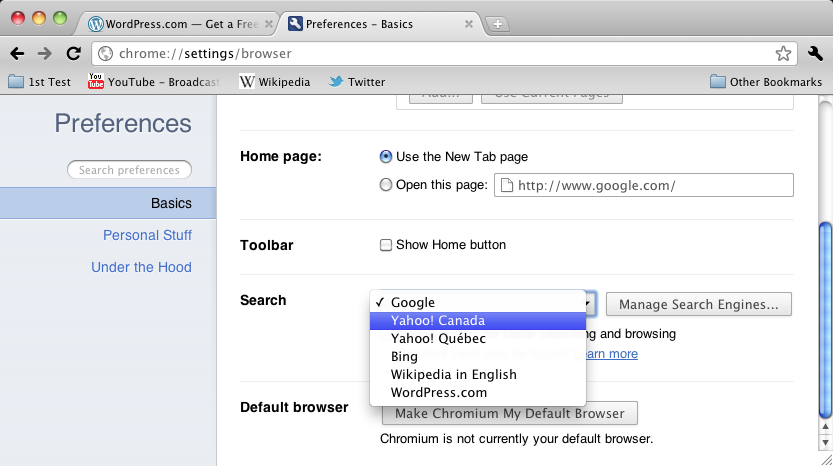
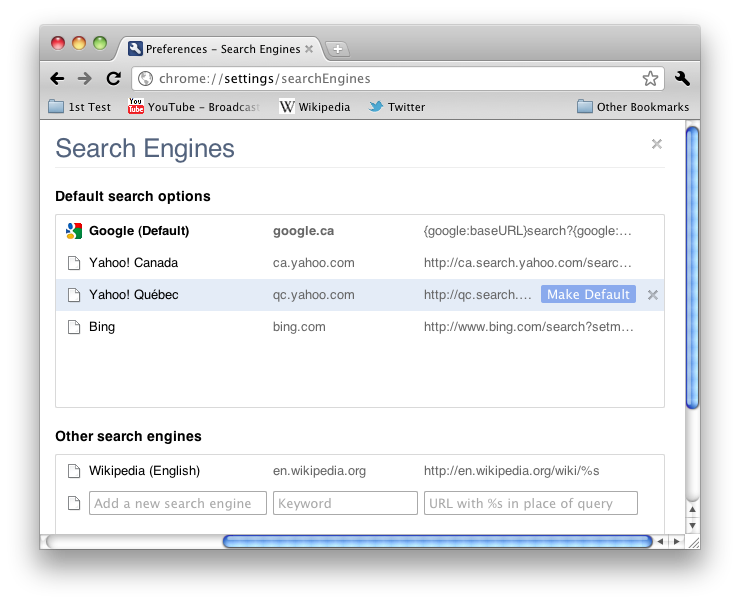
Adding search engines to Chromium
If you'd like to use additional search engines that are not included in Chromium, do the following:
- Click on the Wrench icon and select Options (Windows OS) or Preferences (Mac and Linux OSs).
- Under the Basics tab, in the Search section, click on the Manage Search Engines button.
- In the Other search engines section, type the name of the new search engine that you'd like to use in the field on the left, its associated keyword in the centre field, and its URL in the field on the right.
To find the URL of the search engine you'd like to use, do a search on the web page of that search engine. At the search results page, copy the URL of the web page, and replace the query keywords in the URL with %s.
- After entering in the information for the new search engine, highlight it and click on Make Default to use it in the Chromium Omnibox.
Enabling Instant
If you'd like to speed up your web browsing and searches, click on the box beside Enable Instant for faster searching and browsing in the Search section. Not only does Chromium guess which web page you'd like to visit while you type keywords or an URL into the Omnibox, it also loads that web page before you finish typing.
Handling Personal Information
If you are wary of Chromium tracking your usage data and browsing history, there are several things you can do to control what information does and doesn't get recorded.
Privacy settings in Options/Preferences
To change Chromium's privacy settings, do the following:
- Click on the Wrench icon and select Options (Windows OS) or Preferences (Mac and Linux OSs).
- Choose Under the Hood from the index on the left side of the page.
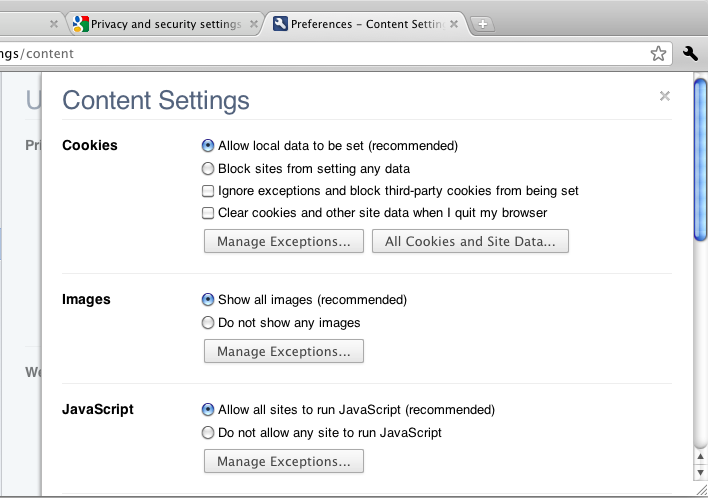
- In the Privacy section, you can do the following:
- Click on the Content Settings button to configure a host of parameters (cookies, images, Javascript, plug-ins, pop-ups, location).
- Clear your browsing data (which includes browsing and download history, cache, cookies, saved passwords, and form Autofill) within a specified time frame.
- Adjust additional settings via option boxes.
For more information on the individual parameters in the Privacy section, visit Google Chrome Help's Privacy and security settings page: http://www.google.com/support/chrome/bin/topic.py?hl=en&topic=14666.
Incognito mode
Chromium's Incognito mode doesn't record your browsing and download history, and cookies are deleted once you close all open Incognito windows. However, bookmarks and general settings are still saved.
For more information on Incognito mode, consult the chapter "Using the Incognito Window" in the Other Features and Functions section of this manual.
External tools to remove Chromium User ID
When you install Chromium, a unique user ID is assigned to your computer to create individual user profiles of a user's actions (such as browsing and download history, and cookies) while using Chromium.
If this is a privacy concern for you, consider downloading one of the following tools to delete this unique ID from your computer:
Opening a New Tab
To open a new browsing tab, either click on the New Tab button to the right of the header of the latest tab to be opened, or press Control (Windows or Linux OSs) / Command (Mac OS) + T on your keyboard.
Opening a Link in a New Tab
To open a hyperlink in a new tab, right click on it and select Open Link in New Tab. Alternatively, press Control (Windows or Linux OSs) or Command (Mac OS) + mouse click on a hyperlink to open it in a new tab.
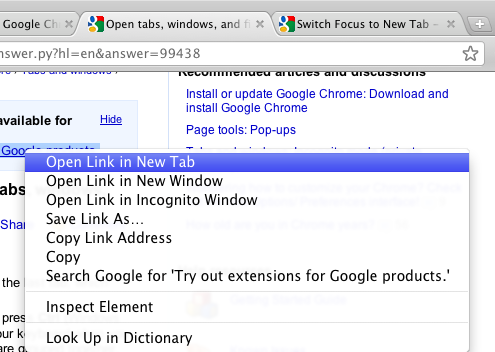
If you'd like Chromium to switch to the new tab as you open the hyperlink, press Shift + Control + mouse click (Windows or Linux OSs) or Shift + Command + mouse click (Mac OS) on a hyperlink.
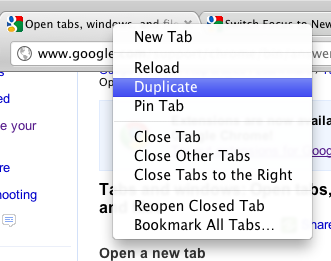
Also, if you'd like to load the current web page in a new tab, right-click on the tab header and select Duplicate.
Moving Tabs
To reorder your browser tabs, click and drag a tab header to the left or right.
You can also drag a tab away from the current window to create a new window. You can then drag it back to the previous window if you wish.

Closing Tabs
To close a tab, press the x button on the right side of the tab header. Alternatively, press Control (Windows and Linux OSs) or Command (Mac OS) + W on your keyboard to close a tab.

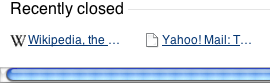
If you'd like to reopen a closed tab, do one of the following steps:
- Open a new tab, and on the New Tab page, find the tab you'd like to reopen under Recently closed.
- Right-click on a tab header and select Reopen closed tab.
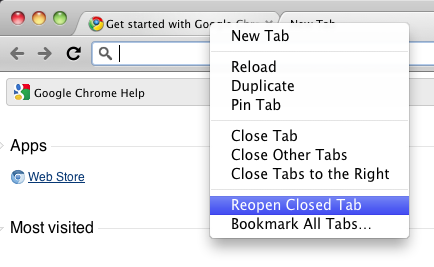
- Press Control (Windows and Linux OSs) or Command (Mac OS) + Shift + T.
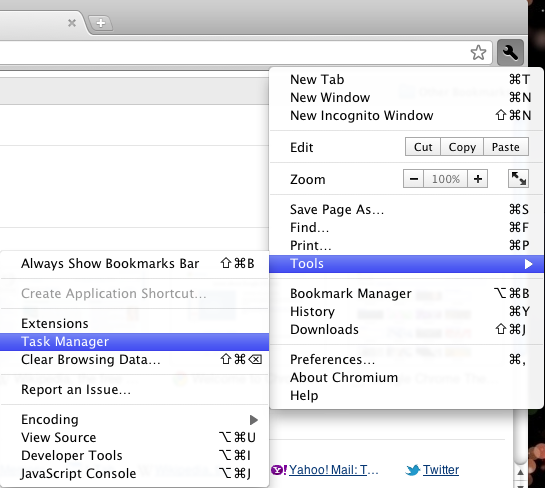
Killing Tabs
When a web page crashes or doesn't load properly, it may immobilize the browsing tab used to view it. To kill this tab, do one of the following:
DOWNLOADING FILES
Download bar
When you download a file from the Internet using Chromium, the Download bar appears along the bottom of the browser.

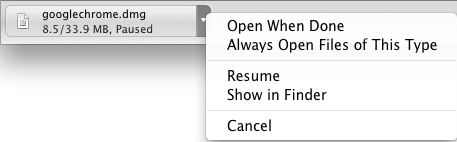
Files that are being downloaded appear as rectangular buttons on the Download bar. Click on the right side of a button to open a menu that allows you to open the file when it is finished downloading; to pause, resume, or cancel the download; and to show the location where the file is saved on your computer.
When you are done with the Download bar, press the x button on the right side of the bar to close it.
Downloads tab
You can also view all of your downloads, both files in the process of downloading and files that have finished downloading, in the Downloads tab. To access the Downloads tab, do one of the following:
- Click on Show all downloads on the right end of the Download bar.
- Click on the Wrench icon and select Downloads.
- Press Control (Windows and Linux OSs) or Command (Mac OS) + J on your keyboard.
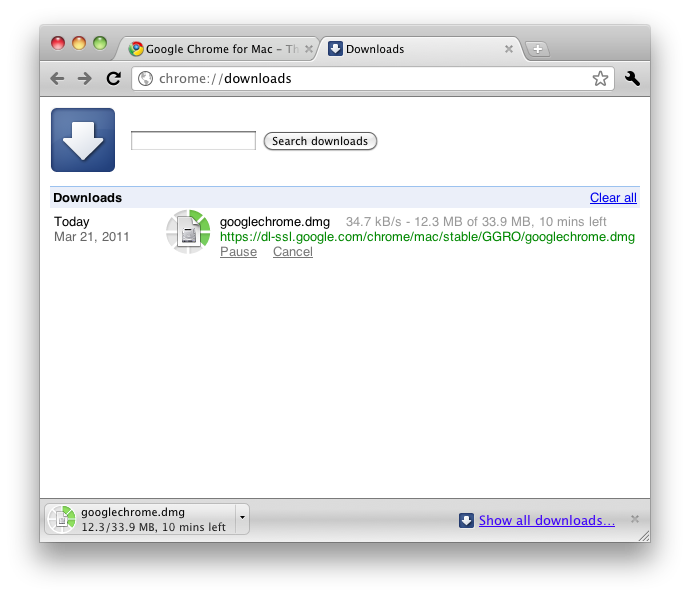
The Downloads tab allows you to pause, resume, or cancel an ongoing download, and to show where the file is saved on your computer. During a download, the tab also shows the size of the file and the estimated time remaining in the download.
Downloading Files Without Displaying Them
If you'd like to download a file that can open in your browser (a .pdf or a .mp3 file, for example), but you'd rather not open it immediately after clicking on the download link, right-click on the link and select Save Link As.
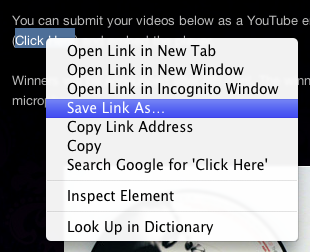
Chromium asks you to name the file and to select where you'd like to save the file on your computer.
Copying Text
To copy and paste text from a web page, do the following:
- Select the text you wish to copy by clicking and dragging your mouse over the text.
- Press Control (Windows and Linux OSs) or Command (Mac OS) + C to copy the text.
Alternatively, you can right-click your mouse and select Copy from the pop-up menu.
Or, you can click on the Wrench icon and select Copy in the Edit section.
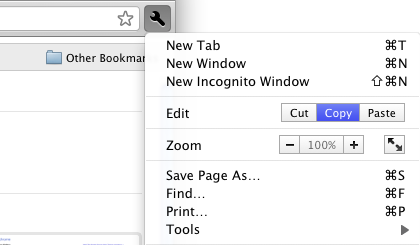
- Go to the tab, window, or program where you'd like to paste the text, and press Control (Windows and Linux OSs) or Command (Mac OS) + V to paste the text.
Alternatively, you can right-click your mouse and select Paste from the pop-up menu.
If you're pasting the text in a Chromium tab or window, you can also click on the Wrench icon and select Paste in the Edit section.
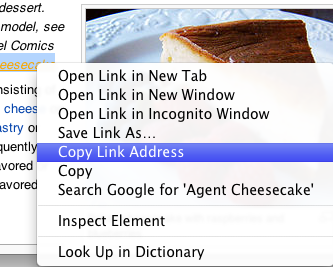
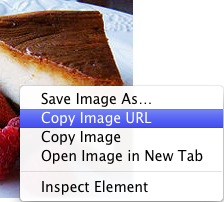
Copying a Link or an Image Link
To copy a link or an image link, right-click on the link or image and select Copy Link Address for a link, or select Copy Image URL for an image. You can then paste the URL into the Omnibox of another tab.
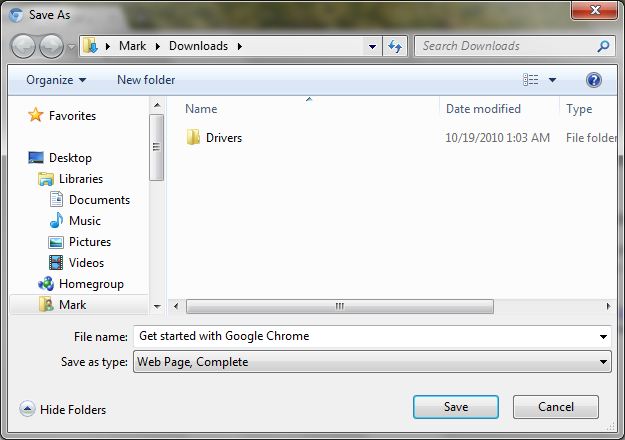
Saving a Page
To save a web page, click on the Wrench icon and select Save page as, or right-click on a web page (away from links and images) and select Save as.
In the Save As pop-up window that appears, choose where you'd like to save the web page on your computer. Also, choose whether you'd like to save the page as one of the following:
- A complete web page, which includes all graphics, stylesheets, and other media linked to the page.
- Just the text of the web page, saved as HTML code.
Saving an Image From a Page
To save an image from a web page, right-click on it and select Save Image As...
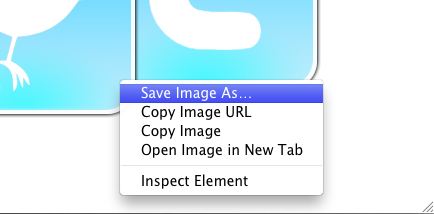
Chromium asks you where you'd like to save the image on your computer. Choose the desired folder and click on Save to save the image.
Printing a Page
To print a web page, do one of the following:
- Right-click on the web page (away from links and images) and select Print.
- Click on the Wrench icon and select Print.
- Press Control (Windows or Linux OSs) or Command (Mac OS) + P on your keyboard.
A dialog box opens to allow you to adjust your printer settings.
Note that certain types of web pages or files, like an email inbox or a PDF file, have their own print commands on the web page or file itself.
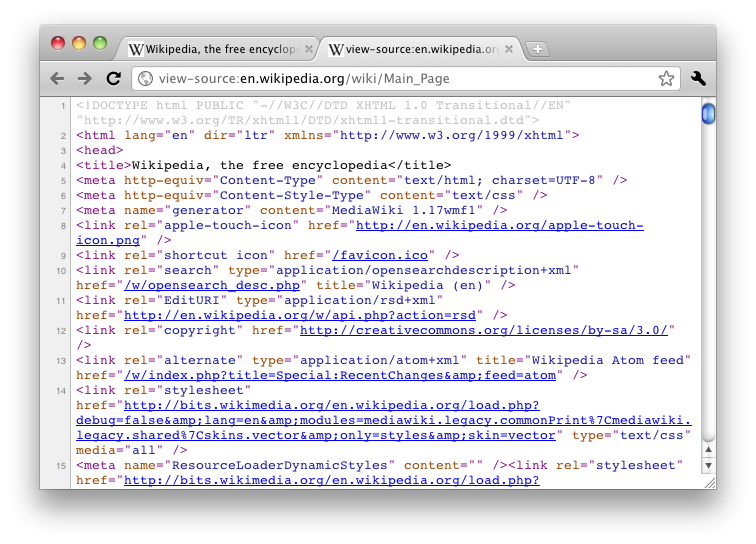
Viewing the Source of a Page
Viewing the source code of a web page is useful if you come across a page with a design and layout that you'd like to implement in your own website or blog.
To view the source code of a web page, do one of the following:
- Right-click on the page (away from images and links) and select View Page Source.
- Click on the Wrench icon, select Tools, and then click on View Source.
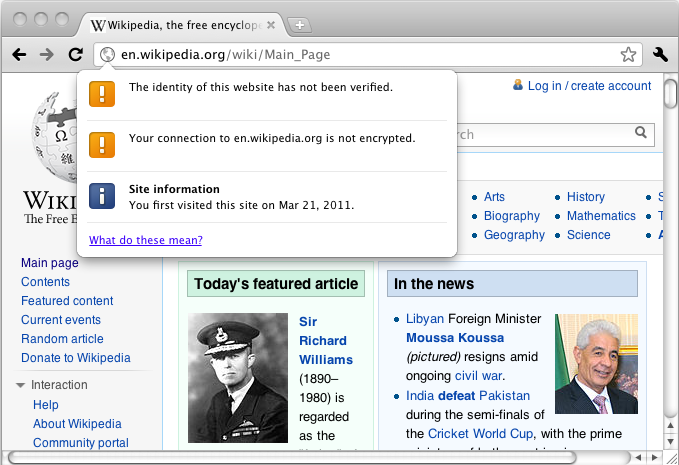
Viewing Information About a Page
To view security information about a web page, such as the identity of the page and the security of your connection to it, right-click on a page (away from images and links) and select View Page Info.
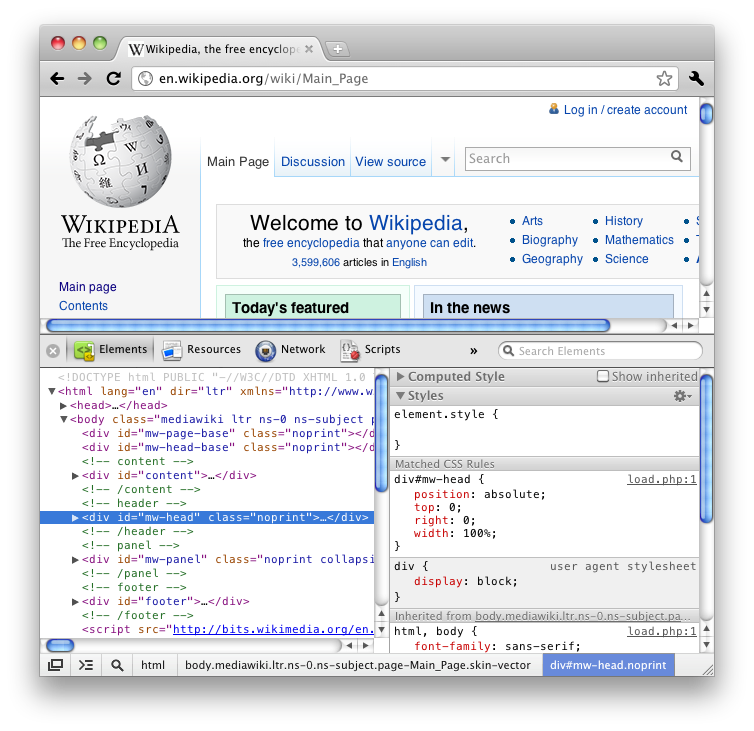
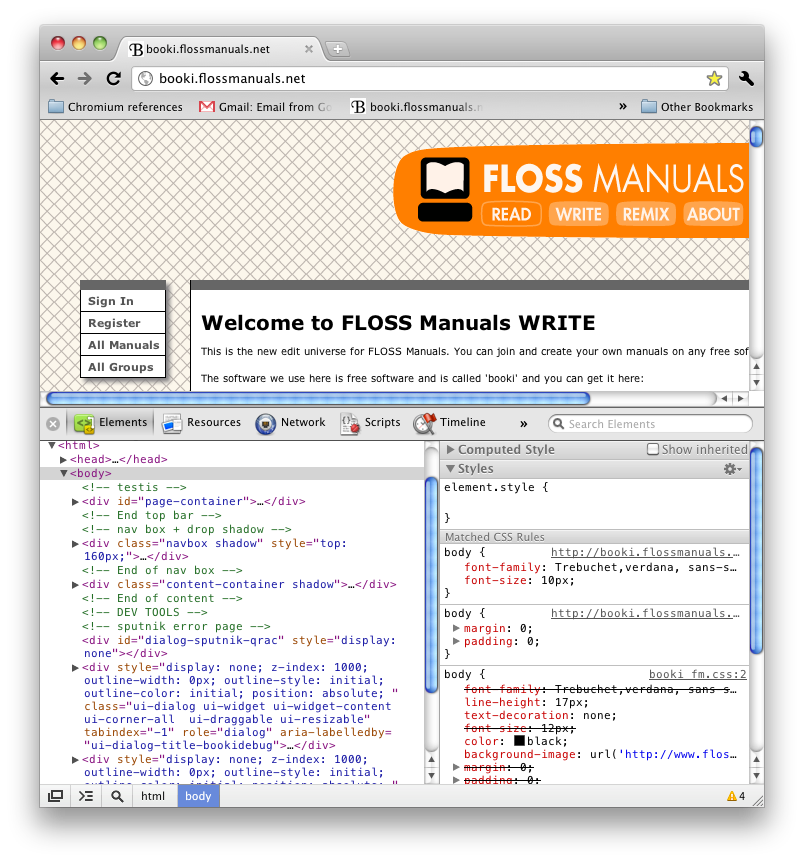
Inspecting the Elements on a Page
Every web page is made up of a number of elements. These include HTML tags, style directives, images, scripts, and more.
Inspecting the elements on a web page enables you to view coding errors on a page. When you've isolated the error, you can go back to your source file and edit the page's code. The element inspector in Chromium also monitors the amount of time it takes for each element on a web page to load, which is useful to gauge a website's level of performance.
To inspect the elements on a web page, right-click on the page (away from images and links) and select Inspect Element.
Finding and Installing Extensions
What are extensions?
Extensions are additional features that you can download for use with Chromium. They provide a number of functions that extend the capabilities of Chromium. Like what? Like Gmail inbox alerts, automatically mapping addresses, verifying the security information of a website, and much more.
Finding extensions
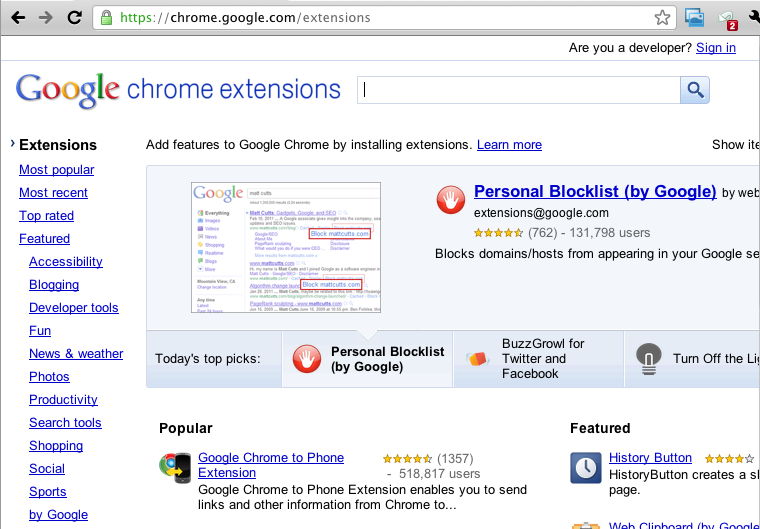
You can find extensions for Chromium at the Google Chrome Extensions Gallery: https://chrome.google.com/extensions
If you're using Chromium in North America, you can also visit the Chrome Web Store at https://chrome.google.com/webstore and look for extensions in the Extensions section.
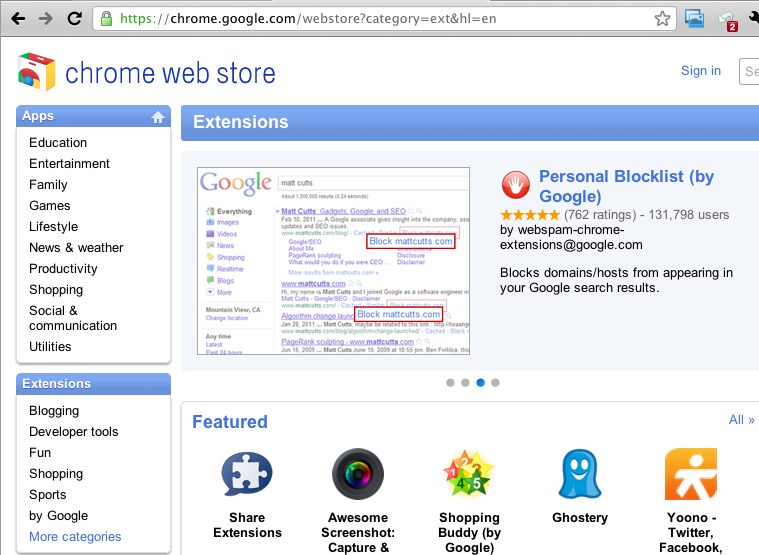
On both sites, extensions are organized in categories like Featured, Popular, and Top Rated. They're also organized by function -- for example, Education, Productivity, and Utilities. On both sites, you can search for extensions using keywords.
Installing extensions
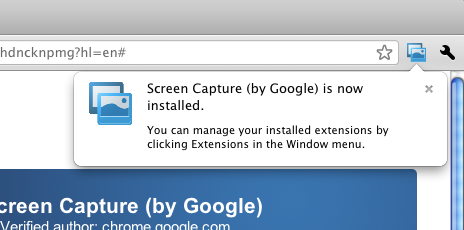
To install an extension, click on the Install button on the description page of an extension. After Chromium finishes downloading the extension, it asks whether you'd like to install the extension. Click on Install to start using the extension.
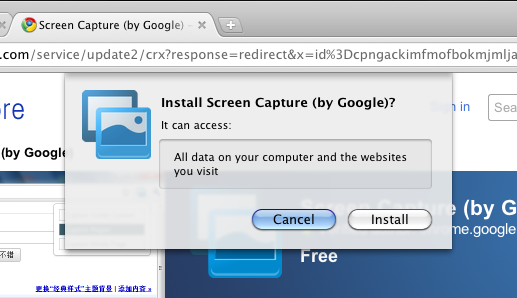
In the Chrome Web Store, the description page of an extension also tells you what types of data the extension can access on your computer. Also, in both the Web Store and the Google Chrome Extensions Gallery, this privacy info pops up when Chromium asks you to confirm the installation of an extension.
Managing Extensions
Extensions Toolbar
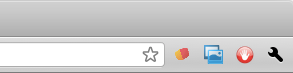
The Extensions Toolbar is located to the right of the Omnibox. The extensions you install for Chromium appear here as buttons. As you add extensions, the Omnibox shortens to accommodate more extension buttons.
To adjust the length of the Omnibox and to control how many extension buttons are shown, place the mouse cursor to the right border of the Omnibox, then click and drag it.
You can also reorder the extensions buttons by clicking and dragging them.
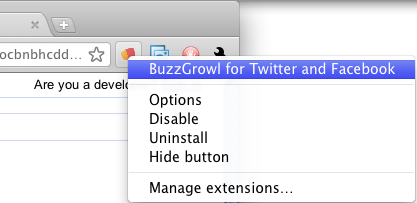
If you right-click on an extension button, a pop-up menu appears that allows you to do the following:
- View the extension's home page.
- Access the extension's options.
- Disable or uninstall the extension.
- Hide the extension button.
- Access the Extensions Manager.
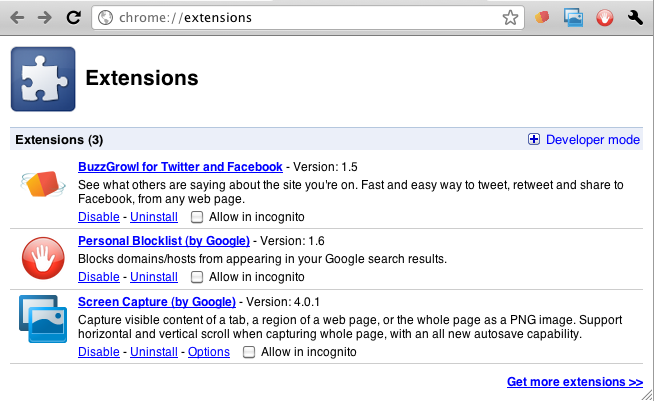
Extensions Manager
The Extensions Manager is a dedicated browser tab for the extensions you've installed. It allows you to do the following:
- View the extension's home page.
- Access the extension's options.
- Disable or uninstall the extension.
- Use the extension in Incognito mode.
- Find and install more extensions.
To access the Extensions Manager, click on the Wrench icon, select Tools, then click on Extensions.
Disabling and Removing Extensions
Disabling an extension
To temporarily disable an extension, do one of the following:
- Right-click on the extension button and select Disable.
- Click on the Wrench icon, select Tools, then select Extensions. In the Extensions Manager, find the extension you'd like to disable and click on Disable.
Once disabled, an extension is removed from the Extensions Toolbar. You can still access a disabled extension in the Extensions Manager.
Removing an extension
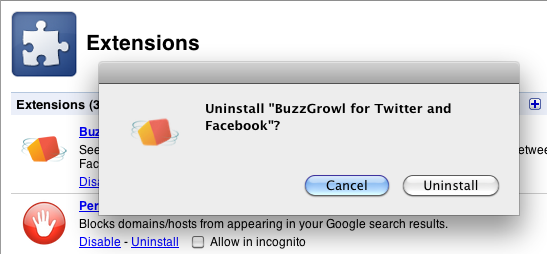
To uninstall an extension, do one of the following:
- Right-click on the extension button and select Uninstall.
- Click on the Wrench icon, select Tools, then select Extensions. In the Extensions Manager, find the extension you'd like to remove and click on Uninstall.
Chromium asks you to confirm the uninstalling of the extension. Click Uninstall to remove the extension.
Some Recommended Extensions
Here are some recommended extensions for use with Chromium:
Adblock
http://bit.ly/mAGyJ1 -- this extension removes the ads from any web page you visit.
BuzzGrowl
http://bit.ly/fO3jq6 -- this extension displays what Twitter and Facebook users are saying about the website you're currently browsing.
Mail Checker Plus for Google Mail
http://bit.ly/92jBxs -- this extension allows you to preview your Gmail account without the need to open another tab. It displays the number of unread messages in your inbox, and lets you delete, archive, and mark messages. When you wish to read a message, it opens up your Gmail inbox in a new browsing tab.
Web Clipboard
http://bit.ly/ltEzJm -- this extension allows you to copy and save multiple text and HTML items onto a web clipboard. You can then paste the items into any Google App that features the Web Clipboard function (e.g. Google Docs).
Creating Application Shortcuts
Application shortcuts enable you to quickly open web applications (like Google Docs) or apps that you've installed from the Chrome Web Store without starting Chromium, by creating shortcuts for them, just like you would a desktop application.
Actually, you're still using Chromium with those apps. By using application shortcuts, however, you're eliminating all the distractions that exist in the browser window like tabs, the Omnibox, bookmark bars, and menus.
Why do that? It's easier to use a shortcut than to fire up a browser, click a bookmark or type a URL, and then log into the web application.
Let's take a look at how to create application shortcuts.
Creating shortcuts for web applications
To create a shortcut for a web application, do the following:
- In Chromium, go to the URL of the web application for which you want to create the shortcut -- for example, http://docs.google.com.
- Click the Wrench icon, select Tools, and then select Create Application Shortcuts.
- On the Create application shortcuts dialog box, choose to create the app shortcut on your Desktop, in your Start menu (Windows OS), in the Application menu (other operating systems), or all of the above.
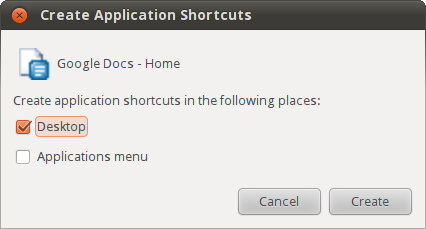
- Click Create
Creating shortcuts for apps from the Chrome Web Store
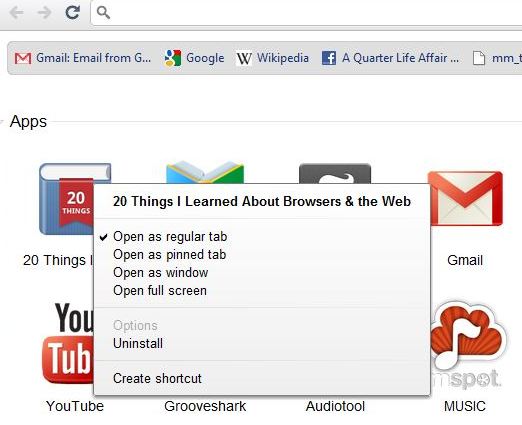
To create an application shortcut for an app from the Chrome Web Store, do the following:
- Open a new tab.
- On the New Tab page, go to the desired app and right-click, then select Create shortcut.
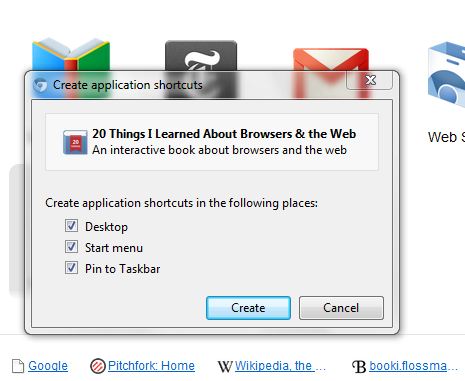
- On the Create application shortcuts dialog box, click on the option boxes to create the app shortcut on your Desktop, Start menu, and/or pin the shortcut to the Taskbar. Then, click on Create.
Using Chromium's Developer Tools
Chromium's Developer Tools allow website developers to debug (correct coding errors). Once you determine the problem, you can go to the source file and edit a web page's code to correct the problem.
Developer Tools also monitor the amount of time it takes for each element on a web page to load, which is useful to gauge a website's level of performance, and which allows developers to edit code in order to increase a website's loading speed.
To access the Developer Tools, click on the Wrench icon, select Tools, then click on Developer Tools.
To learn more about Chromium's Developer Tools, watch the introductory videos to Google Chrome's Developer Tools at http://bit.ly/7b4Mdk, and visit Chrome's Developer Tools mini-site at http://code.google.com/chrome/devtools/.
Covering Your Tracks
Essentially, covering your tracks means deleting your browsing history after using Chromium. Doing this erases the data that the browser has recorded on your web usage. This also means your browsing preferences -- like your most-visited web addresses, form Autofills, saved passwords, and other types of web page settings -- will be deleted.
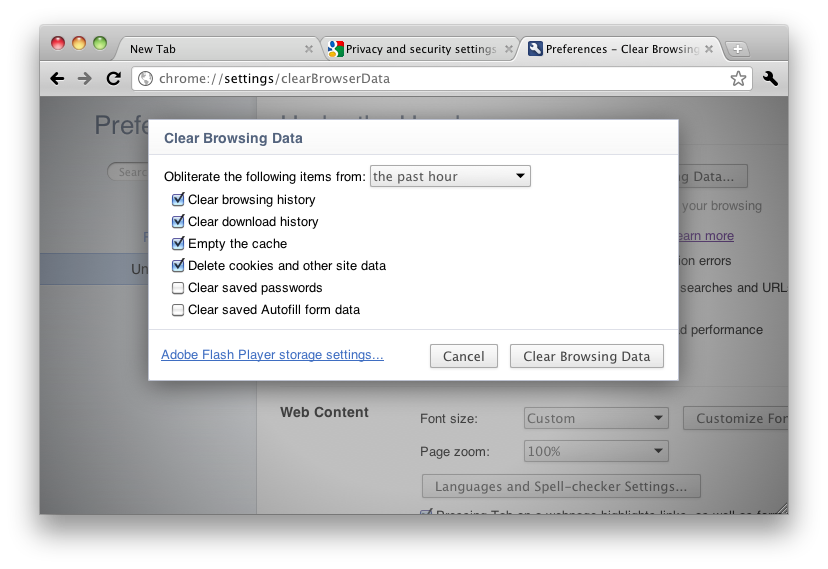
To cover your tracks in Chromium, do the following:
- Click on the Wrench icon, select Tools, then click on Clear Browsing Data.
- In the pop-up window, choose which type of browsing data you'd like to delete by clicking on its associated option box:
- Browsing history (the URLs of websites you've visited).
- Download history (the list of files you've downloaded).
- Cache (copies of frequently-visited web pages and associated images saved on your computer).
- Cookies (records of visited websites, viewed web pages, items you've clicked on, and personalized web page settings).
- Passwords.
- Autofill form data.
- After you've chosen which types of browsing data to delete, use the combo box at the top to choose the timeframe in which the data is to be deleted, from the past hour all the way up to everything.
- Click on Clear Browsing Data to complete the process.
Using the Incognito Window
Chromium's Incognito mode doesn't record your browsing data. Download history and cookies are deleted once you close any Incognito windows. However, bookmarks and general settings are still saved.
To open an Incognito window, do one of the following:
- Click on the Wrench icon and select New Incognito Window.
- Press Control (Windows and Linux OSs) or Command + Shift + N (Mac OS).
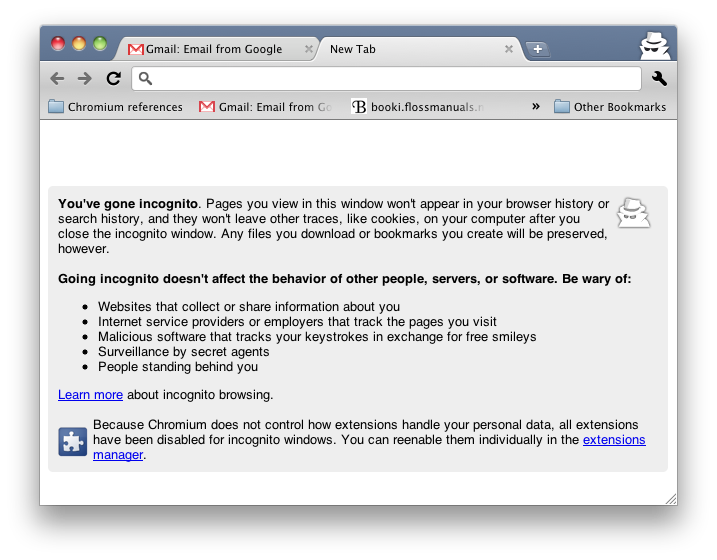
The Incognito window is distinguished by a different window header design and a New Tab page that gives information on the features in Incognito mode.
Note that Incognito mode only prevents Chromium from recording your browsing data. The websites you browse can still store information about your visit.
Chromium's Online Help
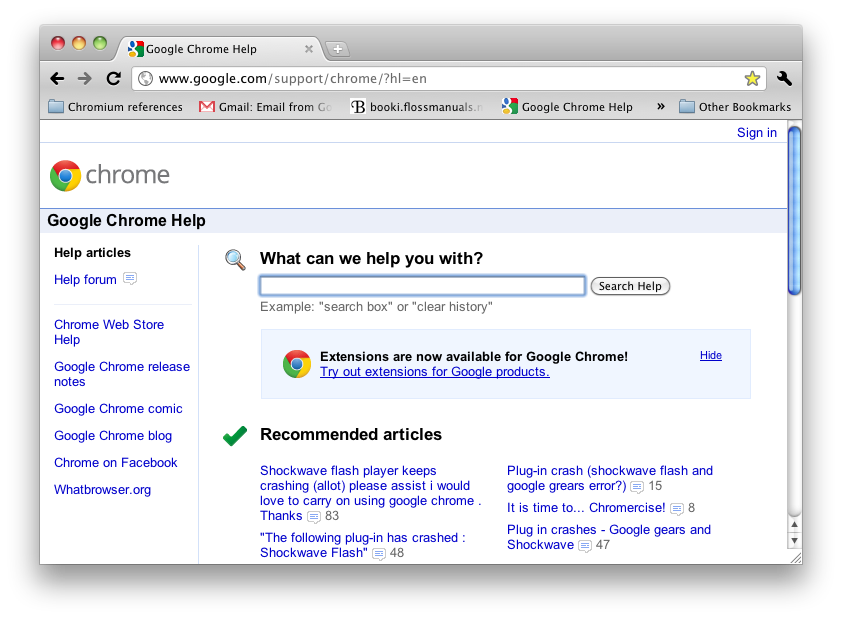
If you run into problems while using Chromium, or if you have questions about how to use one of Chromium's features, the Google Chrome Help website provides quite a bit of information that applies not only to Chrome, but also to Chromium. Visit http://www.google.com/support/chrome/?hl=en.
Type in the keywords to your question in the search field, click on Search Help, and you should get either a help article or a help forum topic that deals with your question.
Other Sources of Help
Besides the Google Chrome Help website at http://www.google.com/support/chrome/?hl=en, which provides a wealth of information applicable to Chromium, here are some additional resources to aid or enhance your Chromium experience:
- The Chromium Blog at http://blog.chromium.org/ is created and managed by Chromium developers, who regularly update the blog with the latest developments and changes to the Chromium browser, like new extensions, loading speed improvements, stability, and compatibility with drivers and applications.
- The Chromium-discuss discussion group at http://groups.google.com/a/chromium.org/group/chromium-discuss/topics is a forum where Chromium users can ask developers and other users about Chromium features, troubleshoot Chromium, or suggest enhancements.
- Various websites have a list of Google Chrome tips and tricks that also apply to Chromium:
Troubleshooting
The following topics are some of the more common Chromium issues. For a searchable list of troubleshooting articles, visit the troubleshooting section of Google Chrome Help at http://bit.ly/kJRczQ.
"Aw, Snap!" web page crash
If this happens often when you use Chromium, check the following:
- Any anti-virus or firewall applications you've installed: they may affect how Chromium operates.
- Any extensions you've installed: some extensions may cause problems, so try disabling them in the Extensions manager (click on the Wrench icon, select Tools, then click on Extensions).
- Malware: use anti-virus software to see there is any malicious software on your computer.
- Your Chromium user profile: if you've done all the above steps and the "Aw, Snap!" error message continues to appear, your Chromium user profile may be corrupted, and you'll need to create a new profile. Visit the Google Chrome Help page on how to create a new user profile at http://bit.ly/a0MAl.
"A script on this page is taking a loooong time to do its job."
This may happen if the website you're browsing uses a lot of Javascript or Flash, and the Javascript or Flash actions on the page fail to complete themselves within Chromium's time limit. You can choose to stop running the script or to let it continue loading if you think the page is operating normally.
"Whoa! Chromium has crashed."
Usually, Chromium runs normally again when you reopen it after a browser crash. If Chromium continues to crash, check this Google Chrome Help page for further steps to correct this error: http://bit.ly/4p1L8f.
Web pages load slowly or not at all
Many factors can make web pages load slowly. Try the following to solve this problem:
- Open the page in an Incognito window. If the page loads properly, the issue is with either your installed extensions or your saved browsing data. Try disabling your extensions one by one in the Extension manager (click on the Wrench icon, select Tools, then click on Extensions) and clearing your browsing data (click on the Wrench icon, the click on Options or Preferences, then select Under the Hood from the tabs to the left, and click on Clear browsing data).
- Note if there is a specific error message that appears. Visit the associated Google Chrome Help page if you see one of the following messages:
- Check any anti-virus or firewall applications you've installed. They may affect how Chromium operates.
- Check for malware using anti-virus software to see there is any malicious software on your computer.
Glossary
Apps
Apps, abbreviated from web-based applications, are like desktop programs (for example, word processors, photo editing software, music production tools, news websites, games) that don't need to be installed on your computer. Instead, they are web-based and run entirely in Chromium.
Visit the Chrome Web Store at https://chrome.google.com/webstore to browse and download apps for Chromium.
Cache
Chromium saves a copy of the web documents you encounter while browsing through websites (for example, HTML pages and images). These copies are stored in a directory known as the cache. When you return to these websites, data can be recalled from the cache instead of being retransmitted from the web server, which minimizes page loading time and speeds up your browsing experience.
For privacy purposes, you can clear this cache in the Under the Hood tab of the Options / Preferences menu.
Cookies
When you visit a website, it may create and store data about your visit (for example, your settings and preferences on a website, the links you've clicked on, your history of browsed pages, your profile information on the website) in a text file. This text file is a cookie.
For privacy purposes, you can remove cookies in the Under the Hood tab of the Options / Preferences menu.
Developer Tools
Chromium's Developer Tools allow website developers to debug (correct coding errors) a web page. Developer Tools also monitor the amount of time it takes for each element on a web page to load, which is useful to gauge a website's level of performance, and which allows developers to edit code in order to increase a website's loading speed.
Extensions
Extensions are additional features that you can download for use in Chromium. They provide functions like instant Gmail inbox alerts, automatically mapping addresses, verifying the security information of a website, and many more.
Visit the Google Chrome Extensions gallery at https://chrome.google.com/extensions to browse and download extensions for Chromium.
Incognito mode
For users who are wary of websites and Chromium recording browsing data, Incognito mode does not record browsing or download history, and cookies stored in Incognito mode are deleted once all Incognito windows are closed.
Note that bookmarks and general browser settings that are created or adjusted in Incognito mode are still recorded.
Killing a tab
The option to kill a tab appears when a web page takes a very long time to finish loading, either because there is too much data, or because there are errors on the page. Killing a tab stops the loading process so that you can open a new tab and continue browsing.
Omnibox
Chromium's URL address bar also functions as a field where you can type in keywords for web searches. Its multiple functions inspired the name "Omnibox".
Snapshots; hourly builds
Since Chromium is an ongoing open source browser project, new codes for the browser are constantly being developed by open source programmers. These developments are compiled into a downloadable package and uploaded more or less hourly onto the Chromium download page at http://build.chromium.org/f/chromium/snapshots/. The name snapshot refers to the temporary nature of each version of Chromium, since a newer version is already being developed while a user downloads the current version.
Sync; synchronization
Syncing in Chromium allows you to save your browsing data, like bookmarks, passwords, extensions, and apps, to your Google account so that you can access them no matter what computer you're using.
Links
The following links provide more information on Chromium, from its conception, its continuing developments, to user issues:
License
All chapters © Edward Cheung 2011, © Scott Nesbitt 2011. All chapters licensed with GNU General Public License version 2.
This documentation is free documentation; you can redistribute it and/or modify it under the terms of the GNU General Public License as published by the Free Software Foundation; either version 2 of the License, or (at your option) any later version.
This documentation is distributed in the hope that it will be useful, but WITHOUT ANY WARRANTY; without even the implied warranty of MERCHANTABILITY or FITNESS FOR A PARTICULAR PURPOSE. See the GNU General Public License for more details.
You should have received a copy of the GNU General Public License along with this documentation; if not, write to the Free Software Foundation, Inc., 51 Franklin Street, Fifth Floor, Boston, MA 02110-1301, USA.
Also, you can visit http://www.gnu.org/licenses/gpl-2.0.html to view the GNU General Public License online.